How to Interconnect Layers via Links?
The Links section is used to connect containers within the same environment across different layers.
Once you establish a connection using this feature, a container can interact with environment variables from the linked image. The imported properties can be identified using a specified prefix. We will give a step-by-step example of how to link containers.
Step 1: Log in to your AccuWeb.Cloud dashboard.
Step 2: Select the environment to which you want to link. Here, we have selected the environment “AccuWeb.cloud” as an example.
Step 3: Expand the environment and select the application that you want to link to other layers or applications such as databases and load balancers. Here, we have selected the application server as an example to link with other layers or servers.
Step 4: Next to the application server, click on the Settings icon and select the Links option.
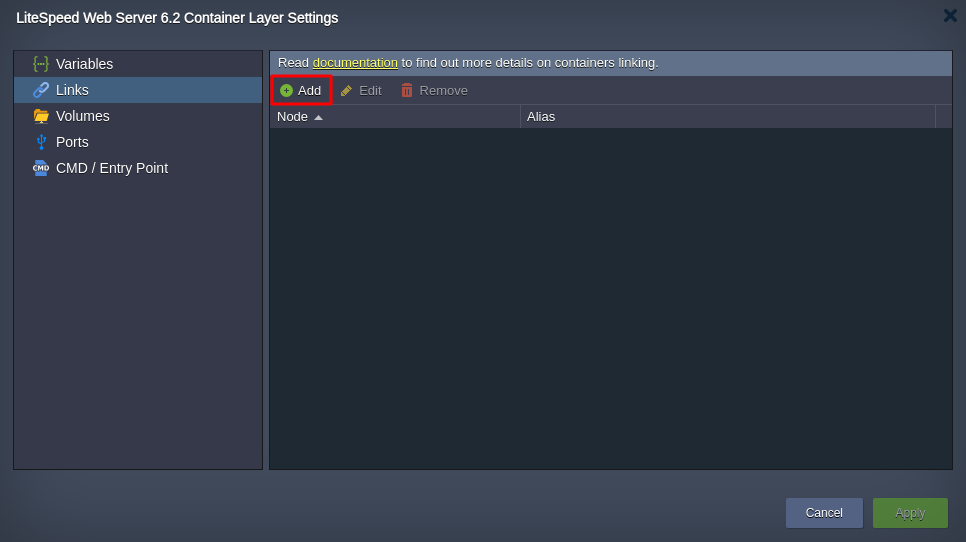
Step 5: Once you click on it, the Container Layer Settings window will be opened. Click on the Add button to add a link.
Step 6: In the Node field – Choose the desired layer of the current environment from the drop-down list. Here, we have selected SQL Databases as an example.
Step 7: In the Alias field – Enter a connection alias (like “DB-1” in our case). This alias will be used as a prefix for imported variables in the current container(s) from the selected layer.
Note:
- When linking containers, the platform automatically adds a corresponding DNS record with the same alias name to the platform database. This allows you to refer to a specific container within these environment layers using the assigned alias along with a counter (e.g., “alias_name_1”, “alias_name_2”, etc.).
- For instance, after linking with the “DB” alias, you can ping specific containers within the appropriate layer as “db_1”, “db_2”, etc., while accessing the platform’s internal network via SSH Gateway. If using a common layer alias (like “db” without a counter), the system will use a Round-Robin algorithm to select any container within the defined node group.
Step 8: After that, click “Save” to confirm the linking settings. As needed, you can connect multiple node groups to a single layer.
Note:
- The connections will only take effect after clicking “Apply” within this section and possibly for the entire topology setup.
- Linked nodes will restart to apply the new settings, resulting in a brief downtime for the involved containers.
Step 9: You can always edit or remove unnecessary links using the corresponding buttons at the top of the Docker layer settings window.
Step 10: After applying updates, you can view the results by navigating to the Variables section, where the newly imported parameters will be listed.
Conclusion
Interconnecting layers via Links in AccuWeb.Cloud allows you to efficiently establish connections between different parts of your environment. By creating links, you can enable communication and resource sharing between containers across various layers. This capability enhances flexibility and scalability within your virtualized environment.
Remember to save your linking settings and apply any changes to ensure they take effect properly. Use the provided tools to edit or remove links as needed, and check the Variables section to verify the imported parameters after making updates. Interconnecting layers via Links in AccuWeb.Cloud optimizes the management and functionality of your virtual environment.


