PHP Connection to MongoDB
MongoDB is a popular NoSQL database designed for storing semi-structured data using a document-oriented model. You will learn how to connect MongoDB with your PHP application hosted on your platform with ease by following this guide.
Create an Environment
Log into your platform account. Create a new environment with the MongoDB node of your chosen version, found in the NoSQL wizard section.
Add any additional required instances (for this guide, we’ll include Apache to deploy a test app, but it can be in a separate environment). Configure other parameters such as resource allocation, region, and environment name.
Click Create and wait a few minutes for your environment to be set up.
MongoDB Configuration
Step 1. Check your email for a message containing your MongoDB instance details and access information.
Step 2. Click the Access URL link in the email or go to your dashboard and open the MongoDB node in your browser.
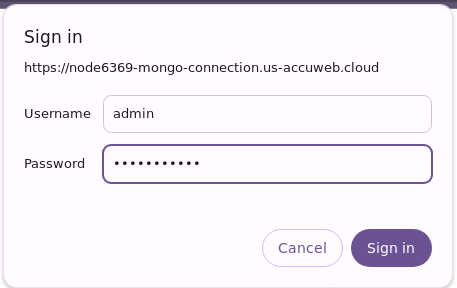
In the new browser tab, log in to the MongoDB admin panel using the admin credentials from the email.
Step 3. Let’s start by creating a new database to connect to. In the opened Mongo Express dashboard, create a new database by entering a name for it (e.g., mongodb) in the Create Database form.
Step 4. Next, create a user for this database. Go to your MongoDB environment and open the web SSH for MongoDB.
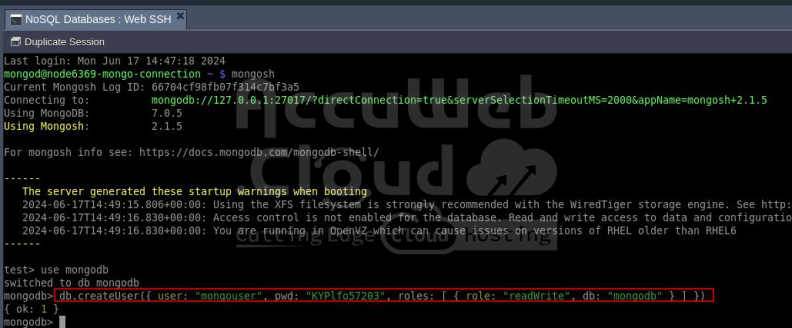
Step 5. In web SSH, type the command mongosh to make a connection with your Mongo Express.
Step 6. Once you connected with your Mongo Express environment, Switch to the database where you want to create the user by using the below command:
use your_database_name
(replace your_database_name with the actual database name)
Then, enter the following command in the input frame:
db.createUser({ user: "user_name", pwd: "password", roles:[{ role: "readWrite", db: "db_name"}]})
Here’s what each part of the command means:
- user_name: The username for the new database user.
- password: The password for this user.
- db_name: The database name (preferably the one you just created) that the user will have read/write access to.
Step 7. To enable the connection between your app server and MongoDB, you need to activate the relevant connection driver. On the platform, this driver is included by default in all PHP app server builds.
Note: There are two driver versions available for PHP app servers:
- mongo.so (deprecated)
- mongodb.so

To enable the required driver, go back to your dashboard, hover over the compute node in your environment, and click the Config button.
Step 8. In the configuration manager tab, expand the etc folder and open the php.ini file.

Scroll down to around line 443 and uncomment the line for the required driver (either mongo.so or mongodb.so) by removing the semicolon at the beginning of the line.
Step 9. Save your changes and Restart the app server node to apply them.

Application Deployment
Now that you’ve prepared the environment, you can proceed with deploying your application using the platform Deployment Manager. This can be done for projects packaged into a single archive or directly fetched from a GIT/SVN repository.
For illustration, we’ll use a simple app to verify the connection between a compute node and a MongoDB server using the mongodb.so extension.
Index.php
<html>
<head>
<title>Test MongoDB Connection</title>
</head>

<body>
<h1>Test MongoDB Connection</h1>
<form action="#" name="form" method="POST">
<table cellspacing="10">
<tr><td>Host</td><td><input type="text" name="host" value="<?php echo htmlspecialchars($_POST['host']); ?>" size="40"></td></tr>
<tr><td>User</td><td><input type="text" name="username" value="<?php echo htmlspecialchars($_POST['username']); ?>" size="20"></td></tr>
<tr><td>Password</td><td><input type="text" name="password" value="<?php echo htmlspecialchars($_POST['password']); ?>" size="20"></td></tr>
<tr><td>Database</td><td><input type="text" name="database" value="<?php echo htmlspecialchars($_POST['database']); ?>" size="20"></td></tr>
<tr></tr>
<tr><td> </td><td><input type="submit" name="sub" value="Test Me!"></td></tr>
</table>
</form>

<?php
if (@$_POST['sub']){
$host=$_POST['host'];
$username=$_POST['username'];
$password=$_POST['password'];
$userdb=$_POST['database'];
$database=$userdb.".phptest";

try{
$manager = new MongoDB\Driver\Manager("mongodb://{$host}/{$userdb}", array("username" => $username, "password" => $password));
if ($manager) {
$bulk = new MongoDB\Driver\BulkWrite;
$bulk->insert(['x' => 1]);
$bulk->insert(['x' => 2]);
$bulk->insert(['x' => 3]);
$manager->executeBulkWrite($database, $bulk);

$filter = ['x' => ['$gt' => 1]];
$options = [
'projection' => ['_id' => 0],
'sort' => ['x' => -1],
];

$query = new MongoDB\Driver\Query($filter, $options);
$cursor = $manager->executeQuery($database, $query);
}
}catch(Exception $e){
echo "<center><h1>Doesn't work</h1></center>";
print_r($e);
exit;
}
}

if ($host)
echo "<center><h1>Good connection</h1></center>";

?>

</body>
</html>
To test the connection, download the packaged project mentioned above and deploy it.

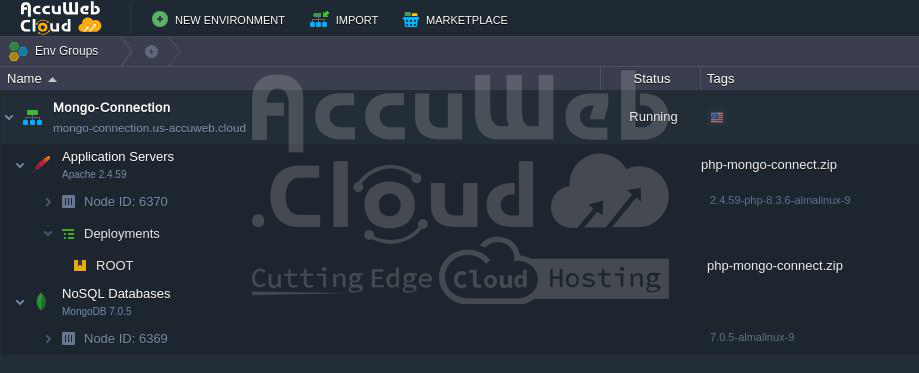
After deployment, you will have an environment similar to the one shown previously.
Connection Check-Up
Step 1. Open your environment in your browser by clicking the same-named button. You’ll see a form to enter your MongoDB database details.
Enter the following information:
- Host: The link to your database admin panel without the https:// part (found in the corresponding email or copied from the browser address bar after clicking “Open in browser” for your MongoDB node).
- User: The name of the user assigned to the database (e.g., dbuser).
- Password: The password for the specified user.
- Database: The name of the required database (e.g., mongodb-connect).
After entering the data, click on the Test Me! button.
Step 2. If the information is correct, a Good connection message will appear.
Otherwise, you’ll receive a notification that the connection Doesn’t work along with detailed error output.
Step 3. Upon a successful connection, a new phptest collection with a few new records will be added to the specified database.
You can then navigate to your DB’s admin panel to ensure everything works correctly and proceed with any other required operations.


