Mount Point
Mount points facilitate data sharing between instances within the same account. Initiated from the client, it establishes a connection enabling access and operation of data on the server as if they were local files.
The platform offers a user-friendly interface for this process directly within the built-in Configuration Manager. With just a few clicks, you can define remote directories physically located on other nodes but accessible within the current container.
When creating a mount point, the platform supports two client protocols: NFS and GlusterFS Native. NFS is available for all containers on the platform and offers relatively faster performance.
On the other hand, GlusterFS Native is a unique feature of the GlusterFS cluster, recommended for high concurrency, high-performance write operations, and failover scenarios.
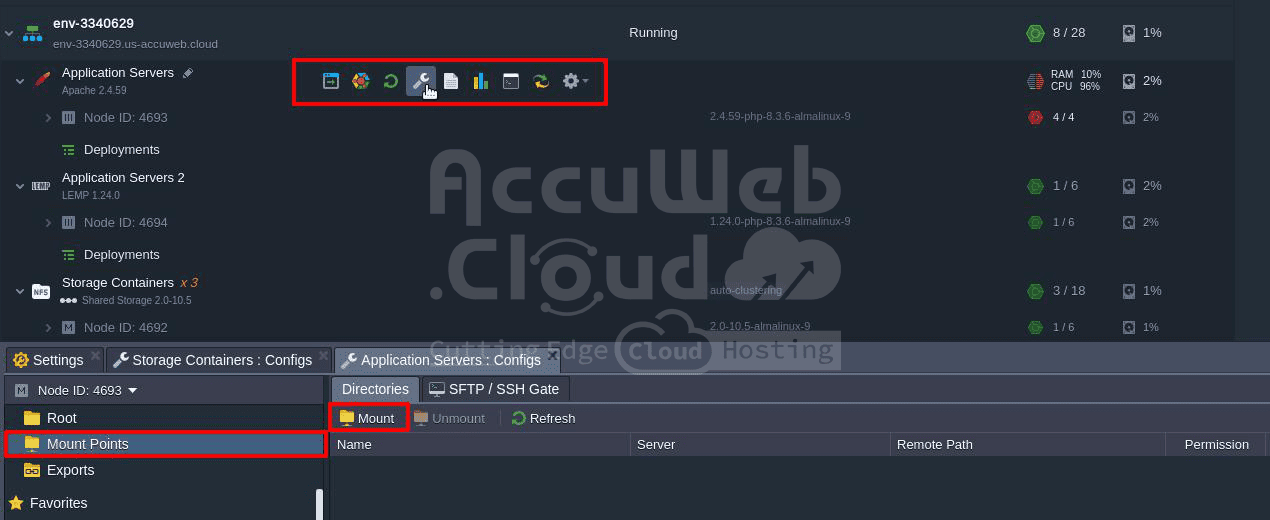
Step 1. To mount data to a container, click the “Config” button next to the chosen container or layer. In the opened tab, navigate to the “Mount Points” section within the menu on your left and click the “Mount” button.
Step 2. The opened wizard offers the following three operation types:
- Data Container: Accessing data from the node within the same account.
- Master Container: Sharing data across nodes of the same layer within the current environment.
- External Server: Accessing data from a remote server outside the PaaS account.
Step 3. After selecting the necessary operation type, provide the following details:
Mount Point: Path to a local folder displaying the mounted content.
Notes:
- If the specified directory doesn’t exist, it will be created automatically.
- The path can’t start with /proc, /dev, /sys, /run, or be equal to certain predefined directories such as /, /bin, /lib, /lib64, /lib32, /usr, /usr/bin, /usr/sbin, /usr/lib, or /usr/lib64 (this list may vary based on your provider’s settings).
Data Container:
- NFS Server: Expandable list of nodes on your account which can be used as a data storage container.
- Remote Path: The required directory location at the remote container. You can either type it manually or choose one of the favorite paths on that node from the automatically fetched drop-down list.
Master Container:
Imagine you have a web application container deployed across multiple nodes within a layer (think of a layer as a group of containers working together). You want to share configuration files or user-uploaded content across all these nodes. In this scenario, you would create a Master Container. The platform automatically selects the master node of the layer as the NFS Server. Any changes made to the mounted directory (specified in the Mount Point field) on the master node will be automatically reflected on all other nodes in the layer, ensuring everyone has access to the latest version of the data.
- NFS Server: The master node of the layer is selected automatically.
- Remote Path: The same folder as specified in the Mount Point field is used and will be shared among all nodes of a layer.
External Server:
Let’s say you have a separate database server outside of your Accuweb.Cloud PaaS account. You want your application container to access and use that database. Here, you would create a Remote/External Server. You’ll need to provide the external IP address or domain name of the data storage server (your database server) in the NFS Server field. The Remote Path specifies the location of the exported files or folders on the database server.
- NFS Server: External IP of the data storage server or its custom domain name.
- Remote Path: Exported files location on the NFS server.
Mount to all nodes: Switcher to set the same mounts to be added for all nodes within a layer, including those that could be added in the future (automatically enabled for the Master Container type).
Read Only: Turn the switcher on to restrict editing of the mounted data at client nodes. By default, read and write rights are provided.
Click “Add” to proceed.
Step 4. Shortly, your mount point will be created and added to the list. You can then either navigate to the directory by double-clicking on the corresponding record, or unmount it when it is no longer needed.
Step 5. Upon navigating inside, you’ll find the same content as on your remote server.
Based on the mount configurations, the remote content can be either editable from the client or read-only, and it can be available for all layer’s nodes or just one. You can switch between nodes using the drop-down list in the left-hand menu.
Please note that for the folder to be editable (i.e., if clients are granted RW rights), the folder on the server should have the appropriate permissions for the client’s user. Default user names may vary for different servers (e.g., root and jelastic).
If necessary, connect to your storage server via SSH and execute the following commands to adjust the rights:
chown {uid}:{gid} {path}
Where:
- `{uid}` is the user ID, which can be found in the `/etc/passwd` file.
- `{gid}` is the group identifier, shown within the `/etc/group` file.
- `{path}` is the path to the directory or file you’d like to change the permissions for.
The platform’s mount points offer a wide range of scenarios and possibilities for advanced data structuring and control.


