Setting Up a WordPress Multisite Network with Domain Mapping and CDN for AccuWeb.Cloud
When running several websites, using a WordPress Multisite Network offers significant advantages over managing multiple standalone WordPress sites:
- Centralized Management: You can manage all your sites from a single dashboard, making administration much more efficient and streamlined.
- Granular User Permissions: You can add other users as admins with restricted access to specific sites, ensuring they can only manage the sites they are responsible for without affecting others.
- Unified Plugin and Theme Management: You can install and activate new plugins and themes across multiple sites simultaneously, saving time and effort.
- Simplified Updates: Updates only need to be performed on the master installation, and they will be automatically applied to all websites within the network, ensuring consistency and security across all sites.
- Individual Customization: Each website or blog can be customized independently, allowing for unique designs and functionalities tailored to each site’s needs, while still benefiting from centralized management.
These features make a WordPress Multisite Network a powerful and efficient solution for managing multiple websites.
Installing WordPress and Enabling Multisite Mode
Steo 1. Begin by initiating the primary WordPress installation from the Jelastic Marketplace. You can choose either a cluster or a standalone package. Keep in mind that the clustered solution is only accessible to billing customers.
Enable essential Advanced Features, including the option for “Installing WordPress Multisite Network,” and continue with setting up the environment.
In this article, we will set up WordPress using LiteSpeed servers and MariaDB Galera, with Web Application Firewall (WAF) enabled, Let’s Encrypt SSL, and the Multisite Network feature activated.
Set Up a Multisite Network and Create a New Website
Once the installation is complete, multisite mode is automatically enabled. You can create websites within the network in one of the following ways:
- Sub-domains: A domain-based network where sites are created using subdomains, e.g., site1.wpcluster.vip.jelastic.cloud, site2.wpcluster.vip.jelastic.cloud.
- Sub-folders: A path-based network where sites are created using directory paths, e.g., wpcluster.vip.jelastic.cloud/site1, wpcluster.vip.jelastic.cloud/site2.
In this article, we will use the sub-folder model for our WordPress multisite network subsites.
Step 1. Access your WordPress Admin Panel by logging in with the credentials sent via email after installation or displayed in the successful WordPress installation window.
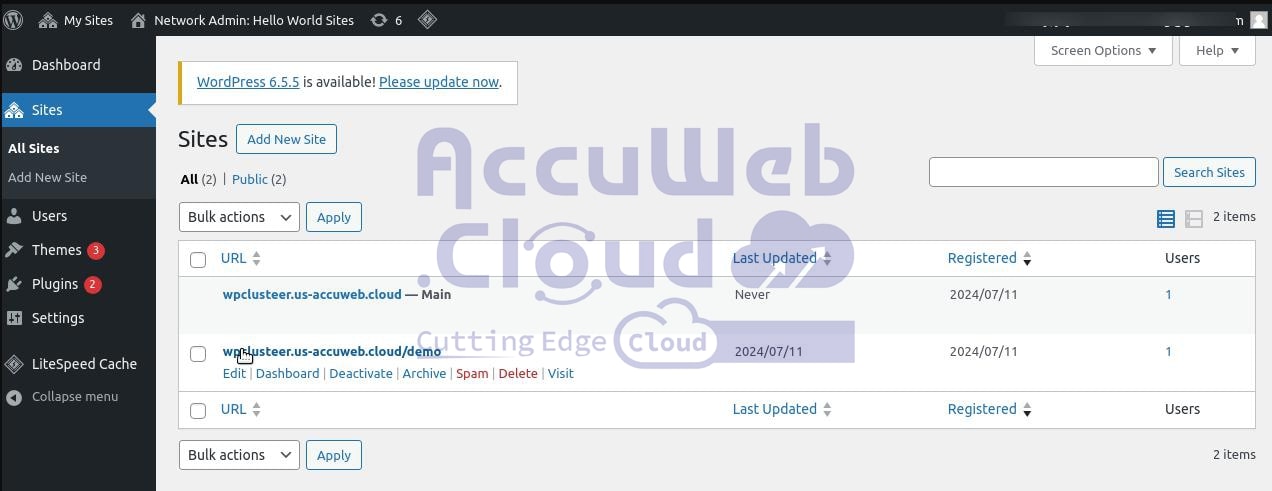
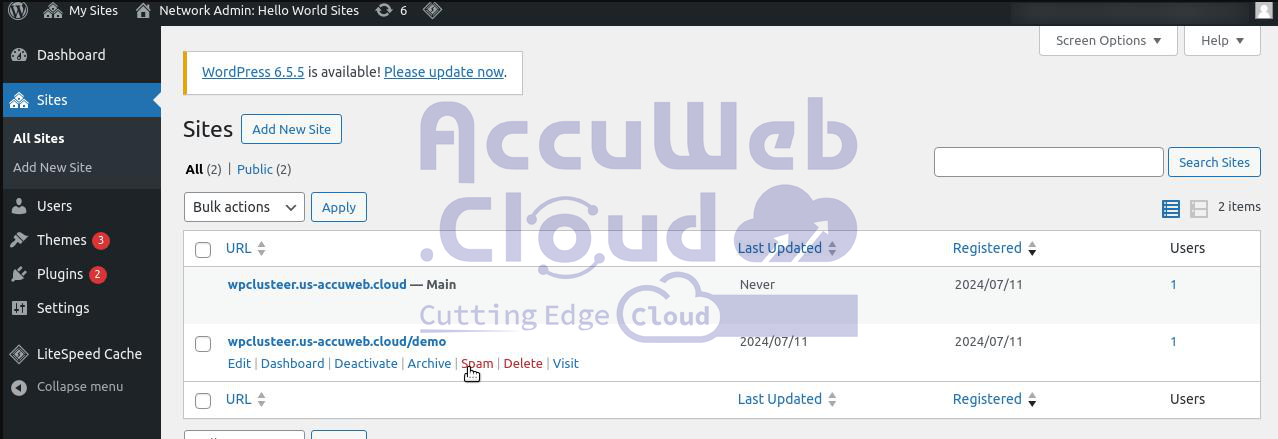
Step 2. Navigate to My Sites > Network Admin > Sites.
Step 3. On this page, you’ll find all the sites within your WordPress Multisite Network. Initially, only the main site is created by default. Click on “Add New” to proceed.
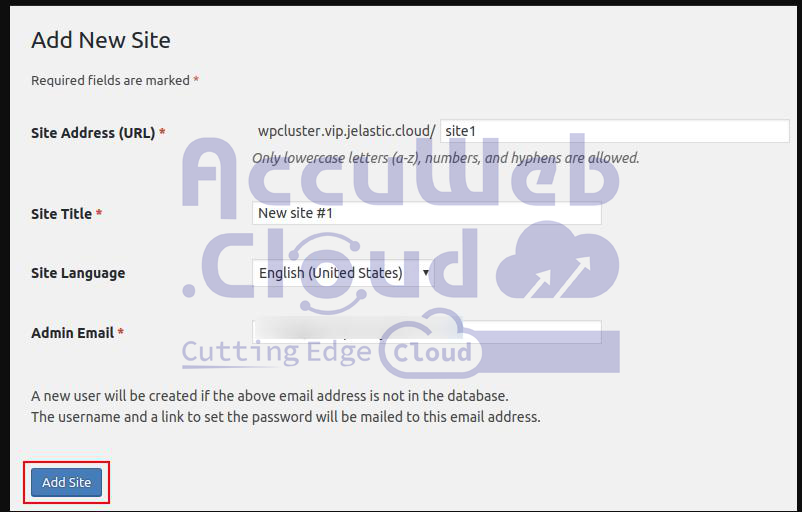
Step 4. Complete the form by entering the Site Address (URL), Title, Language, and Admin Email. Then, click “Add Site” to proceed.
Congratulations on successfully creating and configuring the first website within your WordPress Multisite Network. Follow these steps again whenever you need to create additional sites.
Bind Custom Domains to Websites in the Network
Below, we’ll illustrate how to map custom domains to default domains in the multisite network.
For instance, we have registered three custom domains in the wpclusteer.us-accuweb.cloudzone that will be mapped to three sites in the network, such as
To associate a custom domain (e.g., multiwpclustteer.us.accuweb.cloud)with a newly created site:
- Create an A record for your custom domain to point it to the public IP address of the Load Balancer.
- Locate the Let’s Encrypt Free SSL Add-On in the Load Balancer, click on the Configure button, and include your custom domain in the list of registered domains for your websites.
Step 2. Return to the list of available sites and select “Edit” next to the desired site.
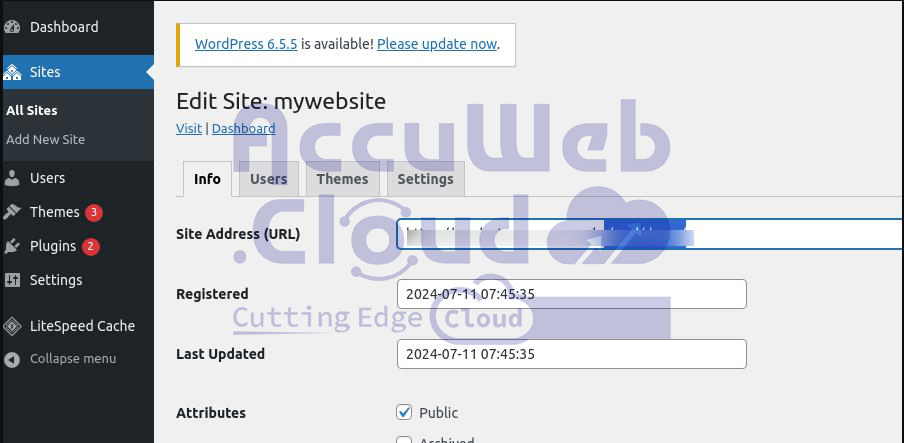
Step 3. Change the Site Address (URL) to a custom domain. cloud/demo/
Step 4. Click on “Save Changes.” Repeat these steps to associate domains with each necessary sub-site.
Activate CDN for Websites Across the Network
Lastly, you need to link a CDN endpoint to each site within the newly created network. This can be achieved in two ways, depending on the application server selected during the WordPress installation process.
Step 1. For LiteSpeed-based WordPress installations:
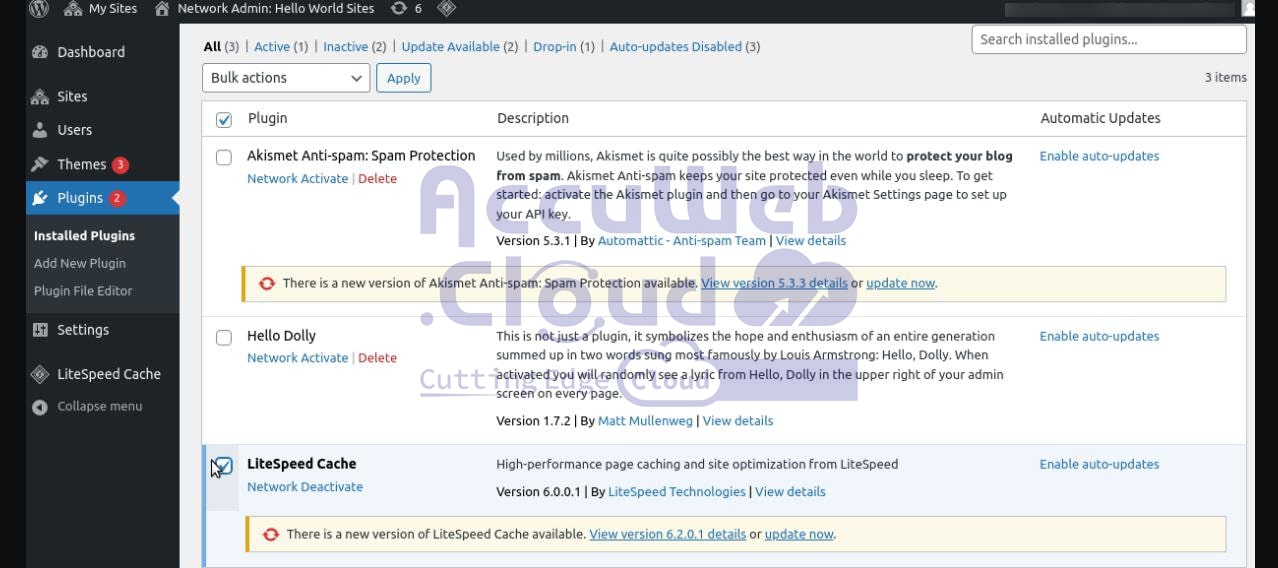
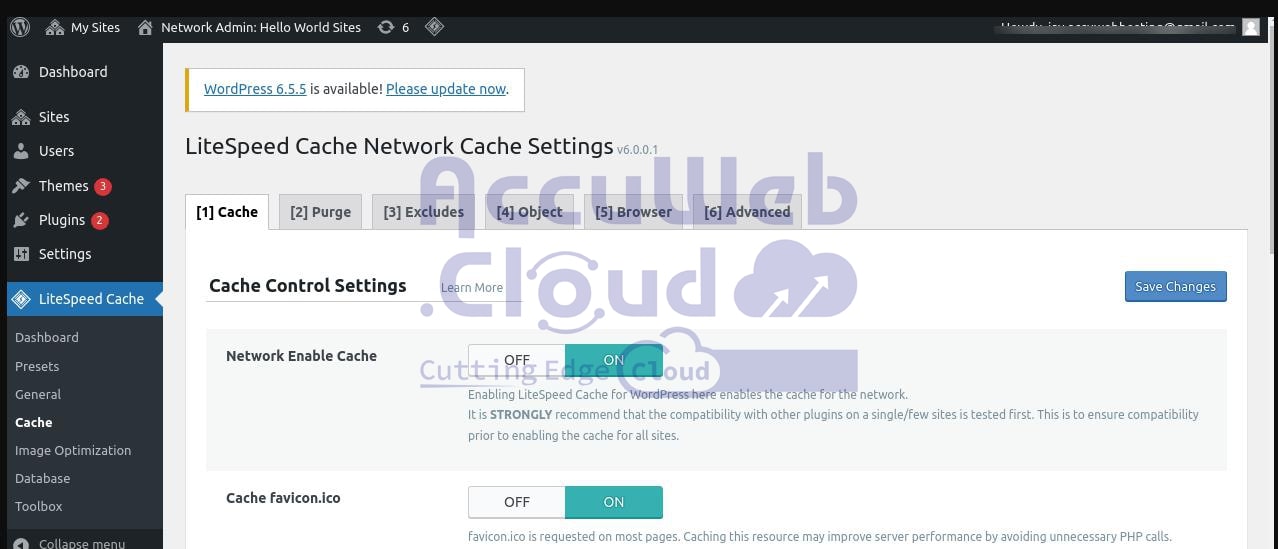
First, enable the LiteSpeed Cache plugin for your entire network.
Step 2. Next, activate the plugin on the Cache Settings page.
Step 3. Toggle “ON” to enable Network-wise caching, then save your changes.
Step 4. Access the dashboard of each site by selecting the Dashboard menu item.
Step 5. Click on LiteSpeed Cache and navigate to the CDN menu item.
Paste the CDN URL provided in the installation email or success window, along with the original website URL (domain you previously bound, formatted as //https://wpclusteer.us-accuweb.cloud/demo/). Then, click “Save Changes.”
Follow these steps for each site in the network to link the CDN:
Step 1. Repeat the procedure to bind the CDN for every site in the network.
Step 2. For NGINX-based WordPress installations:
- Navigate to Performance > General Settings > CDN in the WordPress admin panel.
- Access Performance > General Settings > CDN in the WordPress admin panel.
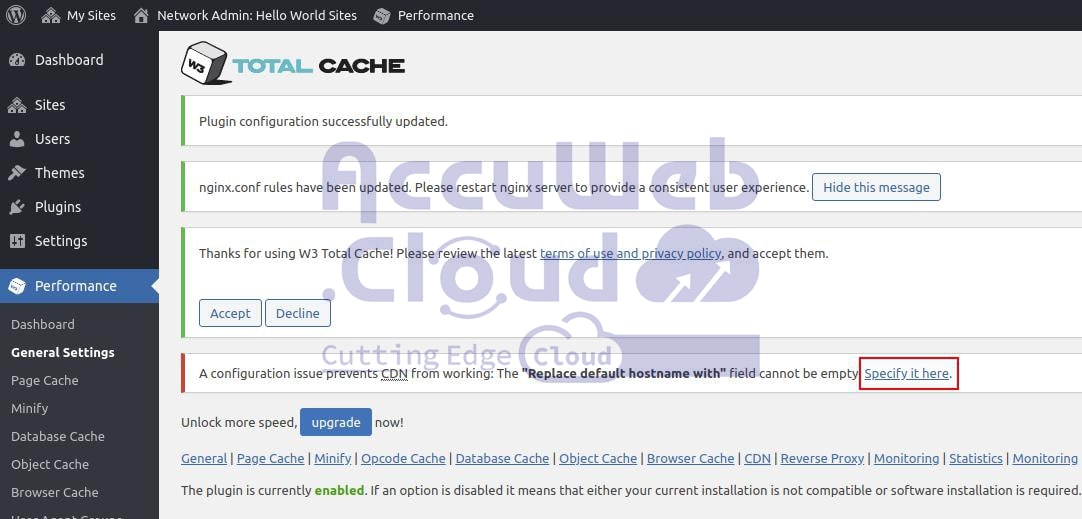
Step 3. Check the Enable box for CDN, select Verizon Digital Media Services (Edgecast) from the CDN Type dropdown, and then click Save all settings.
Step 4. Afterward, a warning will prompt you to fill out the “Replace default hostname with” field. Click on the link provided to specify it.
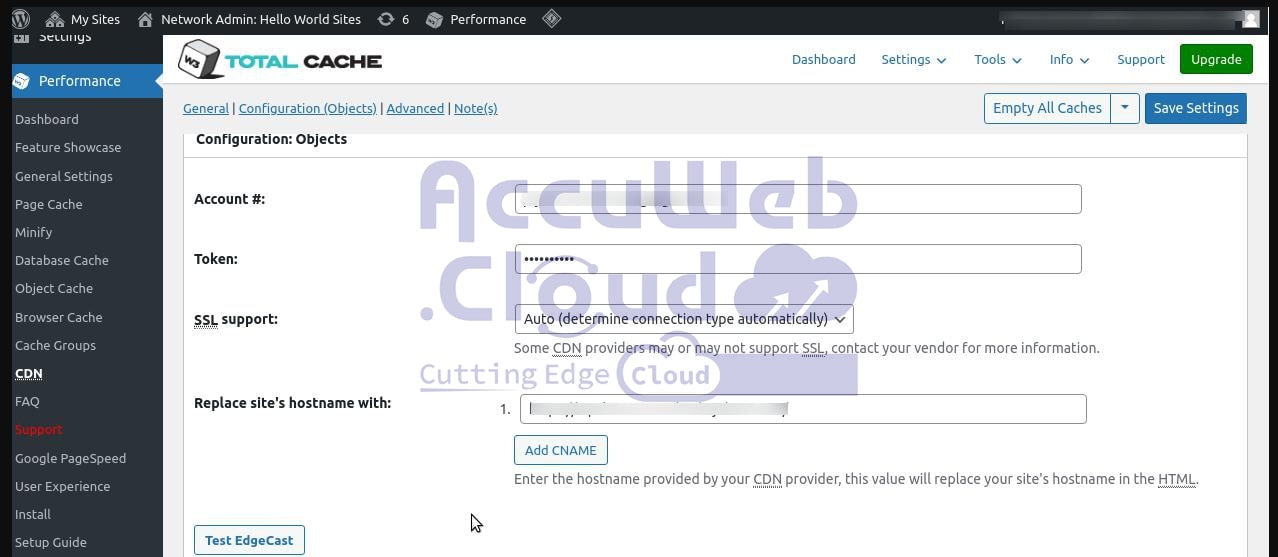
Step 5. Replace the site’s hostname with the CDN endpoint hostname you received during WordPress installation (e.g., wpcluster-demo.cdn.edgeport.net), and then click Save all settings.
Unlike with LiteSpeed-based installations, you don’t need to configure CDN separately for each site. From now on, all newly created websites in the network will automatically be served by CDN.
Sub-sites are set up with custom domains and boosted by enterprise-level CDN. Enjoy streamlined management of your websites and blogs using unified controls.


