Integrate Traffic Distributor with Running Application
Often, developers encounter the challenge of managing traffic across multiple backend systems while their application is already up and running, serving a pool of users and handling continuous incoming requests. This not only involves configuring traffic distribution but also requires making real-time adjustments to the frontend application. When we make these changes, it might mean that things stop working for a little while, which can be annoying for people using it. To mitigate these issues and ensure a seamless experience for your customers, let’s explore how you can smoothly integrate a Traffic Distributor solution into your existing application setup.
- Seamlessly updating applications with a ‘behind-the-scenes’ approach using blue-green deployment.
- Evaluating performance, user satisfaction, and the stability of new app versions through A/B testing.
- Enhancing service reliability with robust failover protection.
To make this happen, you’ll have to go through these steps:
Add Application Copy to Routing
In this case, we’re executing an application on the Apache server in the primary environment.
1. To start, make sure you create an additional setup with the same application inside (let’s call it “second-env”).
2. We’re all set to set up Traffic Distributor making sure to include both of these environments as backends.
3. That’s it! The Traffic Distributor is all setup and primed to manage requests for our application.
We just need to guide the incoming traffic from the initial environment to the Traffic Distributor.
Configure App Entrypoint via TD
In real-world applications, it’s common to have a custom domain tailored to the specific needs of the project. Take, for instance, our starting point, where the main environment (referred to as primary-env) already boasts a custom domain name attached.
Now, to ensure the smooth handling of requests (meaning they go through the distributor as intended), we must transition the appropriate entry point to the TD environment. This will position it ahead of the selected backend pair, distributing incoming traffic among them based on predetermined configurations. To achieve this, you can follow one of these straightforward procedures, depending on the method used to bind the custom domain:
- If you’re employing CNAME or ANAME redirection, simply switch the domains between the initial setup and the TD environment.
- If you’re utilizing A Record, swap the Public IPs to transfer the currently used external IP to the TD environment.
Swap Domains
1. Move your cursor over the setting corresponding to your custom domain’s environment (like “primary-env”) and choose Settings from the options that pop up.
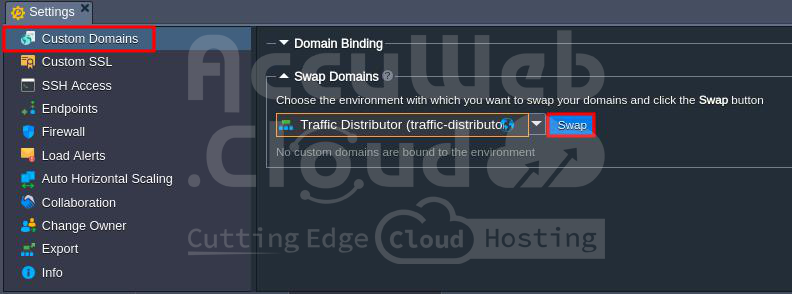
2. When you access the settings in your environment, you’ll automatically see the Custom Domains section. Click on the “Swap Domains” option and choose the Traffic Distributor environment from the list that appears.
Next, just hit the Swap button and give your confirmation in the pop-up to make sure the changes take effect.
3. Your application’s custom domain name will soon be transferred to the environment equipped with a Traffic Distributor. This means that both of your backends will be accessible through this domain shortly.
Swap Public IPs
If you want to transfer your public IP from your primary environment (where your custom domain is linked) to the Traffic Distributor, the easiest method is to utilize the External Addresses Swap feature. You can access this feature through the platform API or CLI.
This functionality enables you to efficiently modify all necessary settings with a single command, thus saving you the effort of manually adjusting the A Record settings.
However, if you prefer using a graphical interface, you’ll have to head over to your domain registrar and manually swap out the external IP address in the A Record for your custom domain.
1. Make sure the NGINX balancer in your Traffic Distributor setup has an external IP address linked to it. You can grab the IP address from the dashboard.
2. Next, head over to your DNS settings and tweak the A record to direct it to the fresh IP address.
- If you’ve made changes and they haven’t shown up yet, it’s because you need to wait for the old information to clear out of the system’s memory. This can take a bit of time. You can check how much longer you’ll need to wait by looking at the TTL setting in your DNS manager. This setting tells you how long the old info will stick around, usually measured in seconds.
- Make sure to double-check your application settings to see if any IP-dependent configurations are hardcoded, and make necessary adjustments.
3. Once you’ve switched the entry point address in the application, you can remove the public IP from the original primary environment if it’s no longer needed for direct access. By doing this, you can avoid being billed for services or features you aren’t utilizing.
Once that’s done, any traffic coming to your custom domain will go through the Traffic Distributor solution, which will then distribute it based on the traffic ratio you’ve set for your application backends.


