Custom Environment Variables for Java Application Servers
Environment variables represent a placeholder, where you can store the frequently used parameters’ values or strings in order not to specify them manually in the code each time they are needed. Some default environment variables are preconfigured at the platform application servers and can be easily integrated into your app, hosted within these servers, to make your work with the platform even more convenient.
The following guide will acquaint you with the details on how to add your custom environment variables to particular Java application servers:
- Tomcat, TomEE, or Jetty
- GlassFish
Note that the same operations can be done using establishing the SSH connection to any of your servers and declaring variables in the corresponding configuration file via the console.
Tomcat, TomEE, and Jetty Variables
The process for adding environment variables is simple and similar for most Java application servers. Here’s how to do it:
Step 1. Click the Config button for your application server (Tomcat, TomEE, or Jetty).
Step 2. Go to the /opt/tomcat/conf directory and open the variables.conf file. Follow the instructions there to add your custom environment variables. Separate each variable with a space or put each one on a new line.
Example
- Dvar1=value1 -Dvar2=value2
- Dmy.var3=/my/value
Remember to save your changes.
Step 3. Update your application’s code using the System.getProperty(“your_variable”) method to use the new values.
Example
- String var1 = System.getProperty(“var1”);
- String var2 = System.getProperty(“var2”);
- String var3 = System.getProperty(“var3”);
Step 4. Restart your application server using the corresponding button.
After this, your new configurations will be applied.
GlassFish Variables
To configure variables for GlassFish, use the Administration Console. Here’s how:
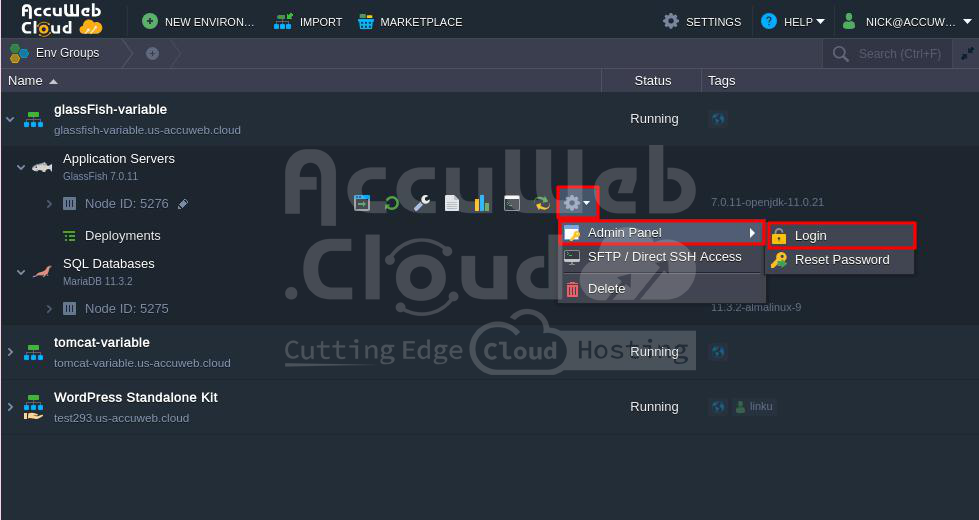
Step 1. Click the gear icon for GlassFish in your environment and select Admin panel -> Login (or use the link to the Admin console from the email you received when you created the environment).
 Step 2. Enter the Username and Password from the same email.
 Step 3. In the Admin Console, go to Configuration > default-config > JVM Settings.
 Step 4. Select the JVM Options tab and click Add JVM Option. An empty field will appear where you can enter your custom environment variable (e.g., -Dvar1=value1).
 To use a JAR file as an option’s argument, upload the JAR to the home folder of your GlassFish server and specify its path (e.g., –javaagent:/opt/glassfish3/temp/newrelic.jar).
After setting your parameters, click Save.
Step 5. You will see a confirmation message if everything is correct.
Step 6. Go back to your platform dashboard and restart GlassFish using the corresponding button.
This way, you can manage GlassFish environment variables through the Admin Console.


