MariaDB Galera Cluster Replication on AccuWeb.Cloud
Extending the Topic of Database Auto-Clustering on AccuWeb.cloud: MariaDB Galera Cluster
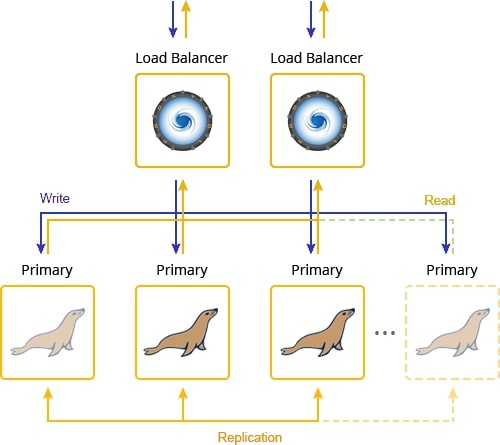
AccuWeb.cloud offers a robust auto-clustering solution with MariaDB Galera Cluster, ensuring high availability and synchronous replication. Key features include:
- True Multi-Master Topology: All nodes in the cluster are equal, allowing read and write operations on any node.
- Automatic New Node Provisioning: New nodes are automatically added and synchronized without manual intervention, simplifying scalability.
- No Data Loss on Node Crashes: The cluster ensures data integrity and availability, even in node failures.
- Consistent Data Replicas: Data remains consistent across all nodes, thanks to synchronous replication.
- Automatic Membership Control: Nodes are automatically managed within the cluster, ensuring seamless integration and operation.
- No Complex Failovers: Failovers are handled automatically and transparently, avoiding the need for manual intervention and reducing downtime.
- Parallel Transaction Execution: Transactions are executed in parallel across all nodes, enhancing performance and throughput.
- No Slave Lag: Eliminates the delay between master and slave nodes, ensuring real-time data consistency.
- No Lost Transactions: Ensures that no transactions are lost, providing reliable data integrity.
- Scalability for Reads and Writes: The cluster can efficiently scale to handle increased read and write operations.
- Smaller Client Latencies: Optimized for reduced latency, providing faster response times for clients.
- Support for Multi-Cloud and Multi-Region Deployments: The cluster can be deployed across multiple clouds and regions, offering flexibility and resilience.
By leveraging MariaDB Galera Cluster on AccuWeb.cloud, you achieve a high-performance, scalable, and resilient database environment, ensuring data consistency and availability across all nodes.
Requirements for Setting Up a Galera Cluster
In Galera, databases need to adhere to specific requirements when creating tables. Key requirements include:
- InnoDB Storage Engine: All data must be stored using the InnoDB transactional storage engine to ensure proper replication.
- Primary Keys: Each table intended for replication must have a defined primary key, which can be a single or multi-column index.
For a comprehensive list of limitations and best practices, refer to the official documentation.
Setting Up MariaDB Galera Cluster on AccuWeb.cloud
- Access the AccuWeb.cloud Dashboard: Sign in to your AccuWeb.cloud account and access the dashboard.
- Create a New Environment: Click on “Create Environment” to start setting up your new environment.
- Select MariaDB Server: Within the topology wizard, select MariaDB as your database server.
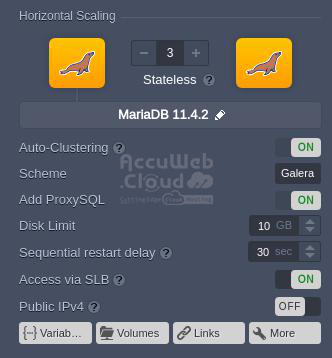
- Activate Auto-Clustering: Enable the Auto-Clustering feature to set up a scalable and resilient database cluster.
- Choose Galera Scheme: Select the Galera scheme to configure synchronous replication and high availability.
Customizing Cluster Topology on AccuWeb.Cloud
Before proceeding with the installation, you have the option to exclude the ProxySQL layer from the cluster topology using the appropriate switch. Note that this decision is final; if you exclude ProxySQL before installation, you cannot add it later, and if you include it, you cannot remove it afterward.
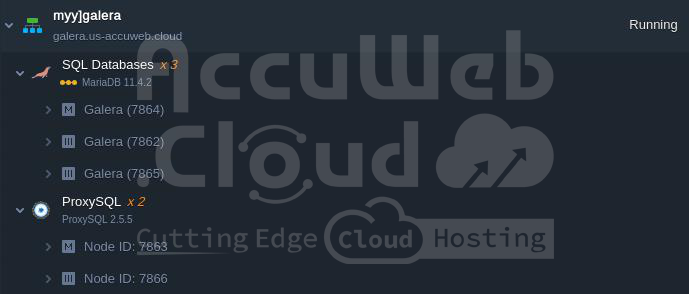
The environment will soon be created with the selected topology, complete with pre-configured interconnections, ready in just a few minutes.
You can monitor the health status of the cluster nodes through the Orchestrator admin panel. Access it using the credentials provided in the email regarding ProxySQL Load Balancer deployment. In the panel, each cluster member is displayed individually, showing their current status and health metrics.
Connecting a Java Web Application to MariaDB Galera Cluster via ProxySQL
Follow the linked guide for detailed instructions to establish a connection from your Java web application to the MariaDB Galera Cluster using ProxySQL as the entry point.
Additionally, upon creating each master node in the MariaDB cluster, you will receive an email containing phpMyAdmin credentials. This allows you to access the databases through the phpMyAdmin panel, which is useful for debugging and performing manual operations on your databases.
Step 1. Access phpMyAdmin using the Admin Panel URL, Username, and Password provided in the email. Select the desired database (e.g., ‘test’ or create a new one) from the left pane. Upon selection, the right pane will display that the database ‘test’ (or your chosen database) currently has no tables.
Step 2. Return to the AccuWeb.Cloud dashboard.
In this example, we are using a separate environment with a Tomcat 9 application server. To configure the database for our test application, click on the Config icon next to your compute node.
Navigate to the /opt/tomcat/temp directory and create a file named mydb.cfg using the platform’s integrated file manager.
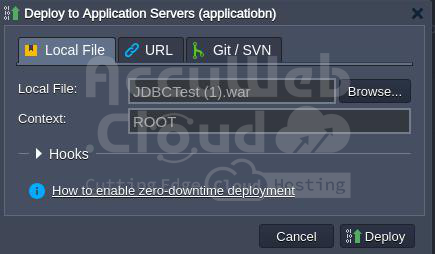
Download the test application from one of the provided links and deploy it on the Tomcat server.
For seamless compatibility with the proxy layer, ensure you use the latest JDBC connector for MariaDB. Place the connectors into the /opt/tomcat/webapps/ROOT/WEB-INF/lib/ directory.
Step 3. Remember to restart your application server to apply the changes made in mydb.cfg. You can accomplish this action by selecting the “Restart Nodes” button.
Step 4. To create and use custom user accounts after installing the cluster, you must add them to the mysql_users table on each ProxySQL node. This step is crucial for establishing connections to the database via the proxy layer. Follow these commands:
$ MYSQL_PWD=admin mysql -h 162.0.0.1 -P6032 -uadmin -e "INSERT INTO mysql_users (username,password,default_hostgroup) VALUES ('<username>', '<password>', 2);"
$ MYSQL_PWD=admin mysql -h 145.0.0.1 -P6032 -uadmin -e "LOAD MYSQL USERS TO RUNTIME; SAVE MYSQL USERS TO DISK;"Replace <username> and <password> with the credentials of your newly created database account. This ensures the ProxySQL nodes recognize and authenticate these custom users correctly.
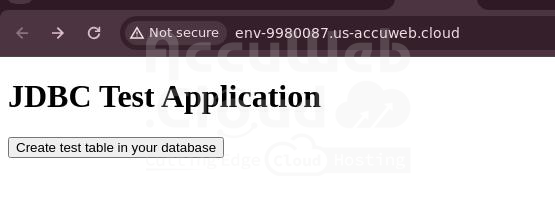
Step 5. After the deployment completes, click on “Open in Browser” either in a popup window or next to your application server. Then, within the application window, click on the button labeled “Create test table in your database” to proceed.
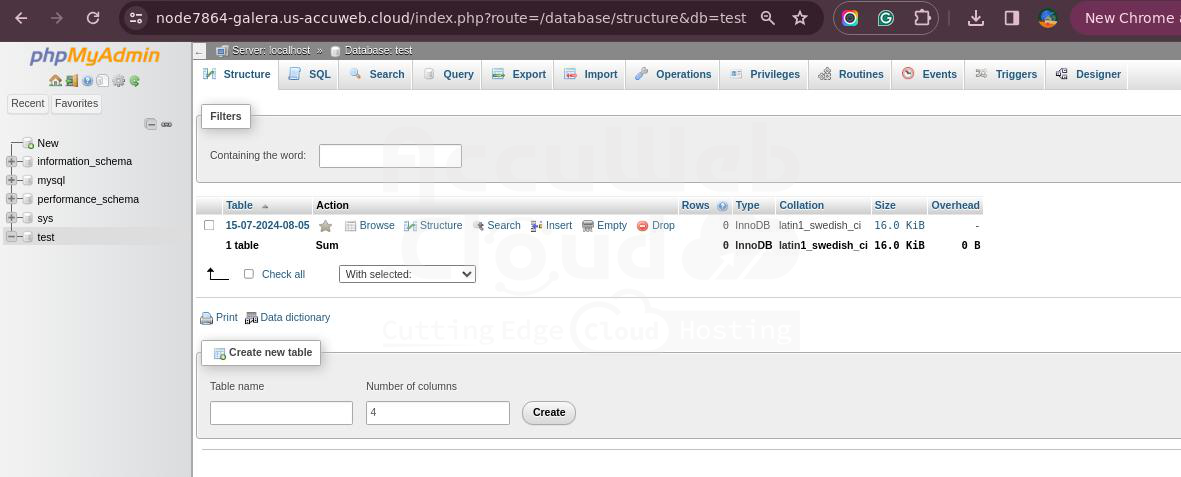
Step 6. To verify that the connection was successfully established and a new table was created, navigate back to the MySQL admin panel.
Check for the table named with the {date-time of creation} to confirm that replication is functioning correctly. Review all database phpMyAdmin panels within the cluster using the same credentials to ensure data availability across all instances.
Awesome! You’ve quickly set up access to your DB cluster from a web application and managed operations seamlessly through a single entry point.
Now you have a highly available and reliable MariaDB Galera Cluster installed automatically within minutes, complete with intuitive management tools out-of-the-box. Take advantage of AccuWeb.Cloud PaaS’s embedded database auto-clustering capabilities.


