LiteSpeed Web ADC
The LiteSpeed Web ADC (Application Delivery Controller) is a powerful solution for HTTP load balancing. It goes beyond just distributing traffic; it enhances the speed and reliability of backend services.
These benefits are made possible by implementing and supporting cutting-edge technologies, including the next-generation HTTP/3 (QUIC) transport protocol.
LiteSpeed Web ADC is well-suited for projects of any scale, capable of handling both everyday traffic and seasonal spikes with ease. With its array of features, this balancer will optimize your application’s performance to its fullest potential.
Set up your own LiteSpeed Web ADC load balancer server on the platform by following the steps below.
Step 1. Sign in and click the “New Environment” button located at the top of the dashboard.
Step 2. Configure your preferred topology using the opened wizard and select LiteSpeed Web ADC as your load balancer.
Click Create to proceed.
– `DEFAULT_CLUSTER`: Selects the load balancing type for requests’ proxying (HTTP, AJP, FCGI, LSAPI). If working with custom backends, this logic can be disabled (0, disabled, false).
– `WP_PROTECT`: Configures an action for the WordPress Brute Force Attack Protection feature (off, on, drop, deny, throttle, captcha; off by default).
– `WP_PROTECT_LIMIT`: Sets a limit for the WordPress Brute Force Attack Protection feature (0, 1, 2-1000; 10 by default).

Step 3. Clicking the “Open in Browser” button for the LiteSpeed balancer will automatically access one of the backend application servers.
Step 4. To manage your load balancer, access its Admin Panel by clicking the appropriate button in the “Additionally” list next to the layer. Access credentials are sent via email after the node creation.
Note: When working with the platform implementation of LiteSpeed via the admin panel, keep the following specifics in mind:- Ensure container stability by using the platform-native redeploy feature instead of the Actions > Version Manager functionality.
– For LiteSpeed ADC version management, ignore notifications about license key expiration in the Actions > Server Log Viewer, as leasing is automatically managed by the platform.
If you need to adjust any configuration files, you can do so through the dashboard file manager or by establishing an SSH connection.
License Pricing
The platform seamlessly integrates the cost of the LiteSpeed license by fair pay-as-you-go principles. Specifically, the license is billed only for active containers on an hourly basis, up to 730 hours per month. Additionally, license lifecycle management is fully automated.
- New licenses are issued for every newly-created container (e.g., during environment provisioning or horizontal scaling)
- Updated when changing available resource limits within each container
- Decommissioned when stopping the environment or scaling in.
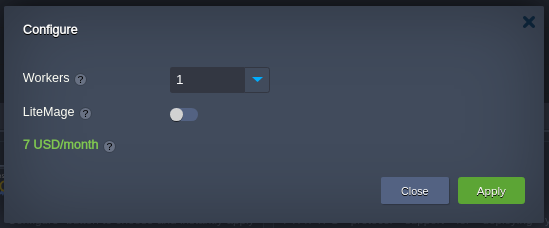
You can select the required plan based on your needs using the dedicated LiteSpeed License Manager add-on, which is automatically installed on all LiteSpeed-based nodes (LS Web Server, LS ADC, LLSMP).
The add-on allows switching between plans by adjusting the number of Workers (processes to handle general server work). Additionally, the LiteMage caching solution (with unlimited publicly cached objects) can be automatically configured for LiteSpeed ADC for an additional price of $152 per month.
| License Type | Workers | Pricing (USD) per 1 GB per Hour | Pricing (USD) per 1 GB per Month |
| Web ADC Small (default) | 1 | $0.00975 | $7.02 |
| Web ADC Medium | 2 | $0.0195 | $14.04 |
| Web ADC Large | 4 | $0.039 | $28.08 |
| Web ADC Ultimate | 8 | $0.078 | $56.16 |
The license price is dynamically calculated based on the network traffic processed by the node at the rate specified in the “per 1 GB per Hour” column.
It’s important to note that active environments are charged for at least 1GB, even if there was no traffic at all during an hour (a minimum fee for license usage).
Additionally, the license cost per month cannot exceed the maximum value specified in the table. For instance, for the default Web ADC Small plan, any traffic over 6500GB is free of charge until the end of the month (the first charge defines the starting date).
Note: The exact cost may vary slightly for platforms with a currency other than USD, as it depends on the conversion rate at the moment of the hourly billing event. All account charges can be viewed via the Billing History in the dashboard.
LiteSpeed ADC Testing
When conducting testing of the LiteSpeed Web ADC load balancer, consider the following peculiarities:
- By default, the load balancer operates in Stateful mode, also known as “Session Affinity,” which tracks sessions associated with each backend server. This means that requests from a single source will always be directed to the same backend server unless it’s not functioning.
- If LiteSpeed ADC does not have its public IP, all requests go through the platform’s Shared Load Balancer. In this scenario, the ADC considers that the load originates from a single IP address (that of the Shared Load Balancer).
For proper testing of the production cluster with LiteSpeed ADC as a load balancer, it’s essential to attach a public IP and send requests from multiple sources.
Alternatively, you can temporarily switch to the Stateless mode, which disregards sessions (recommended during the development/testing stages only). Refer to the official documentation for more information on LiteSpeed ADC testing.
Disabling Health Checks
LiteSpeed ADC automatically monitors the state of the backends and excludes problematic ones to ensure project availability to end-users. However, in some cases, such behavior may not be necessary.
For example, WordPress-based sites in maintenance mode return a 503 HTTP status code, which excludes the application server from the load balancer’s routes. Consequently, users may see a generic balancer’s 500 status code instead of the custom WordPress maintenance screen.
In this section, we’ll demonstrate how to temporarily disable automatic health checks on the LiteSpeed ADC.
Step 1. Log in to the LiteSpeed ADC console and navigate to Configuration > Clusters > clusterHTTP > Worker Group section.
Step 2. Locate the Ping URL setting and clear the value.
Repeat this operation for all Worker Groups.
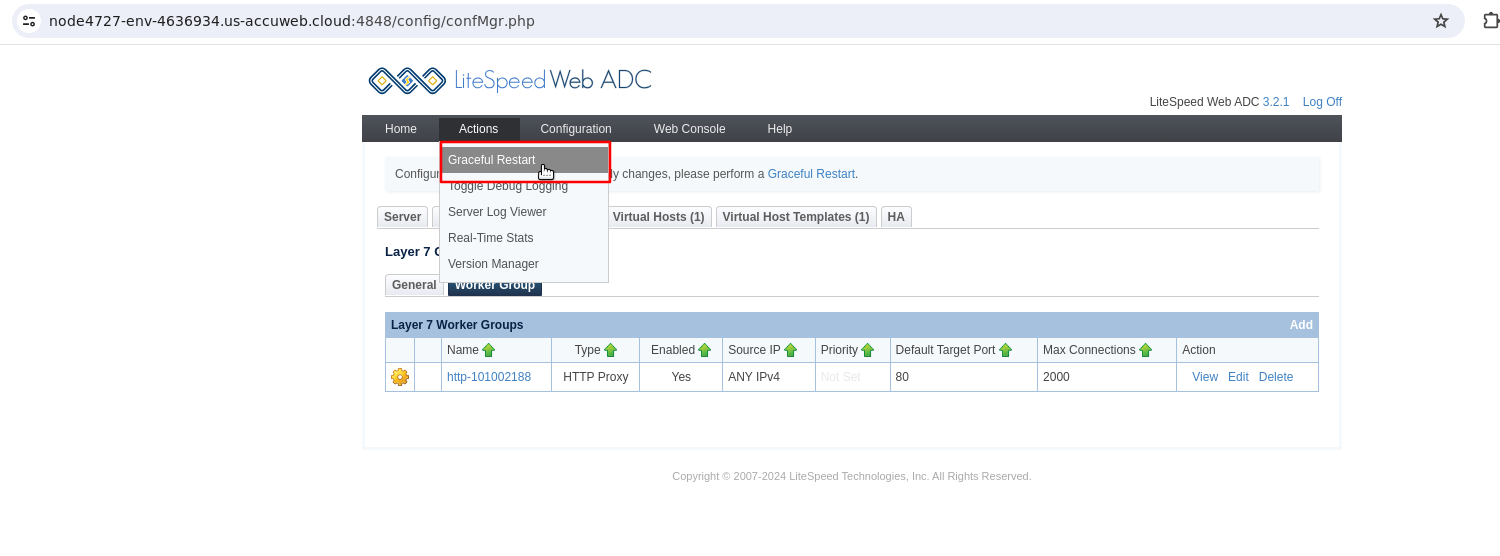
Step 3. Perform a Graceful Restart to apply the new settings.


