SSH Access to Container: Manage Your Server Remotely
Any container in your account can be accessed via SSH thanks to the Jelastic Platform. We’ll go over a few helpful commands for using the SSH terminal to manage your server in this tutorial.
There Are Two Methods You Can Use SSH to Connect To Your Server In Jelastic Paas
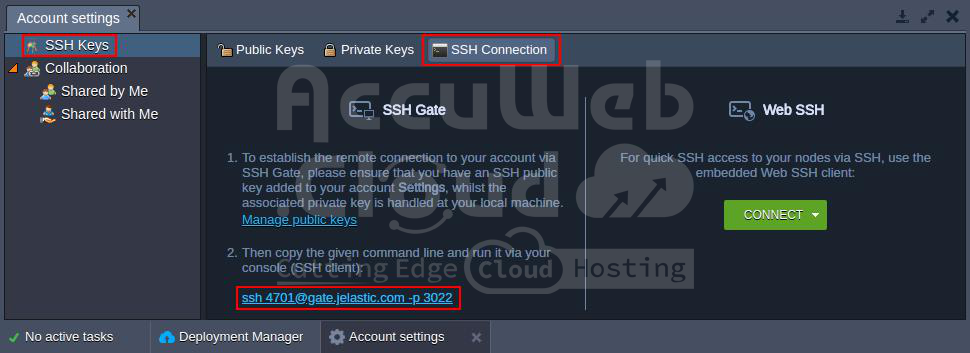
Web SSH: To rapidly access and begin managing the chosen environment layer or particular container online through your browser, click the “Web SSH” option next to it. This causes the Jelastic dashboard’s bottom terminal tab to open.
SSH Gate: As an alternative, you can use pre-generated SSH key pairs to access to your server using any chosen local SSH client. To authenticate, retain the matching private key on your local computer and add the public key to your account settings.
Once all the prerequisites have been satisfied, you can use the command line found in the relevant page of your account settings to create an SSH connection.
In this post, we’ll use the built-in Web SSH tool for ease of use and speed. However, if you are working with a remote local client, you can use the instructions listed below in a similar manner.
Navigation through the Remote Container File System
As experienced coders are not the target audience for this section, many of you may decide to skip it and go on to more complex tasks. Still, we believe it’s important to discuss before moving forward.
By default, you will be in the home directory of the server once you have entered the necessary container using the console. You usually save your custom setups and data in this directory. You can use the `cd` command with the following arguments to traverse between folders:
- `{directory_path}`: Specify the name of a nested folder (you can use slash-separated levels) or provide a full path relative to the container’s root.
- `..`: Move up one level in the file tree.
- `~`: Quickly switch to your working (server home) directory from any location.
- `/`: Instantly switch to the container’s root directory.
As a result, your current location will be displayed in purple text next to the hostname of the container.
To Create A New File Or Folder, Use The Following Commands
 	`touch [path-to/]{file}`: This command creates a new file.
 	`mkdir [path-to/]{dir}`: This command creates a new folder.
Here’s What Each Part Means
- `{file}` and `{dir}`: These are placeholders for the name of the file or folder you want to create if it’s in the current directory.
- `[path-to/]`: This is an optional part of the command if you want to specify a different
location for the new item.
Use the following command to list all files and directories in the current location in order to verify that the file and folder we previously specified have been created:
LsHere are some of the most common commands used for file management:
- `cat`: Used to operate with text files; depending on specified arguments, it allows you to view, merge, and duplicate file content.
- `cp`: Used to copy files and directories.
- `locate`: Used to find a specific file or directory within a server by its name or part of its name.
- `mv`: Used to move and/or rename files and directories.
- `pwd`: Outputs the full path to the current directory relative to the container root.
- `rm`: Removes a specified file or directory.
Now, let’s explore the default shell capabilities to monitor and manage your node’s metrics, resource consumption, running processes, and more.
Commands to View Server System Information
Use the {w} command to rapidly verify the container’s current state and make sure that nothing is affecting its performance or operability.
General system statistics, such as the number of logged-in users, instance uptime, current system timestamp, and average number of active processes for the previous 1, 5, and 15 minutes, are displayed at the top of the output from the `w} command. Details about the connected users, such as their names, terminal type, source connection IP, login time, activity statistics, and the name of the process(es) that are now active and operating on their behalf, are displayed underneath this header.
To view the server’s RAM usage statistics, you can check the content of the `/proc/meminfo` file using the `cat` command:
cat /proc/meminfoTo display basic software and hardware information about the container, use the following command:
uname -aDetails like the machine hardware name, version number, kernel name, and other system-related data will be displayed by this command.
Here you can see information about the server’s kernel (name, version, release date), node hostname, CPU type, operating system, and more.
How to Manage Container Processes Remotely via Terminal
While connected via SSH, you can monitor all currently running processes within a container using the `top` command.
Here, information is continuously updated in real time, showing details about all user processes, including system processes.
To display only your own active processes, type `ps` and execute this command. Use `Ctrl + C` to stop the command and return to the console prompt.
`kill` is an additional helpful command that lets you end any active process by its process ID ({pid}). The output from the previous command has the necessary process identifier.
Enter `kill {pid}{, where {{pid}} is the process ID of the process you wish to end, to use the `kill} command.
As you can see, the process that was operating and visible on the screen in this section’s second step has been terminated because it is no longer included in the list of current processes.
Operating Application Archives via SSH Console
The interface allows you to download and save files directly from the internet, including your application archive, for use on your server.
Utilizing a certain URL, download files with the `wget` command:
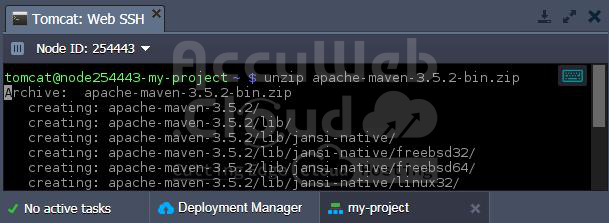
wget {link}Next, you can extract the downloaded archive using the `unzip` command:
unzip {archive}Replace `{archive}` with the path to your compressed package file.
All of the extracted files will then be stored in the current directory in a folder called after the archive.
Setting Custom Server Variables via SSH
You can look at the `.bash_profile} file in the home directory of any container to see the list of default environment variables for that container. After confirming that you are in the appropriate container directory, run the following command:
cat .bash_profile2. The `.bash_profile` file cannot be edited directly. If you need to add your own variables, you can write them into the `.bashrc` file located in the same folder. If the `.bashrc` file doesn’t exist, you can create it. Use any text editor of your choice, such as `vi`, to accomplish this task.
Here, you can define new variables using the following format:
export {VAR_NAME}={VAR_VALUE}Replace `{VAR_NAME}` with the name you want for the variable, and `{VAR_VALUE}` with the value you want to assign to that variable.
To verify if your custom variable was successfully set, run the following command:
echo ${VAR_NAME}Replace `{VAR_NAME}` with the name of your variable. This command will display the value of the specified variable.
In the console response, you should see the `{VAR_VALUE}` string, which will be the value you assigned to the `${VAR_NAME}` variable in the `.bashrc` file.
Specifics of Certified Jelastic Containers Remote Management
At Jelastic PaaS, there are two types of software stack templates used as a base for creating containers:
1. Dockerized Templates
These offer a uniform paradigm for container management for all kinds of servers (e.g., compute nodes, database servers, caching instances), according to the native Docker standard. You automatically have complete control over the instance with root rights when you login to a Dockerized server via SSH. This means you can carry out any necessary actions inside the container.
2. Certified Software Templates
Developed by the Jelastic team to meet platform-specific standards, these templates are based on native stack implementations. You log in as the default server user when you use SSH to access a server built from a certified software template. We give extra settings that can be run using a standard user account to facilitate efficient container management without having root access:
- `sudo sbin/service {service_name} {start|stop|restart|condrestart|status|reload|upgrade|help}`: This set of commands operates the main server process specified by `{service_name}`. Possible values for `{service_name}` vary depending on the server type (e.g., jetty, mysql, tomcat, memcached, mongod, postgresql, couchdb, glassfish-domain1, nginx, php-fpm, httpd).
- `sudo usr/bin/jem firewall {fwstart|fwstop}`: This command is used to start or stop the container firewall.
- `sudo usr/bin/jem nscd`: This command controls the name-service caching daemon, which stores records for common name server requests (e.g., passwd, hosts, group).
- `sudo sbin/service rpcbind.service`: This command operates the RPC bind service, which maps user-readable names to program numbers for handling incoming RPC calls.
All of these commands, when run with `sudo`, do not require entering the server admin root password. This allows you to leverage essential container functionality needed for your application to function properly, even with regular account permissions.
Conclusion
Now that you know all the fundamentals of using the console to manage your containers, you can run your apps with Jelastic Multi-Cloud and benefit from more flexibility. Start with one of the certified service providers worldwide and use Jelastic Multi-Cloud.


