How To Set Up an OpenVPN Server on Debian?
Does your team need a secure way to access internal resources from remote locations over the internet, as if they were directly connected to the private network? A Virtual Private Network (VPN) makes this possible. A VPN server lets remote users securely connect to your private network through a single, protected entry point. It verifies users and creates an encrypted connection between their devices and your network, keeping their access safe and private.
Instead of using a commercial VPN, you can set up your own free VPN. In this guide, you’ll learn how to set up an OpenVPN server on a Debian 11 server and configure it for access from Windows, macOS, Linux, iOS, and Android.
Table of Contents
- What You Need?
- Installing OpenVPN: Simple Steps
- Steps to Create the Server Certificate, Key, and Encryption Files
- Steps to Generate a Client Certificate and Key Pair
- Steps to Configure the OpenVPN Service
- Adjusting the Server Networking Configuration
- Starting and Enabling the OpenVPN Service
- Creating the Client Configuration Infrastructure
- Generating Client Configurations
- Installing the Client Configuration
- Testing Your VPN Connection
- Revoking Client Certificates
- Conclusion
What You Need?
To follow this tutorial, you’ll need:
– Two Debian 11 servers: One will host your OpenVPN server, and the other will act as your certificate authority (CA).
– A non-root user with sudo access on both servers. Follow a Debian 11 setup guide to create a user with these permissions and set up a firewall.
– Easy-RSA installed on both servers for managing VPN certificates.
For security, keep your CA’s private key on a separate server that is not connected to the internet. Since your OpenVPN server will likely stay online, it is more vulnerable to attacks. If an attacker gains access to the CA’s private key, they could create certificates to access your VPN. The official OpenVPN documentation recommends using a standalone server for your CA.
Additionally, if you disable password authentication on these servers, transferring files between them later could be challenging. To fix this, you can either temporarily re-enable password authentication or create an SSH key pair for each server and share their public keys between them.
Once everything is ready, proceed to Step 1 of the tutorial to begin setting up your VPN.
Installing OpenVPN: Simple Steps
Step 1: Update Your Server Packages
Run the command to update the package list:
# apt updateStep 2: Install OpenVPN
Use the following command to install OpenVPN:
# apt install openvpnStep 3: Next Step: Set Up the Server Certificate
Since you already installed Easy-RSA and set up the Certificate Authority (CA), you can now generate the VPN server’s certificate.
Steps to Create the Server Certificate, Key, and Encryption Files
On the OpenVPN Server:
Step 1: Install Easy-RSA
Log in to your vpn Server:
Use a non-root user with sudo privileges created during setup.
Update the system package list:
Run the following command:
# apt updateInstall Easy-RSA:
Install the package by typing:
# apt install easy-rsaConfirm installation:
When prompted, press y to proceed with the installation.
At this point, Easy-RSA is installed and ready to use. Next, you’ll set up a Public Key Infrastructure (PKI) directory to start creating your Certificate Authority (CA).
Step 2: Set Up a Public Key Infrastructure Directory
Create an Easy-RSA directory:
Run this command to create a folder in your home directory:
# mkdir ~/easy-rsaLink Easy-RSA package files:
Use symbolic links to connect your ~/easy-rsa folder to the Easy-RSA package files:
# ln -s /usr/share/easy-rsa/* ~/easy-rsa/Note: This method allows automatic updates to Easy-RSA to reflect in your setup.
Secure the directory:
Restrict access to the Easy-RSA folder so only you can use it:
# chmod 700 ~/easy-rsaInitialize the PKI:
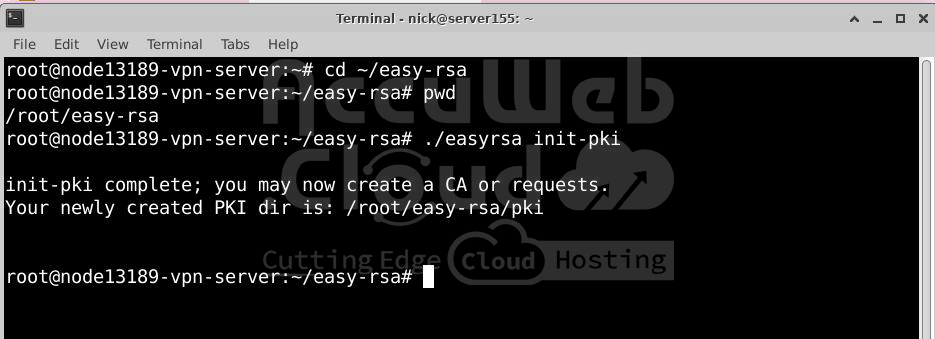
Navigate to your Easy-RSA directory and initialize the PKI:
# cd ~/easy-rsa# ./easyrsa init-pkiOutput:
You will see a message like this:
init-pki complete; you may now create a CA or requests.
Your newly created PKI dir is: /home/username/easy-rsa/pki
Your PKI directory is now set up. In the next step, you’ll create the private key and public certificate for your CA.
Step 3: Generate a Certificate Request
Run the command below to create a certificate request with the name server (or another name of your choice). Use the nopass option to avoid password protection:
# ./easyrsa gen-req server nopassPress ENTER to accept the default name when prompted or enter a different one.
This creates a private key and a request file (server.req).
Step 4: Copy the Server Key to OpenVPN Directory
# cp ~/easy-rsa/pki/private/server.key /etc/openvpn/Step 5: Transfer the Certificate Request to the CA Server
Use scp to transfer the server.req file:
# scp ~/easy-rsa/pki/reqs/server.req root@your_CA_ip:/tmpOn the CA Server:
Step 6: Install Easy-RSA
Log in to your other Server:
Use a non-root user with sudo privileges.
Update the package list:
Run:
# apt updateInstall Easy-RSA:
Install the package with:
# apt install easy-rsaConfirm installation:
When prompted, press y to confirm.
Easy-RSA is now installed. Next, you will set up a Public Key Infrastructure (PKI) directory.
Step 7: Prepare the Public Key Infrastructure Directory
Create an Easy-RSA directory:
Run:
# mkdir ~/easy-rsaLink the package files:
Use symbolic links to connect the package files:
# ln -s /usr/share/easy-rsa/* ~/easy-rsa/Note: This method ensures that any updates to Easy-RSA are reflected automatically.
Secure the directory:
Restrict access to the directory:
# chmod 700 ~/easy-rsaInitialize the PKI:
Navigate to the Easy-RSA folder and initialize:
# cd ~/easy-rsa# ./easyrsa init-pkiOutput:
You’ll see a message like:
init-pki complete; you may now create a CA or requests.
Your newly created PKI dir is: /home/username/easy-rsa/pki
Your PKI directory is now ready. Next, you will create a Certificate Authority (CA).
Step 8: Create a Certificate Authority (CA)
Edit the configuration file:
Navigate to the Easy-RSA directory and create a vars file:
# nano varsAdd configuration details:
Paste the following into the file and modify the values:
set_var EASYRSA_REQ_COUNTRY    "US"
set_var EASYRSA_REQ_PROVINCE   "New Jersy"
set_var EASYRSA_REQ_CITY       "Old Tappan"
set_var EASYRSA_REQ_ORG        "Accuwebhosting"
set_var EASYRSA_REQ_EMAIL      "[email protected]"
set_var EASYRSA_REQ_OU         "Technical support"
set_var EASYRSA_ALGO           "ec"
set_var EASYRSA_DIGEST         "sha512"
Save and close the file:
In nano, press CTRL+X, then Y, and ENTER.
Build the CA:
Create the private key and public certificate:
# ./easyrsa build-caSet a passphrase:
You’ll be prompted to enter and confirm a passphrase. Use a strong passphrase and save it securely.
Confirm the Common Name (CN):
Press ENTER to accept the default name, or enter a custom name.
Output:
Enter New CA Key Passphrase:
Re-Enter New CA Key Passphrase:
…
Common Name (eg: your user, host, or server name) [Easy-RSA CA]:
CA creation is complete and you may now import and sign cert requests.
Your new CA certificate file for publishing is at:
/home/username/easy-rsa/pki/ca.crt
You now have two key files:
ca.crt: The public certificate. Share this with users and servers.
ca.key: The private key. Keep this secure and never share it.
Note: If you don’t want to enter a password every time, you can use:
# ./easyrsa build-ca nopassYour Certificate Authority is now set up and ready to sign certificate requests or revoke certificates.
Step 9: Navigate to the Easy-RSA Directory
# cd ~/easy-rsaStep 10: Import the Certificate Request
Replace server.req and server with the file name and common name you used earlier:
# ./easyrsa import-req /tmp/server.req serverStep 11: Sign the Certificate Request
Use the server request type:
# ./easyrsa sign-req server server– Type yes to confirm the request.
– If your CA key is encrypted, you’ll need to enter its passphrase.
Step 12: Transfer the Signed Certificate to the VPN Server
Use scp to send back the signed certificate:
# scp pki/issued/server.crt root@vpn_server_ip:/tmpAlso, transfer the CA certificate (ca.crt):
# scp pki/ca.crt root@your_server_ip:/tmpBack on the OpenVPN Server:
Step 13: Copy Certificates to OpenVPN Directory
# cp /tmp/{server.crt,ca.crt} /etc/openvpn/Step 14: Navigate to Easy-RSA Directory
# cd ~/easy-rsaStep 15: Generate Diffie-Hellman Parameters
# ./easyrsa gen-dhThis may take a few minutes.
Step 16: Create HMAC Signature
# openvpn --genkey secret ta.keyStep 17: Copy Files to OpenVPN Directory
# cp ~/easy-rsa/ta.key /etc/openvpn/# cp ~/easy-rsa/pki/dh.pem /etc/openvpn/Now all required certificates and encryption files are ready. You can move on to creating the client certificates and keys.
Steps to Generate a Client Certificate and Key Pair
On the VPN Server:
Step 1: Create a Directory for Client Files
Create a folder to store the client certificate and key files:
# mkdir -p ~/client-configs/keysStep 2: Set Secure Permissions for the Directory
Lock down the permissions to secure the files:
# chmod -R 700 ~/client-configsStep 3: Navigate to the Easy-RSA Directory
# cd ~/easy-rsaStep 4: Generate the Client Certificate Request
Replace accuclient1 with a unique name for each client:
# ./easyrsa gen-req accuclient1 nopass– Press ENTER to confirm the default common name.
Step 5: Copy the Client Key to the Client Directory
# cp pki/private/accuclient1.key ~/client-configs/keys/Step 6: Transfer the Certificate Request to the CA Server
Replace client1.req and root@your_CA_ip with the appropriate names and details:
# scp pki/reqs/accuclient1.req root@CA_server_ip:/tmpOn the CA Server:
Step 7: Navigate to the Easy-RSA Directory
# cd ~/easy-rsaStep 8: Import the Certificate Request
Replace accuclient1 with the name used earlier:
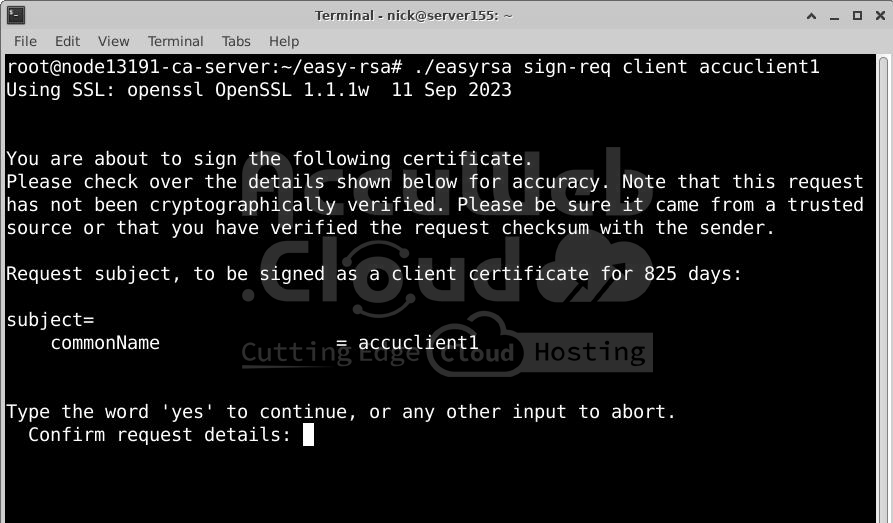
# ./easyrsa import-req /tmp/accuclient1.req accuclient1Step 9: Sign the Certificate Request
Use the client request type:
# ./easyrsa sign-req client accuclient1– Type yes to confirm signing the request.
– Enter the passphrase for the CA key if prompted.
Step 10: Transfer the Signed Certificate Back to the VPN Server
Replace client1.crt and root@vpn_server_ip with the appropriate names and details:
# scp pki/issued/accuclient1.crt root@vpn_server_ip:/tmpBack on the VPN Server:
Step 11: Copy the Client Certificate to the Client Directory
# cp /tmp/accuclient1.crt ~/client-configs/keys/Step 12: Copy Additional Files to the Client Directory
Copy the following files to the same directory:
# cp ~/easy-rsa/ta.key ~/client-configs/keys/# cp /etc/openvpn/ca.crt ~/client-configs/keys/Now, all required certificates and keys for the client are generated and securely stored. You’ll use these files later to create a single client configuration file. Move on to the next step to configure OpenVPN on your server.
Steps to Configure the OpenVPN Service
Step 1: Copy the Sample Configuration File
Use the sample configuration file as a starting point:
# cp /usr/share/doc/openvpn/examples/sample-config-files/server.conf /etc/openvpn/Step 2: Edit the Server Configuration File
Open the file for editing:
# nano /etc/openvpn/server.confStep 3: Update Required Settings
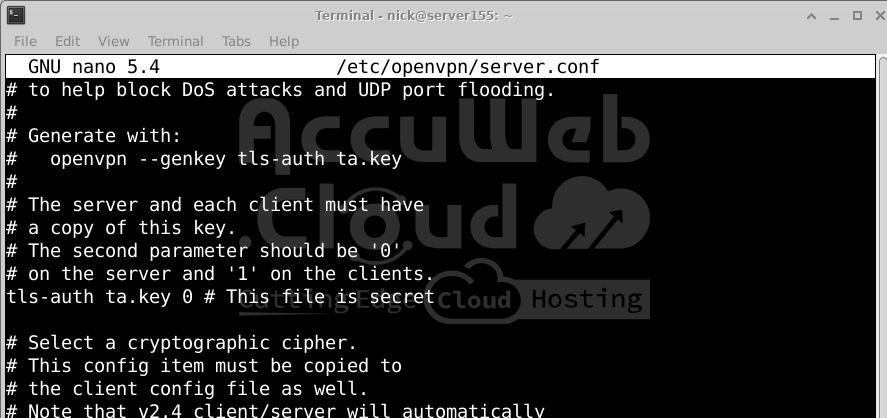
Enable HMAC Authentication
Find the line containing tls-auth. Uncomment it (remove the; at the beginning):
tls-auth ta.key 0 # This file is a secretSet the Encryption Cipher
Locate the line for cipher. Uncomment it and ensure it uses AES-256-CBC:
cipher AES-256-CBCBelow this, add the following line for the HMAC message digest algorithm:
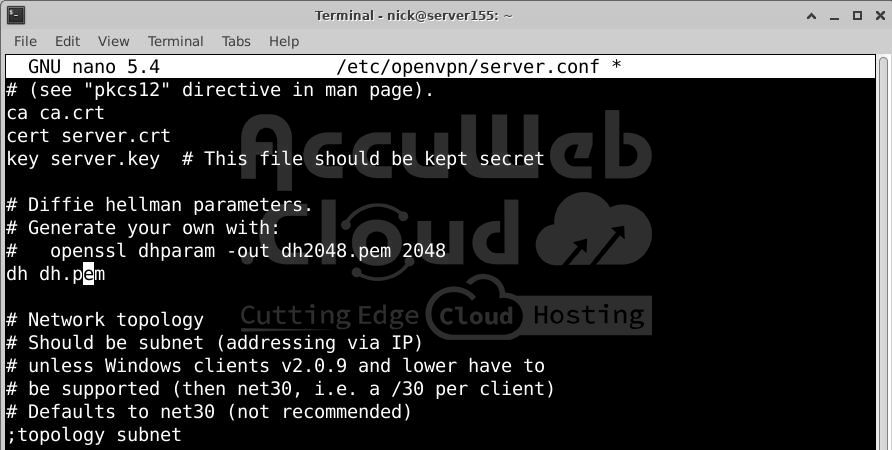
auth SHA256Update Diffie-Hellman Parameters
Find the dh line. Update it to use dh.pem:
dh dh.pemUncomment User and Group Settings
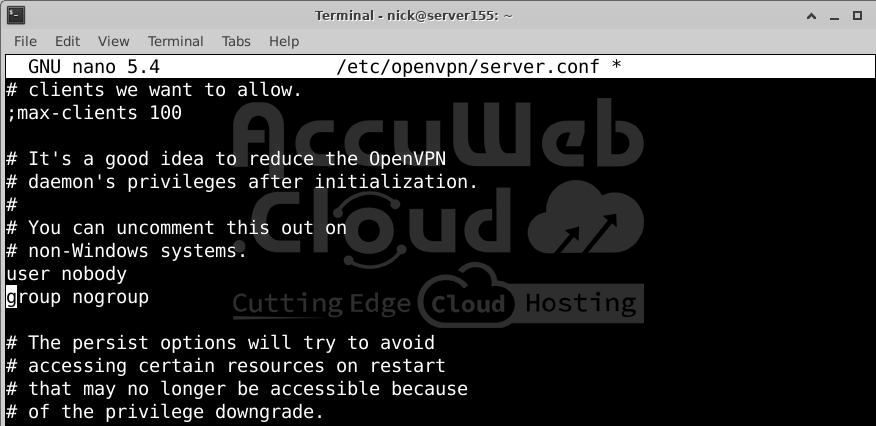
Find user and group. Uncomment these lines:
user nobody
group nogroup
Step 4: Optional Settings
Redirect All Traffic Through the VPN
Find redirect-gateway and uncomment it:
push "redirect-gateway def1 bypass-dhcp"Uncomment the DNS settings to route DNS traffic:
push "dhcp-option DNS 208.67.222.222"push "dhcp-option DNS 208.67.220.220"Change Port and Protocol (if needed)
Update the port (e.g., to 443):
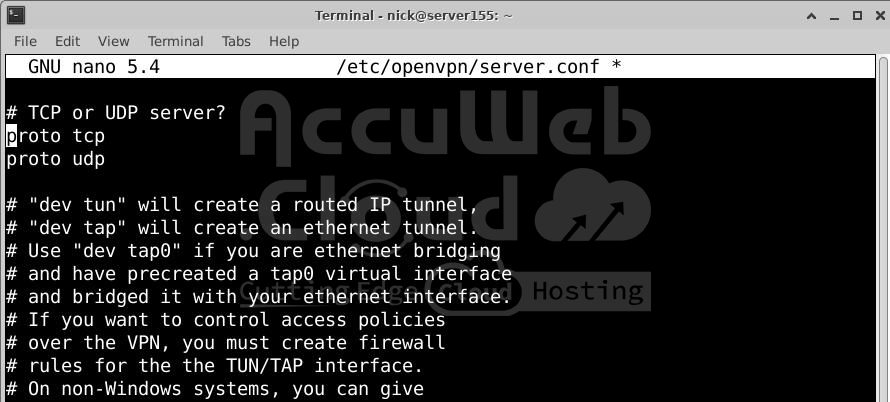
port 443Change the protocol to tcp if required:
proto tcpIf using TCP, set explicit-exit-notify to 0:
explicit-exit-notify 0Point to Non-Default Credentials (if custom names were used)
Update the cert and key lines to match your certificate names:
cert server.crtkey server.keyStep 5: Save and Exit
Save the file and close the editor:
In Nano, press CTRL+O to save, then CTRL+X to exit.
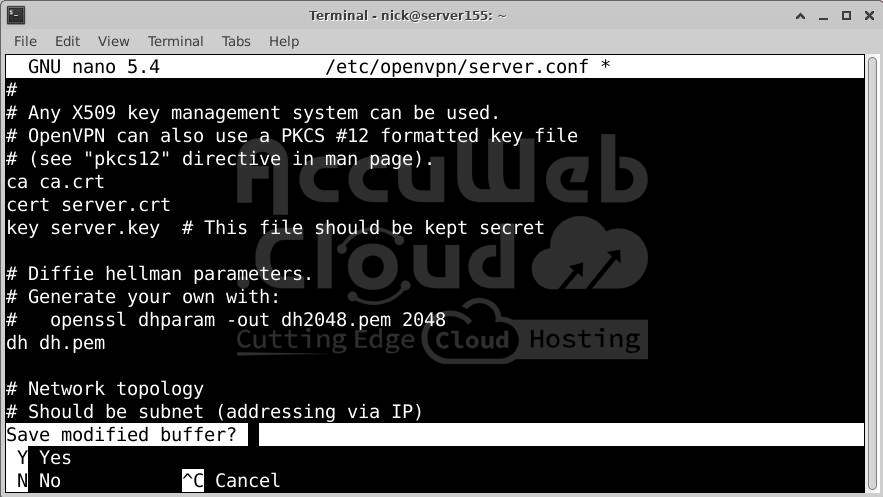
Once the changes are complete, you can proceed to configure your server’s networking and finalize the setup.
Adjusting the Server Networking Configuration
Follow these steps to adjust your server’s networking configuration for OpenVPN:
Step 1: Enable IP Forwarding
Open the sysctl configuration file:
# nano /etc/sysctl.confFind the line that contains net.ipv4.ip_forward. Uncomment it by removing the # and ensure it reads:
net.ipv4.ip_forward=1
Save and close the file.
Apply the changes for the current session:
# sysctl -pStep 2: Identify Your Public Network Interface
Run the following command to find your public interface:
# ip route | grep defaultNote the name of the interface after dev, e.g., venet0, eth0.
Step 3: Configure UFW for NAT (Masquerading)
Open the UFW before-rules file:
# nano /etc/ufw/before.rulesAt the top of the file, add the following lines. Replace venet0 with your public network interface:
# NAT for VPN
*nat
: POSTROUTING ACCEPT [0:0]
-A POSTROUTING -s 10.8.0.0/24 -o venet0 -j MASQUERADE
COMMIT
Save and close the file.
Step 4: Allow Forwarded Packets
Open the UFW default configuration file:
# nano /etc/default/ufwFind the line DEFAULT_FORWARD_POLICY=”DROP”. Change DROP to ACCEPT:
DEFAULT_FORWARD_POLICY="ACCEPT"Save and close the file.
Step 5: Allow OpenVPN and SSH Traffic
Allow traffic for OpenVPN (default port 1194 UDP) and SSH:
ufw allow 1194/udpufw allow OpenSSHIf you changed the port or protocol in the OpenVPN configuration, adjust the command accordingly.
Step 6: Restart UFW
Restart UFW to apply the changes:
# ufw disable# ufw enable
Your server is now configured to properly handle OpenVPN traffic and route it through the VPN.
Starting and Enabling the OpenVPN Service
Follow these steps to start and enable the OpenVPN service:
Step 1: Start the OpenVPN Service
Start the OpenVPN service using the following command:
# systemctl start openvpn@server– This will use the /etc/openvpn/server.conf configuration file.
– If you use a different configuration file, such as server2.conf, replace server with server2.
Step 2: Check the Service Status
Verify that the OpenVPN service is running:
# systemctl status openvpn@serverIf everything is working, the output should indicate the service is active.
Step 3: Check the VPN Interface
Confirm the OpenVPN interface (tun0) is available:
# ip addr show tun0– You should see details about the tun0 interface.
Step 4: Enable the OpenVPN Service to Start on Boot
Enable the OpenVPN service so it starts automatically when the server boots:
# systemctl enable openvpn@server
Your OpenVPN service is now running and will start automatically on reboot. The next step is to create a client configuration file for connecting to the server.
Creating the Client Configuration Infrastructure
Follow these steps to create a system for generating client configuration files automatically:
Step 1: Create a Directory for Client Configurations
Create a directory to store the client configuration files:
# mkdir -p ~/client-configs/filesStep 2: Copy the Example Client Configuration File
Copy the example client configuration file into the new directory:
# cp /usr/share/doc/openvpn/examples/sample-config-files/client.conf ~/client-configs/base.confStep 3: Edit the Base Configuration File
Open the base configuration file for editing:
# nano ~/client-configs/base.confUpdate the following settings:
Remote Server: Set your server’s public IP address and port:
remote <Your_Server_IP> 1194Protocol: Ensure the protocol matches the server’s setting (typically UDP):
proto udpUser and Group: Uncomment the lines to downgrade privileges:
user nobody
group nogroup
Comment Out Certificate and Key Directives: These will be added directly later:
ca ca.crt
cert client.crt
key client.key
Comment Out TLS-Auth: The key will be added later:
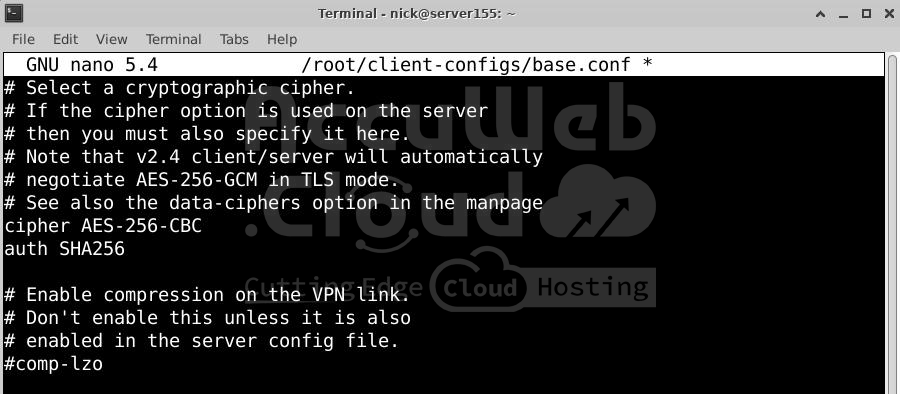
tls-auth ta.key 1Match Server Settings: Set the cipher and auth:
cipher AES-256-CBC
auth SHA256Add Key Direction: Set the key direction to 1 for proper VPN function:
key-direction 1Optional for Linux Clients: Uncomment these lines if needed for Linux clients:
script-security 2
up /etc/openvpn/update-resolv-conf
down /etc/openvpn/update-resolv-conf
Save and close the file.
Step 4: Create the Configuration Generation Script
Create a script to generate client configuration files automatically:
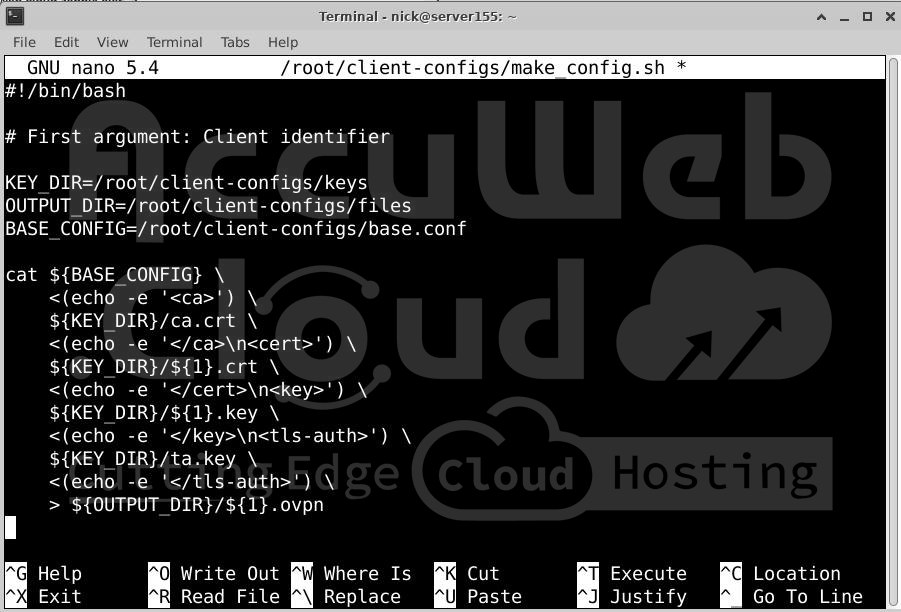
# nano ~/client-configs/make_config.shAdd the following content, replacing root with your server’s non-root username:
#!/bin/bash
# First argument: Client identifier
KEY_DIR=/root/client-configs/keys
OUTPUT_DIR=/root/client-configs/files
BASE_CONFIG=/root/client-configs/base.conf
cat ${BASE_CONFIG} \
    <(echo -e '<ca>') \
    ${KEY_DIR}/ca.crt \
    <(echo -e '</ca>\n<cert>') \
    ${KEY_DIR}/${1}.crt \
    <(echo -e '</cert>\n<key>') \
    ${KEY_DIR}/${1}.key \
    <(echo -e '</key>\n<tls-auth>') \
    ${KEY_DIR}/ta.key \
    <(echo -e '</tls-auth>') \
    > ${OUTPUT_DIR}/${1}.ovpn
Save and close the file.
Step 5: Make the Script Executable
Make the script executable:
# chmod 700 ~/client-configs/make_config.shStep 6: Use the Script for New Clients
– This script combines the base configuration file with the client’s certificate, key, and other required information into a single .ovpn file that can be used for client setup.
– Each time you add a new client, run this script after generating new certificates and keys for the client.
With this infrastructure, you can quickly create client configuration files with all the necessary credentials and settings in one easy-to-distribute file.
Generating Client Configurations
Follow these steps to generate and transfer your client configuration file:
Step 1: Create the Client Configuration File
If you followed the guide, you should have created client1.crt and client1.key in Step 3.
Navigate to the ~/client-configs directory and run the script:
# cd ~/client-configs# ./make_config.sh accuclient1This will generate a file named accuclient1.ovpn in the ~/client-configs/files directory.
Step 2: Locate the Configuration File
The file path for the generated configuration will be:
# ~/client-configs/files/accuclient1.ovpnStep 3: Transfer the Configuration File to Your Client Device
– Decide on the device where you want to use this configuration (e.g., your local computer or a mobile device).
Step 4: Choose a Transfer Method
Use a secure method such as SFTP or SCP to transfer the file. These methods ensure the file is sent over an encrypted connection.
Step 5: Transfer Using SFTP (Example Command)
On macOS or Linux, you can use this SFTP command to transfer the file to your home directory:
# sftp root@your_vpn_server_ip:client-configs/files/accuclient1.ovpn ~/Place the File on Your Device
After the transfer, ensure the client1.ovpn file is accessible on your device for use with the VPN client application.
Installing the Client Configuration
Follow these step-by-step instructions to install and connect your VPN on Windows, macOS, or Linux.
For Windows
Step 1: Download and Install OpenVPN
– Go to OpenVPN’s Downloads page and download the installer for your Windows version.
– Run the installer as an administrator to complete the installation.
Step 2: Copy the Configuration File
Place the client1.ovpn file in this directory:
C:\Program Files\OpenVPN\config
If access is denied, transfer the file to a user-accessible location first, then copy it to the above directory as an administrator.
Step 3: Set OpenVPN to Always Run as Administrator
– Right-click the OpenVPN shortcut and select Properties.
– Under the Compatibility tab, click Change settings for all users.
– Check Run this program as an administrator, then click Apply.
Step 4: Connect to the VPN
– Launch the OpenVPN GUI. Approve any permissions prompts.
– In the system tray, right-click the OpenVPN icon.
– Select client1 (or the name of your .ovpn file) and click Connect.
– A log window will show the connection status.
Step 5: Disconnect
– Right-click the OpenVPN icon in the system tray.
– Select client1 and click Disconnect.
For macOS
Step 1: Download and Install Tunnelblick
– Visit the Tunnelblick Downloads page and download the latest version.
– Open the .dmg file and follow the prompts to install.
Step 2: Add the Configuration File
– When prompted, choose I have configuration files.
– Open a Finder window and double-click the client1.ovpn file.
– Tunnelblick will install the profile (administrative privileges required).
Step 3: Connect to the VPN
– Launch Tunnelblick from the Applications folder.
– Click the Tunnelblick icon in the menu bar and select Connect client1.
Step 4: Disconnect
Use the Tunnelblick menu bar icon and select Disconnect client1.
For Linux
Step 1: Install OpenVPN
For Debian-based distributions:
# apt update# apt install openvpnFor CentOS-based distributions:
#yum install epel-release# yum install openvpnStep 2: Update the Configuration File (Optional)
– Check if the update-resolv-conf script exists:
# ls /etc/openvpnIf it exists, open the configuration file:
# nano accuclient1.ovpnUncomment the following lines:
script-security 2
up /etc/openvpn/update-resolv-conf
down /etc/openvpn/update-resolv-conf
For CentOS, change group nogroup to group nobody.
Step 3: Connect to the VPN
Run this command to start the VPN:
# openvpn --config client1.ovpn
Follow the steps for your operating system to set up and manage your VPN connection!
Testing Your VPN Connection (Optional)
Follow these steps to test if your VPN connection is working properly. This method applies only if you choose to route all traffic through the VPN in Step 4.
Step 1: Check Your Connection Without the VPN
Open a web browser.
Visit DNSLeakTest.
Note the following:
– The IP address shown (your internet service provider’s assigned IP).
– To check DNS settings, click Extended Test to see the DNS servers you are using.
Step 2: Connect to Your VPN
Launch your OpenVPN client and connect to your VPN server.
Ensure the connection is active.
Step 3: Recheck Your Connection
Refresh the browser while still connected to DNSLeakTest.
Observe the results:
– A new IP address (your VPN server’s IP) should now appear.
– Run the Extended Test again to confirm you are using the DNS resolvers pushed by the VPN.
– If your OpenVPN server is hosted on a platform like DigitalOcean, all internet traffic from your VPN clients will consume the server’s bandwidth.
– Be mindful of potential bandwidth overages, especially with many active clients.
By following these steps, you can confirm your VPN is working as expected and securely routing your traffic.
Revoking Client Certificates
Follow these steps to revoke a client certificate and prevent access to the OpenVPN server:
Step 1: Revoke the Client Certificate
Go to the Easy-RSA directory on your Certificate Authority (CA) machine:
# cd ~/easy-rsaRun the revoke command for the client you wish to revoke:
# ./easyrsa revoke client_nameConfirm the revocation by typing yes when prompted.
If your CA key has a passphrase, enter it when asked.
Step 2: Generate the Certificate Revocation List (CRL)
Run the following command to create a CRL:
# ./easyrsa gen-crlThis will create a file named crl.pem in the Easy-RSA directory.
Step 3: Transfer the CRL to the OpenVPN Server
Securely copy the crl.pem file to your OpenVPN server:
# scp ~/easy-rsa/pki/crl.pem root@your_server_ip:/tmpOn the OpenVPN server, move the file to the OpenVPN directory:
# cp /tmp/crl.pem /etc/openvpnStep 4: Update the OpenVPN Server Configuration
Open the server configuration file for editing:
# nano /etc/openvpn/server.confAdd the following line at the end of the file to enable CRL checks:
crl-verify crl.pemSave and close the file.
Step 5: Restart the OpenVPN Service
Apply the changes by restarting the OpenVPN service:
# systemctl restart openvpn@serverStep 6: Verify Revocation
The client using the revoked certificate will no longer be able to connect to the VPN.
Step 7: Revoke Additional Certificates
For each additional client:
Revoke the certificate:
# ./easyrsa revoke client_nameGenerate a new CRL:
# ./easyrsa gen-crlTransfer and replace the crl.pem file on the OpenVPN server.
Restart the OpenVPN service:
# systemctl restart openvpn@server
This process ensures that revoked certificates are no longer valid, maintaining the security of your VPN environment.
Conclusion
Your remote team can now securely access your internal resources as if they were on a private network.
With your new VPN, consider moving resources currently exposed to the internet—such as those protected by weaker methods (e.g., HTTP basic authentication)—to your private network behind the VPN. This setup enhances the security of your critical data and infrastructure.
A web proxy is another tool similar to a VPN. It acts as a middleman between users and the websites they access, providing anonymity. However, unlike a VPN, a web proxy is only for web traffic and does not offer encryption. It could still be useful for your team in situations where a VPN is not needed.


