How to set up OpenVPN with AccuWeb.Cloud?
Protecting your online privacy and security has never been more important. With the rise of cyber threats, individuals and businesses are increasingly seeking ways to safeguard their internet traffic. One of the most reliable methods for achieving this is by using a Virtual Private Network (VPN), which creates a secure and encrypted connection.
In contrast, OpenVPN is provided by AccuWeb.Cloud offers a dedicated VPN server in a private cloud environment, providing much stronger security and greater control over your connection. In this guide, we’ll explore what OpenVPN is, and the benefits of using it through AccuWeb.Cloud, and provide a step-by-step guide on how to connect to OpenVPN from a Windows machine.

Benefits of AccuWeb.Cloud’s OpenVPN
- Dedicated VPN Server: Unlike commercial VPN services that use shared infrastructure, AccuWeb.Cloud provides a private OpenVPN server within your cloud environment, offering complete control and higher security.
- Strong Encryption: OpenVPN uses robust encryption algorithms and ensures that your internet traffic is secure and protected from potential cyberattacks.
- Customizable Access Modes: AccuWeb.Cloud offers the flexibility to choose between different VPN modes to meet your needs, whether for secure internet access or remote access to private resources.
- Secure Business Data Transmission: You can safely transmit sensitive business data over the VPN preventing unauthorized access or breaches.
This VPN solution is especially useful for companies or individuals who require secure access to their network resources from remote locations and or who need to ensure the safety of their online activities while using potentially compromised networks such as public Wi-Fi.
Steps to install and configure the OpenVPN Server software on AccuWeb.Cloud
Step 1: Login into the AccuWeb.Cloud Dashboard. Once logged in navigate to the Marketplace.
 Step 2: In the Marketplace, go to the Dev & Admin Tools section and locate OpenVPN Access Server. This tool allows you to set up a VPN server easily with integrated administrative controls.
Step 3. Click on the Install button under the OpenVPN Access Server window.
 Step 4: After selecting OpenVPN Access Server from the Marketplace, an installation window will open. Customize the settings as follows:
Select Access Type: OpenVPN Access Server provides two primary access options:
Secure Internet Access:
- Protects internet connections by routing traffic through the VPN server.
- Shields users from threats on public Wi-Fi hotspots and untrusted networks.
- Enforces company internet usage policies by securing all traffic.
- Routes DNS queries through Google Public DNS, which limits use to general internet browsing.
Secure Remote Access:
- Provides secure access to corporate networks and public cloud environments.
- Adds an extra security layer for remote desktop protocols and screen-sharing services.
- Uses the platform’s internal DNS servers, which link cloud environment hostnames with their private IP addresses. This setup allows seamless access within the same cloud region as though the connection originates internally.
- For VPN servers in isolated environment groups, VPN clients are restricted to access only within that specific group.
Enable Let’s Encrypt SSL (Optional but recommended): Select the option to Install Let’s Encrypt Free SSL with Auto-Renewal for the OpenVPN Admin Web Server. This installs a Let’s Encrypt SSL certificate on the VPS server and secures the web admin interface of OpenVPN.
Note that this SSL certificate applies to the environment’s default domain generated by the platform. If you prefer using a custom domain, you can update it after installation.
Set Environment Name and Region: Update the Environment Name and select the Destination Region if required, based on your preferences and the organization’s deployment setup.
Step 5: Once all customizations are complete, click Install to begin setting up the OpenVPN Access Server.
 Step 6: Once the installation is completed a success message will appear.
 Step 7: Follow the Client-UI URL link provided in the installation success window. This link directs you to the OpenVPN Admin Web Server interface, where you can manage server settings and user access.
From the Admin Web Server interface, you can generate connection profiles for clients or adjust the OpenVPN Access Server parameters to suit your requirements.
By following these steps, you have successfully installed and configured the OpenVPN Access Server on AccuWeb.Cloud. This setup will now allow secure access to internal resources or protected internet browsing for users connected through this VPN.
Steps to Install OpenVPN Connect on Windows
To set up OpenVPN Connect on your Windows PC, follow the instructions below. This process will allow you to securely connect to an OpenVPN server or any VPN service that supports the OpenVPN protocol.
Step 1: Visit the OpenVPN Website and go to the [OpenVPN Connect download page](https://openvpn.net/client/ connect vpn for windows/).
Step 2. Locate the latest version of OpenVPN Connect for Windows on the download page. Make sure it’s compatible with your version of Windows (e.g. Windows 10 or 11).
Step 3. Click the download OpenVPN Connect for Windows link to save the installer file (a ‘.exe’ file) to your computer. It may take a few moments, depending on your internet speed.
 Step 4: Navigate to the location where you downloaded the file. Double-click the ‘.exe‘ file to launch the installer.
 Step 5: When the User Account Control (UAC) prompt appears it will ask if you want to allow the program to make changes to your system. Click Yes to proceed.
Step 6: The installation wizard will guide you through this process. Read through the terms and conditions and then select Agree to continue.
 The installer will prompt you to choose a location for installation. The default path is recommended unless you have a specific requirement. When all steps are completed, click Finish to close the installer.
 Step 7: Open the Start menu type “OpenVPN Connect” and click on the application to launch it.
Step 8: On the first launch, OpenVPN Connect will display a data usage policy. Review the policy and then click Agree to accept and continue.
 Step 9: To establish a VPN connection, you must import or create a VPN profile. OpenVPN Connect allows you to import profiles using two methods:
- Login with Username and password:
Step 1. Open the OpenVPN Connect app and enter the provided **Connection URL**.
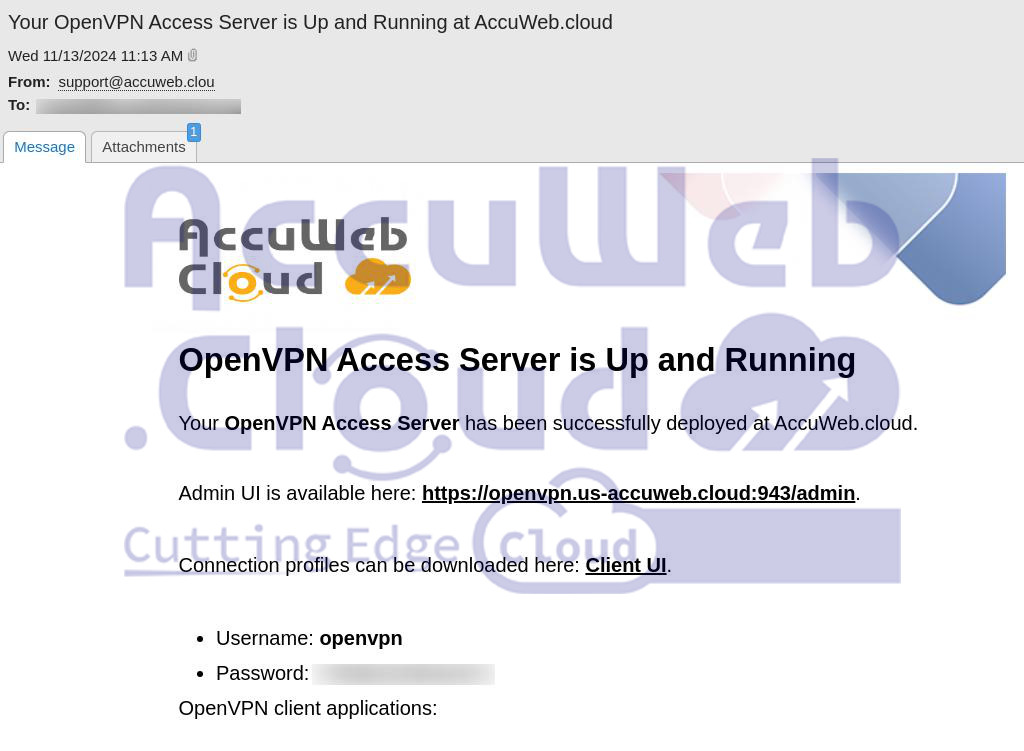
You can find the connection URL, username, and password in the confirmation email titled “Your OpenVPN Access Server is Up and Running at AccuWeb.cloud” or from the installation window.
 Step 2. After entering the URL, click Next.
 Step 3. Enter your Username and Password on the login screen.
Step 4. Customize settings as needed, including options like profile name, port, auto-login profile import, and Connect after import.
Step 5. When all information is filled out, click Import to complete the setup.
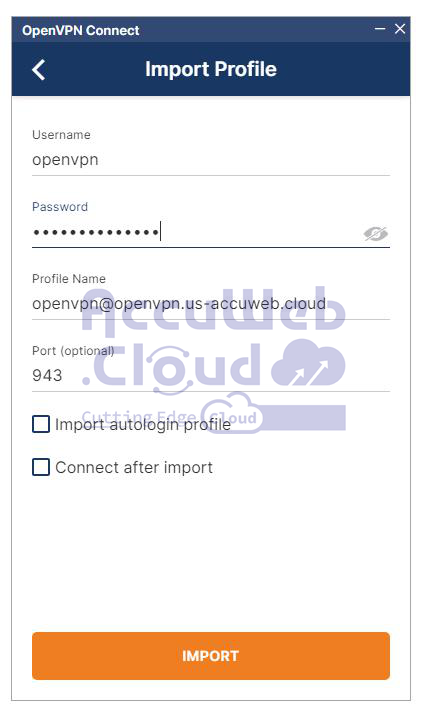 Once imported, you can connect to OpenVPN using this profile.
 - Import from a file:
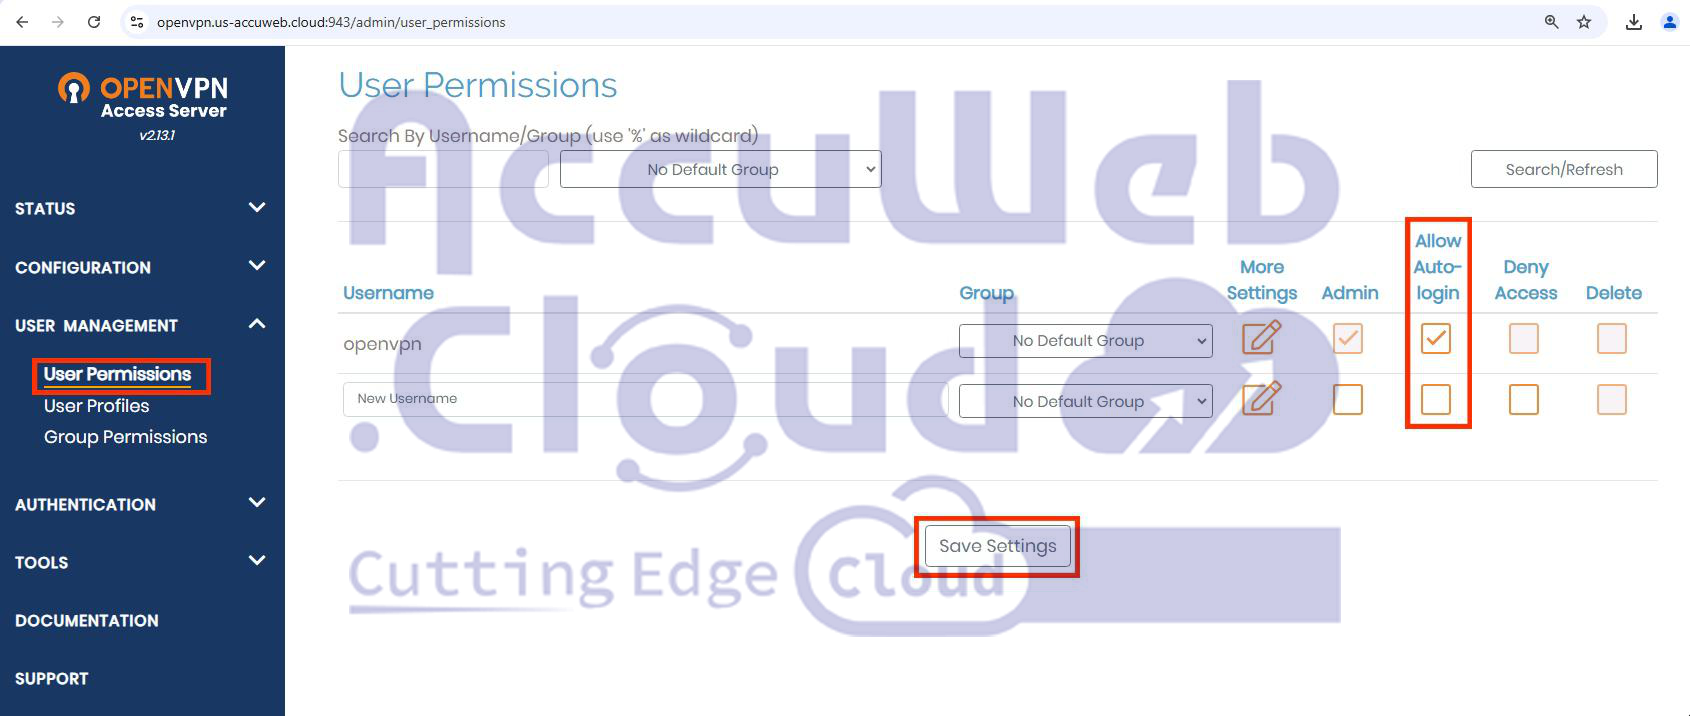
Step 1: Enable Auto-Login Profile for the User- Log in to the OpenVPN Admin Web UI using the credentials provided by the administrator or found in the installation summary.
- Navigate to User Permissions > User Management.
- Locate the user in the list and enable Allow Auto-login for their account.
- Save the settings, then click Update Running Server to apply the changes.
 Step 2: Download and Import the Auto-Login Profile
- Have the user log in to the Client Web UI.
- In Available Connection Profiles, select the Auto-login profile to download it to their device.

- After the download, Navigate to the Upload File section and select the downloaded file.
- OpenVPN Connect will open to the Import Profile screen. Click Browse to complete the setup.

Once imported, the user can connect to OpenVPN using the auto-login profile.
Step 10: After importing, the profile will be listed in the OpenVPN Connect app. Select the profile and click Connect to establish a VPN connection.
 OpenVPN Connect may prompt you to allow changes to network settings. Click Yes to authorize these changes and proceed with the connection. Once connected OpenVPN Connect will indicate an active VPN connection. You should see a confirmation of a successful connection within the app interface.
 To disconnect and return to the OpenVPN Connect app, select the active profile and click Disconnect(Green Toggle button).
By following these steps, you have successfully installed and set up OpenVPN Connect on your Windows computer, enabling secure access to a VPN server using the OpenVPN protocol.
Verifying the VPN Tunnel
After establishing the VPN connection, proceed with verification to ensure everything is functioning as expected.
If you select Secure Internet Access, you can confirm that the VPN connection is active by checking your public IP address. Visit https://whatismyipaddress.com your displayed IP address should match your VPN’s IP, indicating that your internet traffic is securely routed through the VPN.
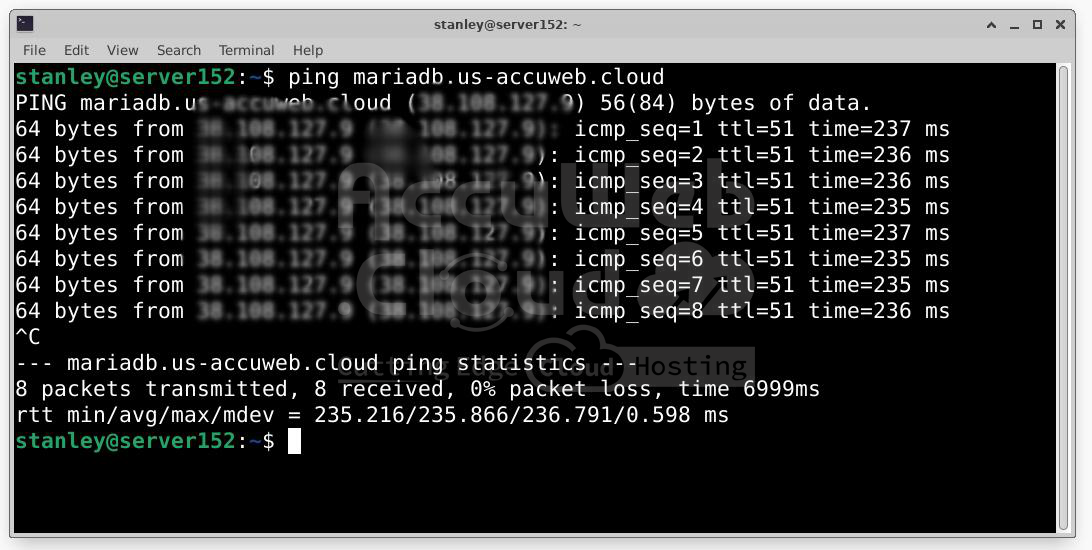
 For Secure Remote Access, verify access to resources within the cloud LAN. Use the environment hostnames to connect to hosts by their private IP addresses. To test this, try pinging specific nodes from your local computer.
Steps to Change VPN Access Mode on OpenVPN Server
If you need to change the VPN Access Mode after installation, you can do so easily from the server’s settings. OpenVPN provides two modes: Secure Internet Access and Secure Remote Access. Follow these steps to adjust the mode according to your needs, and if necessary, reset the default user password.
Step 1. Log in to your server management interface(Accuweb.Cloud Dashboard) when OpenVPN is installed. Navigate to the Add Ons tab. This section contains options to manage additional settings and configurations for the OpenVPN server.
Step 2. Locate the Configuration button for the VPN Access Mode within the Add-Ons tab. Click on the Configuration button to open the settings menu where you can make changes to the Access Mode.
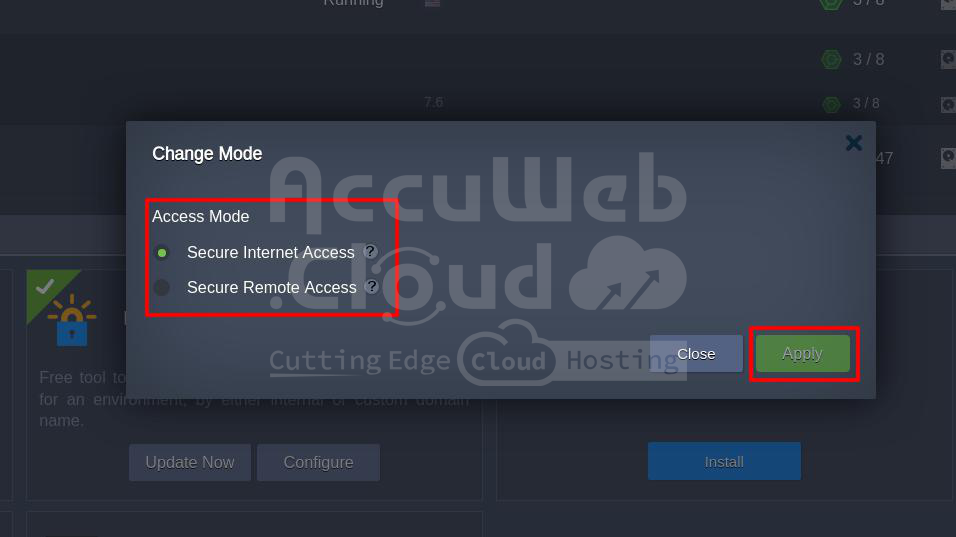
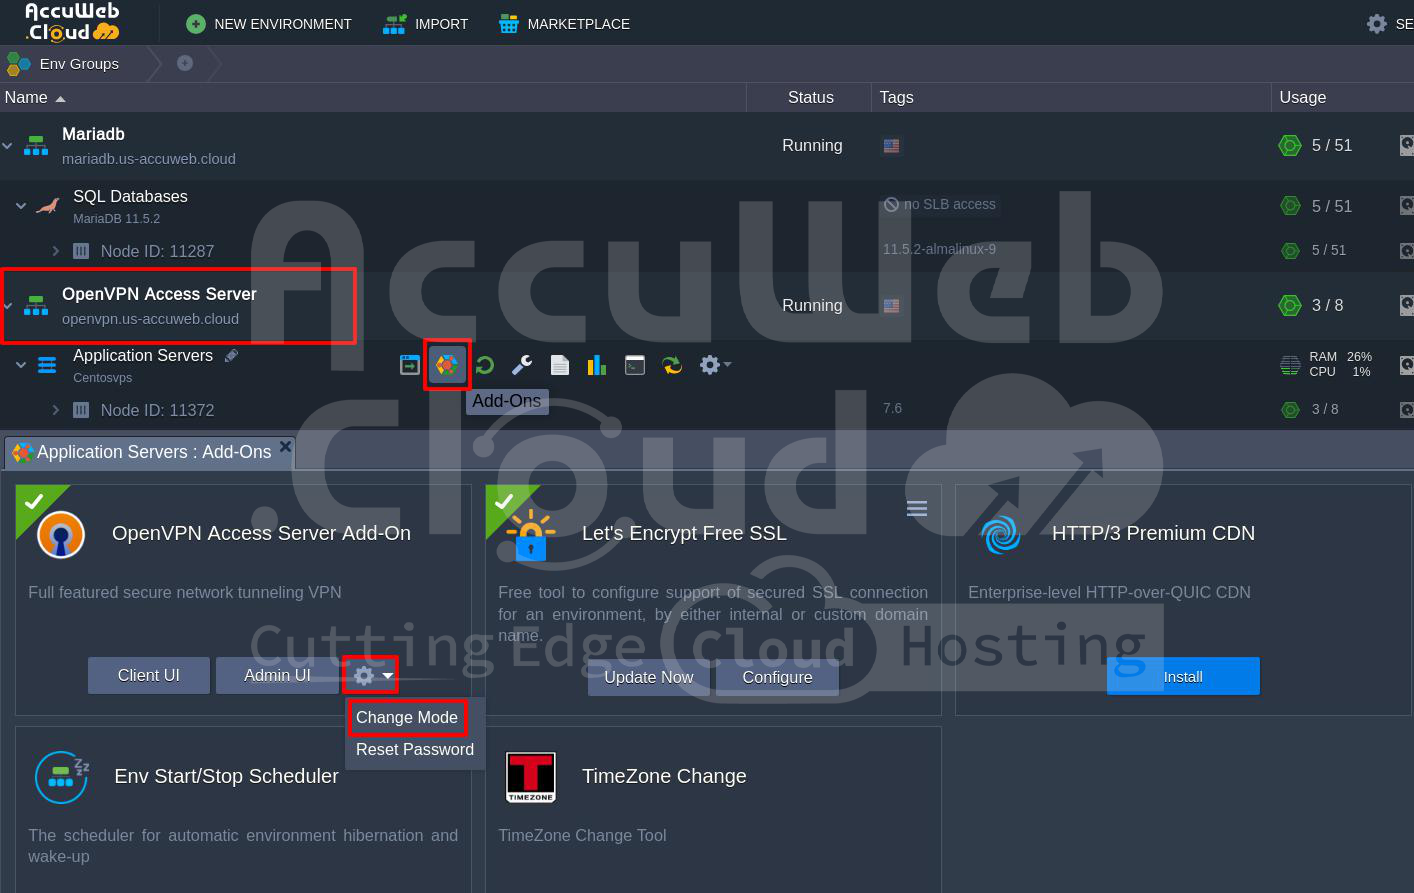 Step 3. In the Configuration settings, you will see options to change the mode to switch between Secure Internet Access and Secure Remote Access:
- Secure Internet Access: This mode routes all internet traffic through the VPN and provides secure browsing on public or untrusted networks.
- Secure Remote Access: This mode is designed for secure access to private corporate resources or internal cloud networks.
Step 4. Select the mode that best fits your requirements and confirm the change. The VPN server will adjust its configuration to reflect the new mode.
 Step 5. If you need to reset the password for the default ‘openvpn’ user account, you can do so here as well. Simply select the option to Reset Password and follow the prompts to set a new password for the ‘openvpn‘ account and ensure secure access to the VPN.
 By following these steps, you can successfully change the VPN Access Mode and update the default user credentials if necessary.
Conclusion
Connecting to OpenVPN from Windows using AccuWeb.Cloud is a straightforward process that ensures secure and reliable access to your internal resources or the internet. By following the installation and configuration steps, including importing the VPN profile, and choosing the appropriate access mode (Secure Internet Access or Secure Remote Access), you can quickly establish a protected connection. Whether you’re browsing securely on public networks or accessing cloud-based services, OpenVPN provides the necessary security and flexibility for your Windows machine.


