Redeploy Docker Container
Most Docker-based solutions (including platform-managed stacks) keep getting updates with new versions and fixes. It’s a good idea to keep your templates up to date with the latest releases.
- When you update, your custom data and important system files are kept safe.
- Your files are stored in volumes, both default and custom ones.
- Files listed in /etc/jelastic/redeploy.conf (these are special settings needed for the containers to work)
- Configurations related to AutoFS and NFS (/etc/autofs.jelastic, /etc/auto.master, /etc/exports)
- Firewall settings (/etc/sysconfig/iptables-custom, /etc/sysconfig/iptables4-jelastic, /etc/sysconfig/iptables6-jelastic, /etc/iptables/rules.v4)
- Access info for SSH (/root/.ssh/authorized_keys, /root/.ssh/authorized_keys2, /root/.ssh/id_rsa)
- Your custom settings, like commands and links, won’t change.
- If you’re using multiple instances, you can update them one by one without any downtime.
This means you can update your Docker container to a new version without affecting your application. Using the platform, you can redeploy containers with just a few clicks on the dashboard or automate it with the API.
Update Container via Dashboard
The easiest way to update a template tag is by using the platform dashboard.
The steps below will guide you through what you need to do.
Step 1. You can access the redeployment options in two ways:
Click the “Redeploy Container(s)” button next to the node or layer you want to update.
Click the pencil icon next to the layer tag version in the topology wizard if you’re changing the environment’s structure.
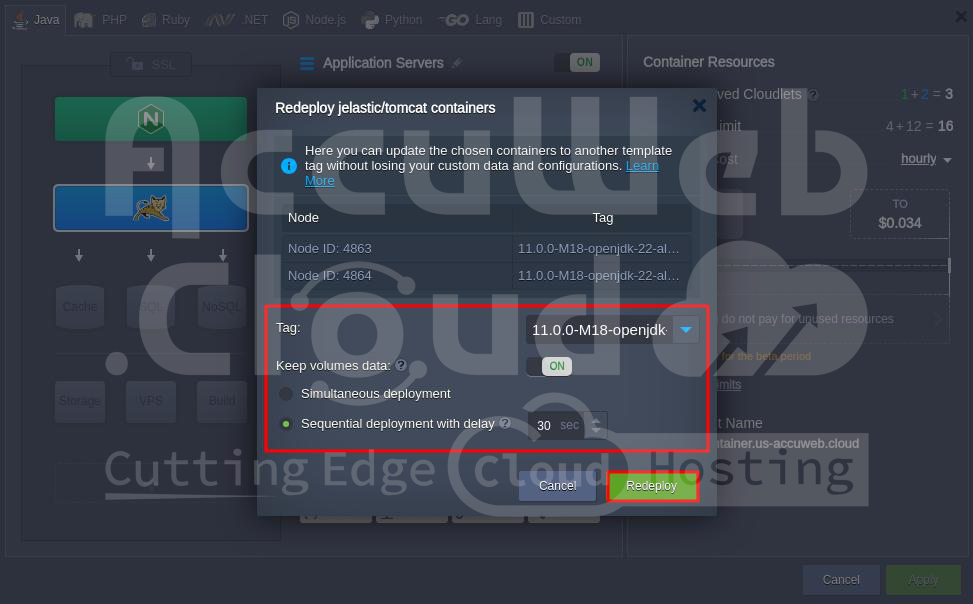
Step 2. This opens the redeployment window, where you can choose a new tag for your container(s).
You also have some extra choices:
- You can choose to keep your volume data safe. If you turn this on, your data won’t be erased when you redeploy.
- If you have containers that are scaled horizontally, you can pick how they get updated:
- Simultaneous deployment updates all nodes together, which is faster but might briefly stop your application.
- Sequential deployment with delay updates one node at a time, with a pause between each.
This ensures that there’s always a node running to handle requests so that your application keeps running smoothly.
Once you’ve set everything up, click “Redeploy” and confirm in the pop-up box.
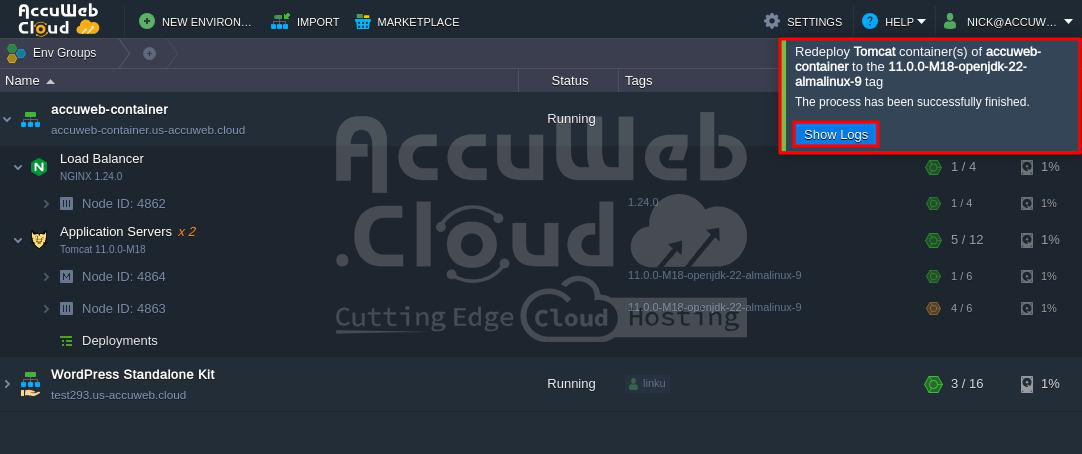
Step 3. When the update finishes, you’ll see a notification in the top right of the dashboard.
You can click “Show Logs” to see details about the updated container, like its ID, name, tag, and how long it took to update.
That’s it! Now you know how to update a container using the platform dashboard.
Update Container via Platform API/CS/CLI
The update can be made automatic using platform API, Cloud Scripting, and CLI (command-line interface).
To update containers, you use the environment.Control.RedeployContainers method. It needs the following information:
- envName: The name of the environment where you want to update containers.
- session: Your user session or token for authentication.
- nodeGroup: The identifier for the layer in the environment you want to update (if needed).
- nodeId: The ID number of the specific container you want to update (if needed).
- tag: The version of the image you want to use for the update.
- useExistingVolumes: Set it to true if you want to keep data in the mounted volumes when updating (optional).
- login and password: Your credentials to access an image from a private registry (optional).
You must provide either nodeGroup or nodeId to define the target of the operation. The method will use nodeGroup if both are provided, but it will fail if neither is specified.
You can use the following formats in your automation scripts to define the update:
1. To update a whole layer of containers:
api: environment.control.RedeployContainers
nodeGroup: {nodeGroup}
tag: {myImage}:{newTag}
Here:
{nodeGroup}: The layer (or node group) where all containers should be updated.
{myImage}: The name of the image to use.
{newTag}: The version of the image.
2. To update a specific container:
api: environment.control.RedeployContainers
nodeId: {nodeId}
tag: {myImage}:{newTag}
Here, replace {nodeId} with the ID number of the container you want to update. The other placeholders are the same as in the previous example.
https://app.cp-accuweb.cloud/1.0/environment/control/rest/redeploycontainers?envName=accuweb-container&session=caf1288acfd3444e8d41a41e5ef5b923ca46ee79&tag=11.0.0-M18-openjdk-22-almalinux-9&nodeGroup=Application Servers&nodeId=4863&useExistingVolumes=true

Api: https://app.cp-accuweb.cloud/1.0/environment/control/rest/redeploycontainers?envName=accuweb-container
Session: caf1288acfd3444e8d41a41e5ef5b923ca46ee79
Tag: 11.0.0-M18-openjdk-22-almalinux-9
nodeGroup: Application Server
Nodeid: 4863
useExistingVolumes: trueOnce you execute the script from the application, the container will be redeployed, and you can see it on the AccuWeb Cloud dashboard.
Keeping Your Own Data Safe When You Redeploy Your Container
Every container managed by the platform has a special file called redeploy.conf in the /etc/jelastic/ folder. This file holds important settings for your container. When you update your container, the platform makes sure these settings stay safe. You can find and manage this file easily using the built-in file manager.
The redeploy.conf file has two parts: system and custom. You can use it to back up important system files.
System Files and Folders
Here, you’ll find configurations that your container needs to update correctly. Some common files are the same on all setups:
- /etc/jelastic/redeploy.conf: This file tracks what needs to be saved when you update your container.
- ${home}/.bash_profile: It holds settings for the command line, like messages and configurations.
- /etc/sysconfig/iptables: This file has default rules for the firewall.
- /etc/sysconfig/iptables-custom: Here, you can put your own firewall rules.
- /var/lib/jelastic/keys: This is where your SSH keys are stored for accessing the container and other containers.
Each type of container might have different stack-specific files listed in its own redeploy.conf.
Custom Files and Folders
Remember: Only include system setup files necessary for your container to work properly during updates. For other files, like your application’s data, use container volumes.
If you need to, you can add your own files and folders to the list of system configurations. Just open the redeploy.conf file and add the full path of each item you want to include, with each entry on its line.
Backing Up Configuration Files When Redeploy Container Images
The platform makes it easy to create backups of important files when you update your container. When you replace a config file with a new version, the platform automatically saves a copy of the old file.
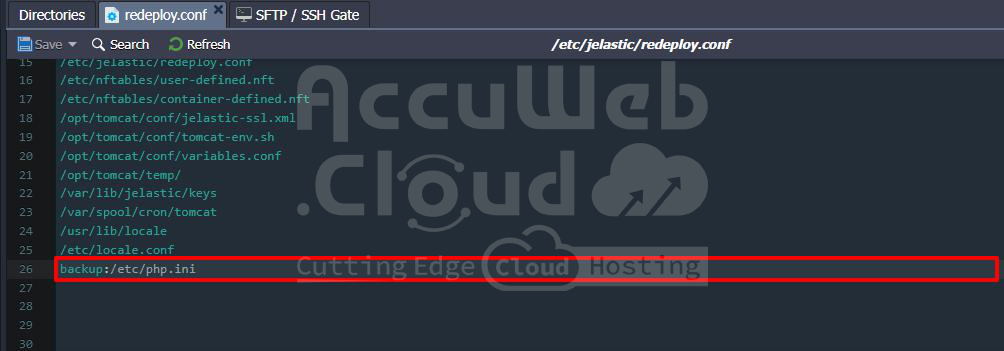
To create a backup, just specify the file’s path in the redeploy.conf file and add “backup:” before it.
backup: {path_to_file}
Remember: This only works for files, not folders.
After updating your container, you’ll see both the new and old versions of the file. The old version will have either a “backup” or a timestamp added to its name. You can use these backups to quickly go back to previous settings if needed.
For example, all PHP application servers on the platform automatically back up the /etc/php.ini file.
After updating the container, you’ll find two versions of files like php.ini:
- {file_name}: This is the new version of the updated image.
- {file_name}.{time_stamp}: This is the backup made just before the update. Each time you update to a new version, a new backup with a different timestamp is created.
- {file_name}.backup: This is the most recent backup, replacing any previous backups with the same name.
With this feature, you can easily switch back to the previous settings by using the backup file. Now you know how to manage different versions of container templates (Docker tags) on the platform.


