How to Install Concrete CMS on AccuWeb.Cloud?
Concrete CMS is a free and open-source content management system (CMS) designed for ease of use, making it accessible even for beginners with minimal technical skills. With Concrete CMS, you can edit your site’s content directly on the page, without needing to navigate through an administrative interface or use web editors.
This CMS is particularly well-suited for promotional, educational, news, and intranet sites. Deploying Concrete CMS on your platform is straightforward – just follow the steps below.
Create Environment
Step 1. Access the platform dashboard and select the “New Environment” button located at the top left corner.
Step 2. In the topology wizard that opens, navigate to the PHP tab. Choose an Apache application server that supports the PHP version required by Concrete CMS (e.g., PHP 7.4.20) along with a MySQL database.
Specify your required cloudlet limits and any other parameters. Name your environment (e.g., “concrete-cms”) and proceed by clicking the Create button.
Afterwards, your environment, consisting of Apache and MySQL servers, will be provisioned within a few minutes and will appear in the list of environments.
Upload Application
Step 1. Visit the official Concrete CMS website to download the latest version of the CMS or to copy its download link.
Step 2. Return to the platform dashboard and upload the CMS archive to the Deployment Manager, either by selecting a local file or using a URL.
Step 3. Next, hover over the uploaded archive, then click on “Deploy to” Select your target environment and optionally enter a context name, or leave it blank, to continue.
Now you have got that your application is deployed.
Configure Database
Step 1. Click the “Open in Browser” button for the MySQL node within your environment.
Step 2. Upon environment creation, the platform sent you an email containing database credentials. Use the provided username and password to access the phpMyAdmin panel.
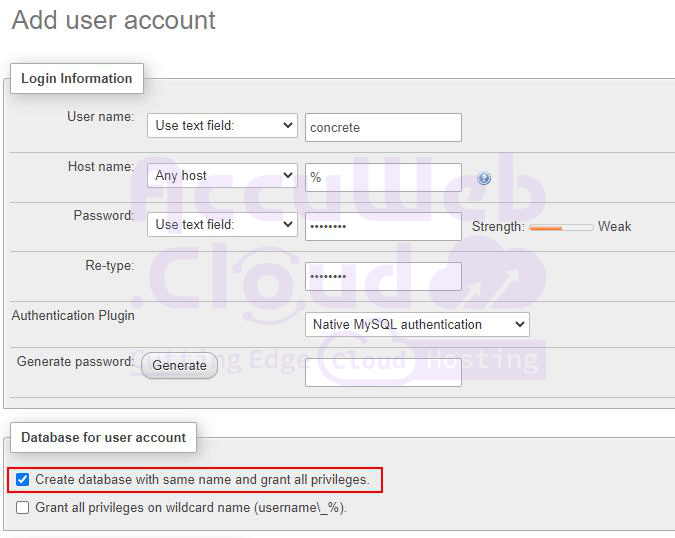
Step 3. Navigate to the User Accounts tab and click on the link labeled “Add user account.”
In the interface that appears, specify your desired username and password. Ensure to check the option to create a database with the same name and grant all privileges.
Click the GO button which is given at bottom.
Install Concrete CMS
Step 1. Return to the platform dashboard and click the “Config” button.
Step 2. Find the /etc/php.ini file and make the following adjustments:
Remove the semicolon to uncomment the line extension=gd.so to enable the GD extension.
Add the property mbstring.http_input = pass to the mbstring module configuration.
Step 3. Save your modifications and restart the Apache node to apply the changes.
Step 4. Click on the “Open in Browser” icon for the Apache application server within your environment.
Step 5. Begin the Concrete CMS installation by selecting your preferred language and verifying system requirements. Then, complete the following fields:
- Site Name: Enter the desired name for your site.
- Administrator Email Address: Input the email address of the administrator user.
- Administrator Password: Specify and confirm the password for the administrator user.
- Server: Paste the database link without “https://” (copy it from the phpMyAdmin address bar or from the MySQL node email).
- MySQL Username: Enter the database username created during the database configuration.
- MySQL Password: Type the password specified for the database user.
- Database Name: Provide the name of the database (should match the database username).
Check the checkbox to agree to the privacy policy before proceeding with the installation.
Step 6. Please wait while the installation process completes successfully.
Click on the “Edit Your Site” button.
Step 7. Congratulations! You are now ready to begin managing your website using Concrete CMS within your platform.


