How to Install WordPress Standalone Website?
Today, we will discuss an easy way to set up a basic WordPress Standalone website from the AccuWeb.Cloud. This setup is cheaper and works well for small and medium-sized projects. Plus, some helpful tools are included that you can turn on easily for better security and speed.
The WordPress Standalone package is a simple and efficient way to run WordPress. It uses either LLSMP (Linux + LiteSpeed + MariaDB + PHP) or LEMP (Linux + NGINX + MariaDB + PHP) templates and has extra features. Now, let’s go through the steps to install a compact and efficient solution all in one container.
Step 1. Log into the AccuWeb.Cloud account.
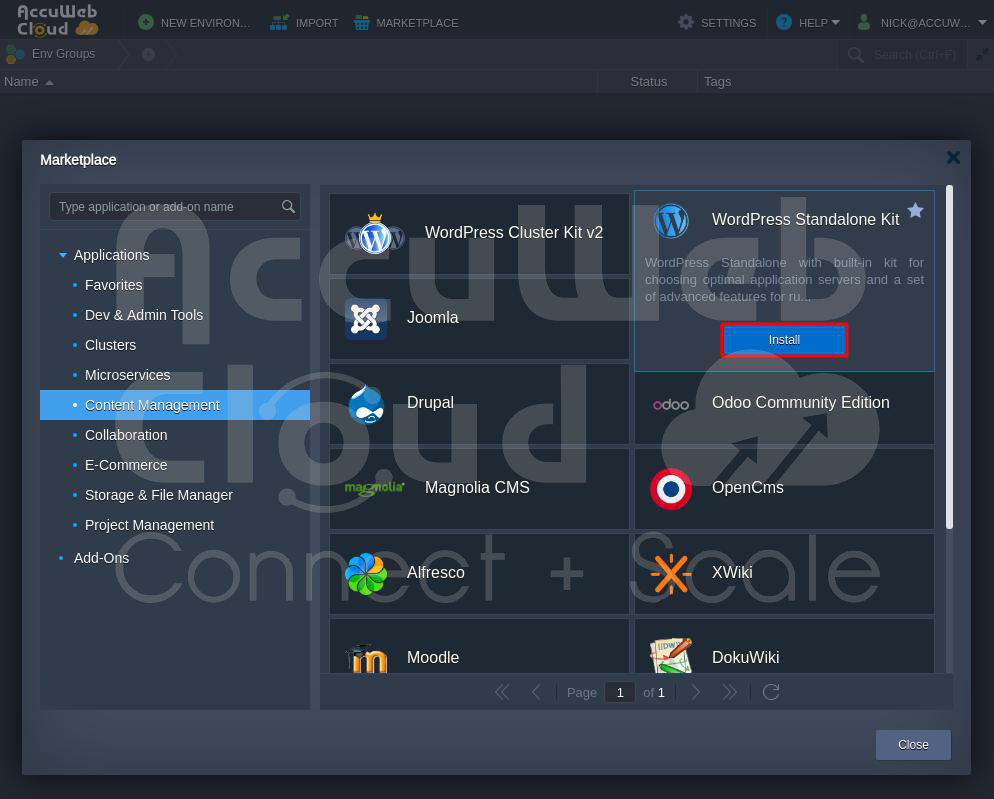
Step 2. Click on the MarketPlace on the screen’s upper side.
Step 3. Go to the Application in the Marketplace window and click on Content Management. After that, go to the WordPress Standalone Kit option.
Step 4. Click on the Install button to install WordPress Standalone.
Step 5. In the opened installation window, you can customize your WordPress Standalone with the advanced features. You can select the PHP version as per your requirements.
Advanced Features Description:
- LiteSpeed High-Performance Web Server makes websites super fast using LiteSpeed Web Server and modern technology. If you don’t choose this, it will use a different system called LEMP instead of LiteSpeed.
- The Web Application Firewall (WAF) can turn on or off security rules from Comodo, but it only works with LiteSpeed Web Server.
Important Note: Using LiteSpeed Web Admin Console to set up WAF is not a good idea because it can cause problems when you expand your website. If you need to change WAF settings later, use a special setting called WAF=TRUE/FALSE.
After you change the setting, remember to restart LLSMP.
The Lightning-Fast Premium CDN with 145+ locations makes your WordPress site faster by adding Verizon Edgecast CDN.
- Let’s Encrypt SSL with Auto-Renewal lets you get a trusted, free certificate for your domain. It automatically renews the certificate to avoid problems, and you’ll get email notifications. If you don’t choose this, your site will have a built-in SSL, but it will only work for your main domain.
- WordPress Multisite Network lets you run multiple sites on one WordPress installation. It means you can have many sites with just one WordPress setup, similar to the regular setup with the same files and code.
Step 6. In the Environment field, you can enter the name you want to use to browse the WordPress site. Here, we have entered accuwebtraining as an example. In the Display name, enter the name you wish to display in the AccuWeb.Cloud environment.
Step 7. After that, click on the Install button to start the installation process of WordPress Standalone.
Step 8. Wait a few minutes for the installation to finish.
Step 9. You’ll see a confirmation message once it’s done. Save the login details on the screen, and check your email for the login information.
Step 10. Click on the Open in Browser button to open the WordPress site in the browser.
Step 11. You can see that the WordPress site is opened successfully.
Conclusion
You’ve now set up a production-ready WordPress Standalone with high availability and protection against web application security threats. Thanks to advanced LiteSpeed application servers, a load balancer with speedy HTTP/3 support, dependable MariaDB Galera, an integrated CDN, and Let’s Encrypt SSL for security, it’s super fast.


