How to Create a Basic REST API with Flask in Python?
Build your first REST API in Python using Flask, straight from your browser, on a blazing-fast VPS with AccuWeb.Cloud.
Why This Guide Matters
If you’re searching for:
- How to create a REST API in Python for beginners
- Flask REST API tutorial step-by-step
- Host a Flask API on a cloud server
- Best way to deploy Python API on VPS
- or even REST API Python tutorial with terminal commands then this is the blog you’ve been looking for!
And if you’re using AccuWeb.Cloud, this guide makes it 10x easier – we’ll walk you through the process using your cloud dashboard, with zero confusion.
Step 1: Log in to Your AccuWeb.Cloud Dashboard
You can log in to your dashboard using the credentials that have been sent to you in your registered email.
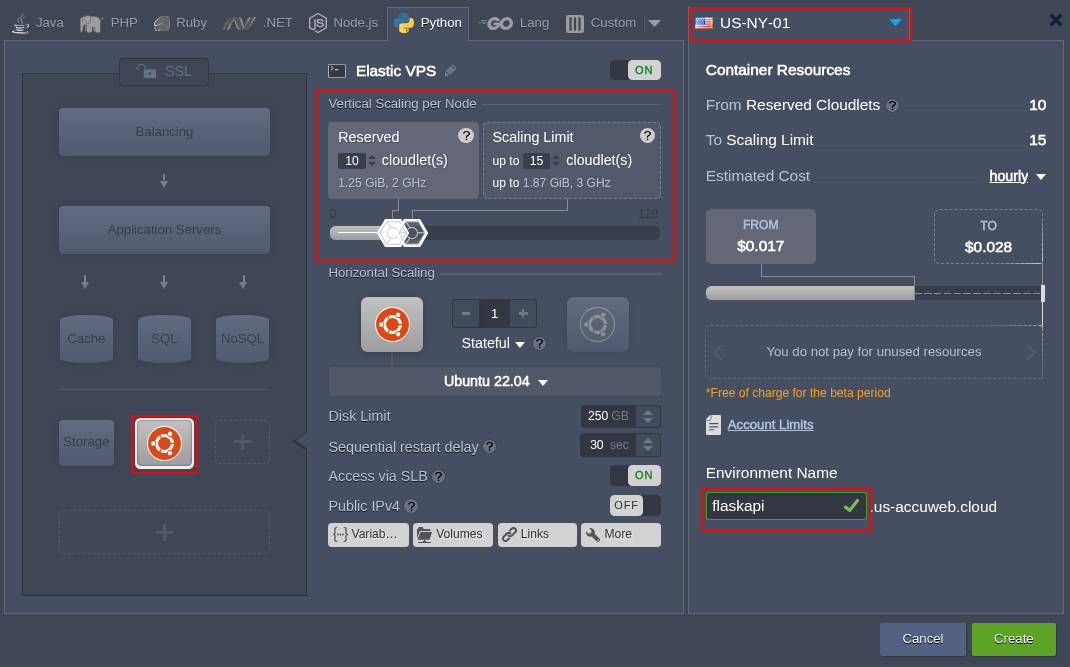
Step 2: Deploy a New VPS (Ubuntu)
1. On the dashboard, go to New Environment.
2. Choose:
- Ubuntu 22.04 LTS (lightweight and stable)
- Minimum specs: 1 vCPU, 1GB RAM for testing
- The region closest to your target audience
3. You can name your server: flaskapi
4. Click Create
Step 3: Connect to Your Server via Web SSH
Once your server is live:
- In AccuWeb.Cloud dashboard, go to your newly created environment named flaskapi
- Click on the Web SSH widget
- You’ll now see a command-line interface
Step 4: Update Your Server
Before anything else, run:
sudo apt updatesudo apt upgrade -yThis ensures your packages are up to date.
Step 5: Install Python3, pip, and virtualenv
sudo apt install python3 python3-pip python3-venv -yThese tools are essential to build and run Flask apps.
If you get error while installing the python
follow this steps
🔹 Step 1: Test Network Connection
Run:
ping -c 4 google.com- If it says unknown host, DNS is not working.
- You may have no internet access if it hangs or gives Destination Host Unreachable.
🔹 Step 2: Create a Custom DNS Configuration
Run this command:
sudo mkdir -p /etc/systemd/resolved.conf.dThen create a new DNS file:
sudo nano /etc/systemd/resolved.conf.d/dns_servers.confPaste the following into it:
[Resolve]
DNS=8.8.8.8 1.1.1.1
FallbackDNS=8.8.4.4These are Google’s and Cloudflare’s DNS servers.
🔹 Step 3: Restart the DNS Service
Now reload systemd and restart the resolver:
sudo systemctl daemon-reexecsudo systemctl restart systemd-resolved🔹 Step 4: Point /etc/resolv.conf to systemd-resolved
Let’s make sure /etc/resolv.conf is correctly linked.
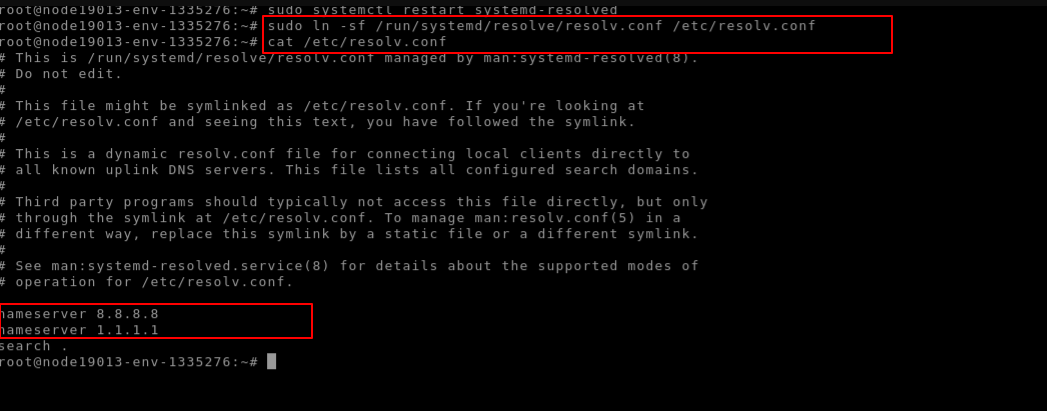
Run:
sudo ln -sf /run/systemd/resolve/resolv.conf /etc/resolv.confThen check the contents:
cat /etc/resolv.confYou should see something like:
nameserver 8.8.8.8nameserver 1.1.1.1
🔹 Step 5: Test DNS Resolution Again
Now try:
ping -c 4 google.comIf you see replies, you’re good to go!
🔹 Step 6: Proceed to Install Python & Flask
Once ping works, proceed:
sudo apt updatesudo apt install python3 python3-pip python3-venv -y🔹 Step 7: Create a Project Directory and Virtual Environment
mkdir cafe_app
cd cafe_app
python3 -m venv venv
source venv/bin/activateYou’ve now activated an isolated Python environment. You’re ready to build!
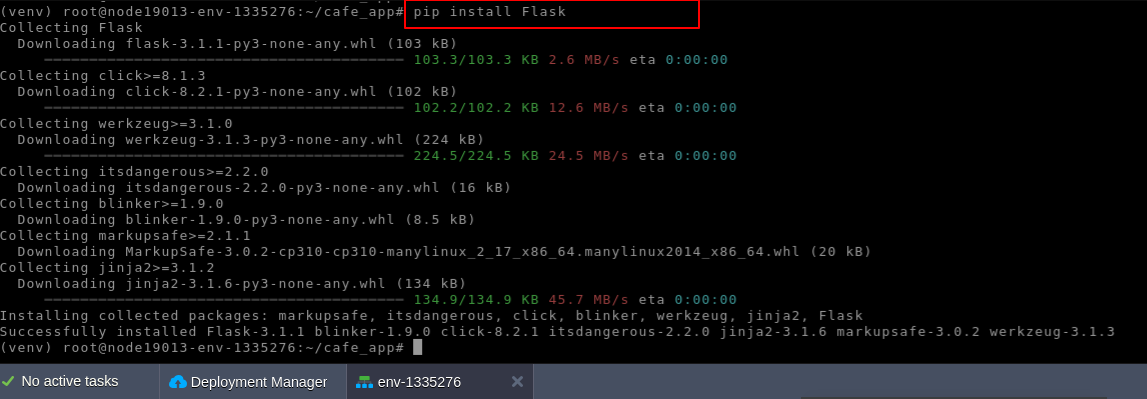
🔹 Step 8: Install Flask
Run:
pip install Flask🔹 Step 9: Create Your First Flask API
Steps:
1. Create the folder structure as shown.
2. Place files in their appropriate locations.
cafe_app/
├── app.py
├── templates/
│ ├── index.html
│ ├── add.html
│ └── edit.html
├── static/
│ └── style.css
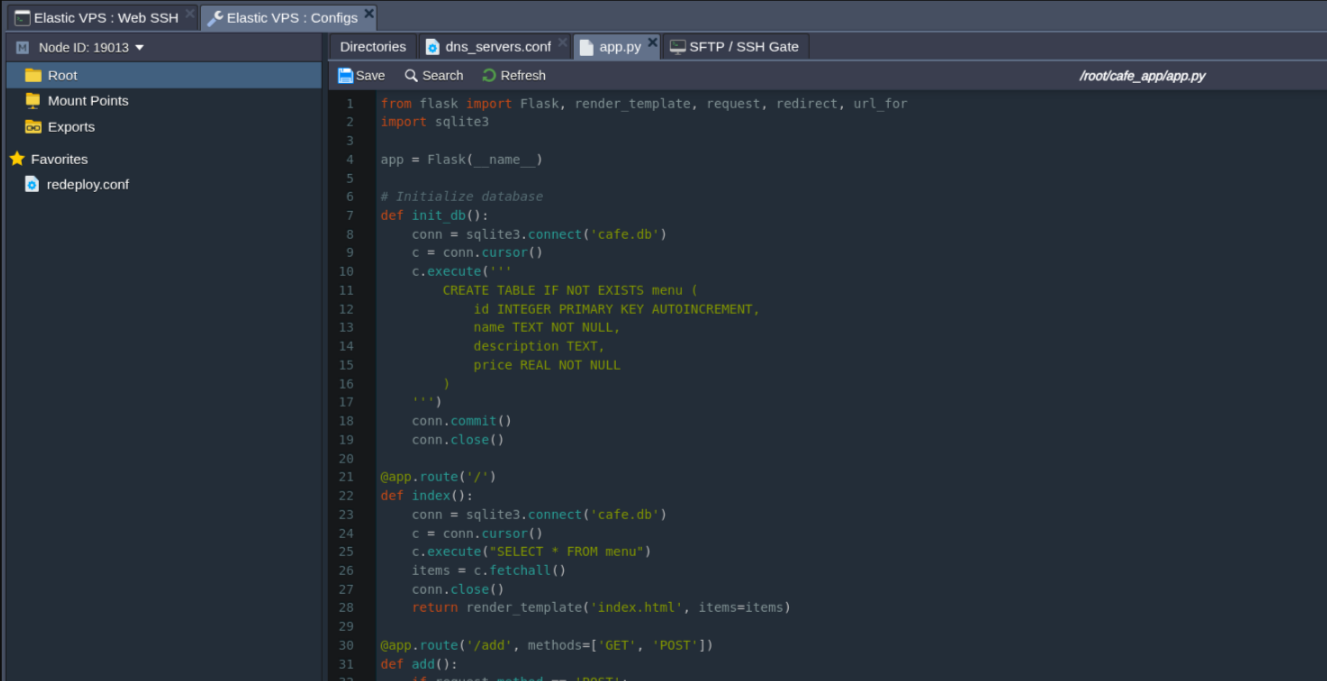
Create a file:
nano app.pyPaste this code into the editor:
from flask import Flask, render_template, request, redirect, url_for import sqlite3
app = Flask(__name__)
# Initialize database
def init_db():
conn = sqlite3.connect('cafe.db')
c = conn.cursor()
c.execute('''
CREATE TABLE IF NOT EXISTS menu (
id INTEGER PRIMARY KEY AUTOINCREMENT,
name TEXT NOT NULL,
description TEXT,
price REAL NOT NULL
)
''')
conn.commit()
conn.close()
@app.route('/')
def index():
conn = sqlite3.connect('cafe.db')
c = conn.cursor()
c.execute("SELECT * FROM menu")
items = c.fetchall()
conn.close()
return render_template('index.html', items=items)
@app.route('/add', methods=['GET', 'POST'])
def add():
if request.method == 'POST':
name = request.form['name']
description = request.form['description']
price = request.form['price']
conn = sqlite3.connect('cafe.db')
c = conn.cursor()
c.execute("INSERT INTO menu (name, description, price) VALUES (?, ?, ?)", (name, description, price))
conn.commit()
conn.close()
return redirect(url_for('index'))
return render_template('add.html')
@app.route('/edit/<int:item_id>', methods=['GET', 'POST'])
def edit(item_id):
conn = sqlite3.connect('cafe.db')
c = conn.cursor()
if request.method == 'POST':
name = request.form['name']
description = request.form['description']
price = request.form['price']
c.execute("UPDATE menu SET name=?, description=?, price=? WHERE id=?", (name, description, price, item_id))
conn.commit()
conn.close()
return redirect(url_for('index'))
else:
c.execute("SELECT * FROM menu WHERE id=?", (item_id,))
item = c.fetchone()
conn.close()
return render_template('edit.html', item=item)
@app.route('/delete/<int:item_id>')
def delete(item_id):
conn = sqlite3.connect('cafe.db')
c = conn.cursor()
c.execute("DELETE FROM menu WHERE id=?", (item_id,))
conn.commit()
conn.close()
return redirect(url_for('index', deleted='true'))
if __name__ == '__main__':
init_db()
app.run(host='0.0.0.0', port=5000)Create the HTML Pages
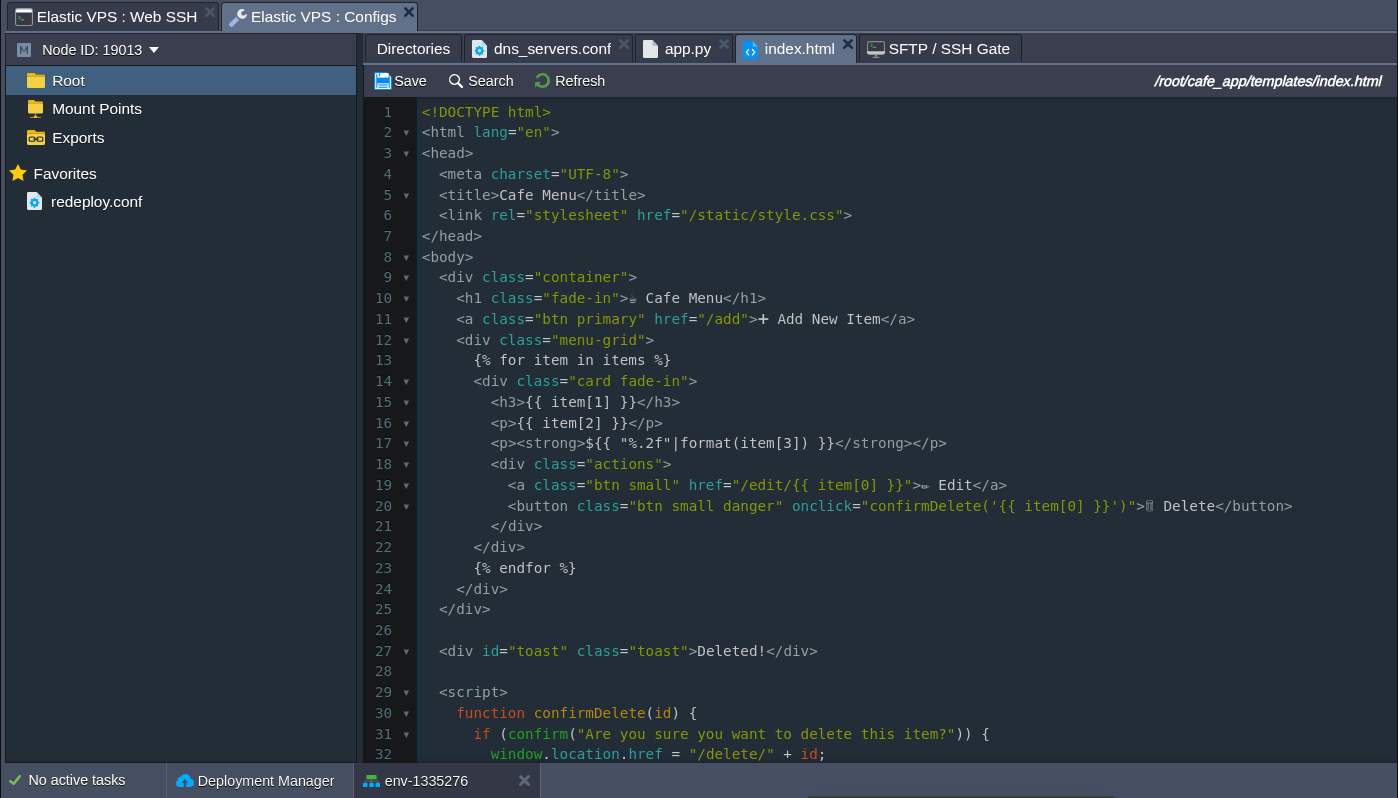
templates/index.html
<!DOCTYPE html>
<html lang="en">
<head>
<meta charset="UTF-8">
<title>Cafe Menu</title>
<link rel="stylesheet" href="/static/style.css">
</head>
<body>
<div class="container">
<h1 class="fade-in">☕ Cafe Menu</h1>
<a class="btn primary" href="/add">➕ Add New Item</a>
<div class="menu-grid">
{% for item in items %}
<div class="card fade-in">
<h3>{{ item[1] }}</h3>
<p>{{ item[2] }}</p>
<p><strong>${{ "%.2f"|format(item[3]) }}</strong></p>
<div class="actions">
<a class="btn small" href="/edit/{{ item[0] }}">✏️ Edit</a>
<button class="btn small danger" onclick="confirmDelete('{{ item[0] }}')">🗑️ Delete</button>
</div>
</div>
{% endfor %}
</div>
</div>
<div id="toast" class="toast">Deleted!</div>
<script>
function confirmDelete(id) {
if (confirm("Are you sure you want to delete this item?")) {
window.location.href = "/delete/" + id;
}
}
{% if request.args.get('deleted') %}
window.onload = () => {
const toast = document.getElementById("toast");
toast.classList.add("show");
setTimeout(() => toast.classList.remove("show"), 3000);
}
{% endif %}
</script>
</body>
</html>templates/add.html
nano add.html<!DOCTYPE html>
<html lang="en">
<head>
<meta charset="UTF-8">
<title>Add Menu Item</title>
<link rel="stylesheet" href="/static/style.css">
</head>
<body>
<div class="container">
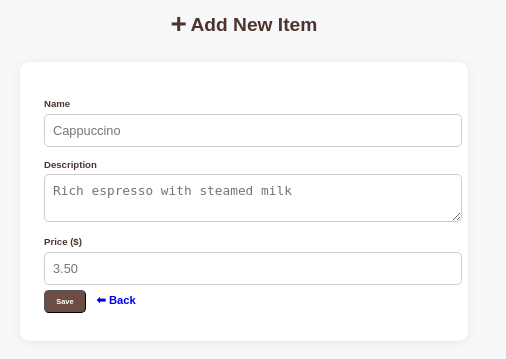
<h1 class="fade-in">➕ Add New Item</h1>
<form method="POST" class="form-card fade-in">
<label>Name</label>
<input type="text" name="name" placeholder="Cappuccino" required>
<label>Description</label>
<textarea name="description" placeholder="Rich espresso with steamed milk" required></textarea>
<label>Price ($)</label>
<input type="number" step="0.01" name="price" placeholder="3.50" required>
<button type="submit" class="btn primary">Save</button>
<a href="/" class="btn small">⬅ Back</a>
</form>
</div>
</body>
</html>templates/edit.html
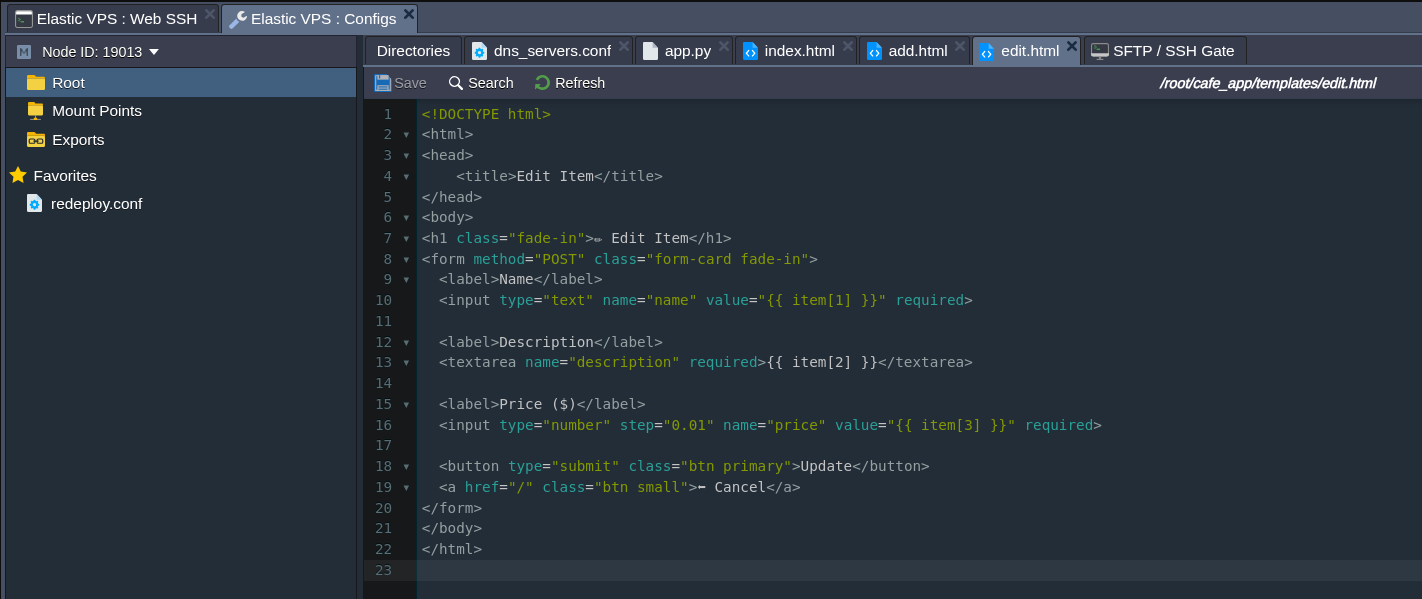
nano edit.html<!DOCTYPE html>
<html>
<head>
<title>Edit Item</title>
</head>
<body>
<h1 class="fade-in">✏️ Edit Item</h1>
<form method="POST" class="form-card fade-in">
<label>Name</label>
<input type="text" name="name" value="{{ item[1] }}" required>
<label>Description</label>
<textarea name="description" required>{{ item[2] }}</textarea>
<label>Price ($)</label>
<input type="number" step="0.01" name="price" value="{{ item[3] }}" required>
<button type="submit" class="btn primary">Update</button>
<a href="/" class="btn small">⬅ Cancel</a>
</form>
</body>
</html>Add a Simple Style (static/style.css)
cd
cd cafe_app/
mkdir static
cd static/
nano style.cssbody {
font-family: 'Segoe UI', sans-serif;
background-color: #f6f8fa;
margin: 0;
padding: 0;
color: #333;
}
.container {
padding: 40px;
max-width: 900px;
margin: auto;
}
h1 {
text-align: center;
margin-bottom: 30px;
color: #4e342e;
}
.btn {
text-decoration: none;
display: inline-block;
padding: 8px 14px;
border-radius: 6px;
margin: 5px 0;
font-weight: 600;
cursor: pointer;
transition: background-color 0.3s;
}
.btn.primary {
background-color: #6d4c41;
color: white;
}
.btn.primary:hover {
background-color: #5d4037;
}
.btn.small {
font-size: 14px;
padding: 6px 10px;
}
.btn.danger {
background-color: #d32f2f;
color: white;
}
.btn.danger:hover {
background-color: #b71c1c;
}
.menu-grid {
display: grid;
grid-template-columns: repeat(auto-fill, minmax(250px, 1fr));
gap: 20px;
}
.card {
background: white;
padding: 20px;
border-radius: 12px;
box-shadow: 0 2px 10px rgba(0,0,0,0.1);
transition: transform 0.2s;
}
.card:hover {
transform: translateY(-5px);
}
.card h3 {
margin-top: 0;
color: #3e2723;
}
.actions {
margin-top: 10px;
}
.toast {
position: fixed;
bottom: 30px;
left: 50%;
transform: translateX(-50%);
background-color: #4caf50;
color: white;
padding: 10px 20px;
border-radius: 6px;
opacity: 0;
transition: opacity 0.5s;
}
.toast.show {
opacity: 1;
}
/* Animation */
.fade-in {
animation: fadeIn 0.6s ease-in-out;
}
@keyframes fadeIn {
from { opacity: 0; transform: translateY(10px); }
to { opacity: 1; transform: translateY(0); }
}
.form-card {
max-width: 500px;
margin: auto;
background: white;
padding: 30px;
border-radius: 12px;
box-shadow: 0 2px 12px rgba(0,0,0,0.08);
}
.form-card label {
display: block;
margin-top: 15px;
font-weight: bold;
color: #4e342e;
}
.form-card input,
.form-card textarea {
width: 100%;
padding: 10px;
margin-top: 6px;
border: 1px solid #ccc;
border-radius: 6px;
font-size: 16px;
transition: border-color 0.3s;
}
.form-card input:focus,
.form-card textarea:focus {
outline: none;
border-color: #6d4c41;
box-shadow: 0 0 4px rgba(109, 76, 65, 0.4);
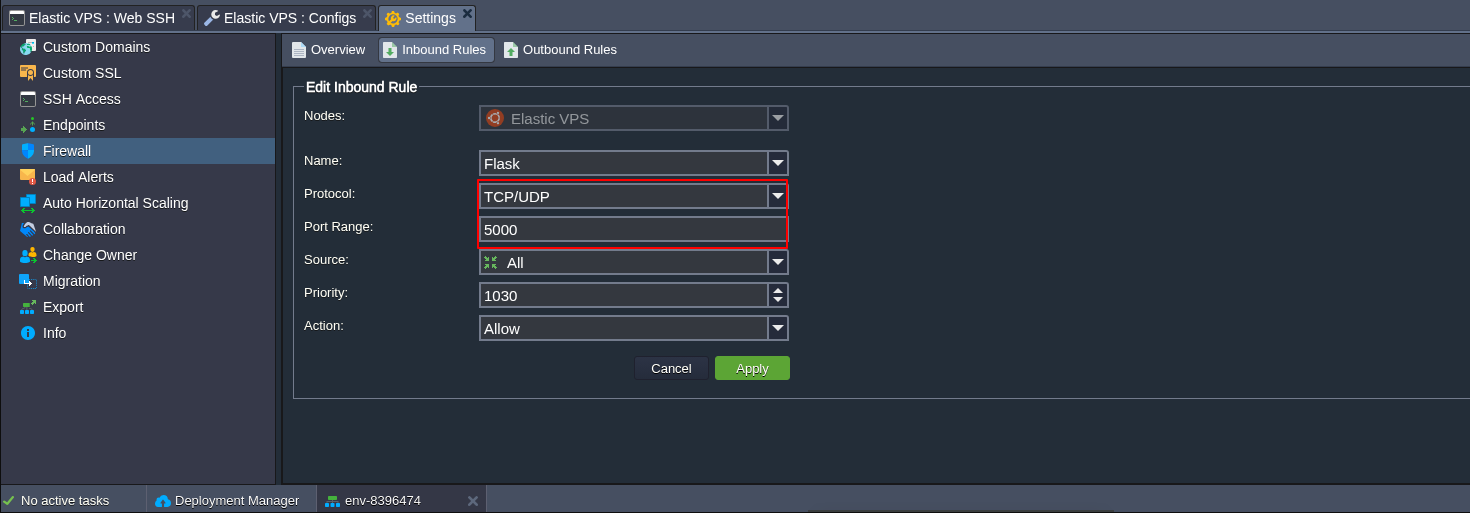
}Disable firewall
Or you can allow port 5000 from the inbound rules
Add Public IP
From the cafe_app/ folder, run:
python3 app.pyOpen http://your-server-ip:5000 in your browser.


