How to sync your local system file to the OwnCloud server?
OwnCloud is a safe app for storing and syncing your files. It allows you share, open, and save your files from anywhere, just like Google Drive or OneDrive. The difference is you can install it on your own server, so you stay in full control of your data.
Syncing your computer files with cloud services like Google Drive, OneDrive, or OwnCloud helps you:
- Keep a backup in case something happens to your computer.
- Open your files from any device with internet.
- Automatically update files across all your devices.
- Share files easily and work with others.
- Save space by keeping some files online only.
It’s a simple way to keep your files safe, easy to access, and always updated.
In this guide, we’ll show you how to sync files from your computer to the OwnCloud server.
Create an OwnCloud environment in Accuweb.Cloud dashboard:
Step 1: Log in to Accuweb.Cloud dashboard
Step 2: Click on the Marketplace on the screen’s upper left side.
Step 3: Go to the Storage & File Manager in the Marketplace window and select the ownCloud option.
Step 4: Click on the Install button to install the ownCloud application in the environment.
Step 5: In the OwnCloud window, enter the name that you want to set for your environment. You can access the Owncloud server with this name.
In the Display Name box, type a name that helps you remember what this environment is for like the domain or service it’s connected to. This name will show in your Accuweb.cloud dashboard.
In the Region field, choose the location where you want to install the OwnCloud app.
Then click Install to begin the setup.
Step 6: Once the Owncloud application is successfully installed, you will see the login details on the screen. The system will also send the login details to your registered email address.
Download and install the OwnCloud Desktop App on your computer
You can get the latest OwnCloud Desktop App from the OwnCloud Official Download page. It’s available for Linux, macOS, and Windows. If you’re using Linux, you can also use the AppImage version.
Step 1: Go to the Owncloud official website and download the installation (setup) file according to your local system’s OS.
In this article, we will show you how to install the Windows version, as this is currently the most popular OS.
Step 2: Go to the Download window and double-click on the OwnCloud setup file to launch the installation window, which you downloaded from the OwnCloud official website.
Step 3: In the OwnCloud Installation wizard, click on the Next button to continue the installation process.
Step 4: In the custom setup window, click the Next button to proceed. Then click the Install button to install the OwnCloud Desktop App on the Windows system.
Step 5: Once the installation has been completed, click on the finish button to exit the installer.
Step 6: After installing, restart your computer to make sure OwnCloud works properly with File Explorer. Click Yes to restart right away.
Once restarted, the OwnCloud Desktop App is ready to use and can be opened from the new shortcut on your desktop.
Configure the OwnCloud Desktop App to sync the data with the OwnCloud server:
Step 1: After the installation is done, the OwnCloud app will open, and you’ll see a screen asking for the server address.
Step 2: Enter the OwnCloud URL in the Address box and click on the Next button.
Step 3: In the Add New Account window, enter your OwnCloud credentials (username and password) and click the Next button.
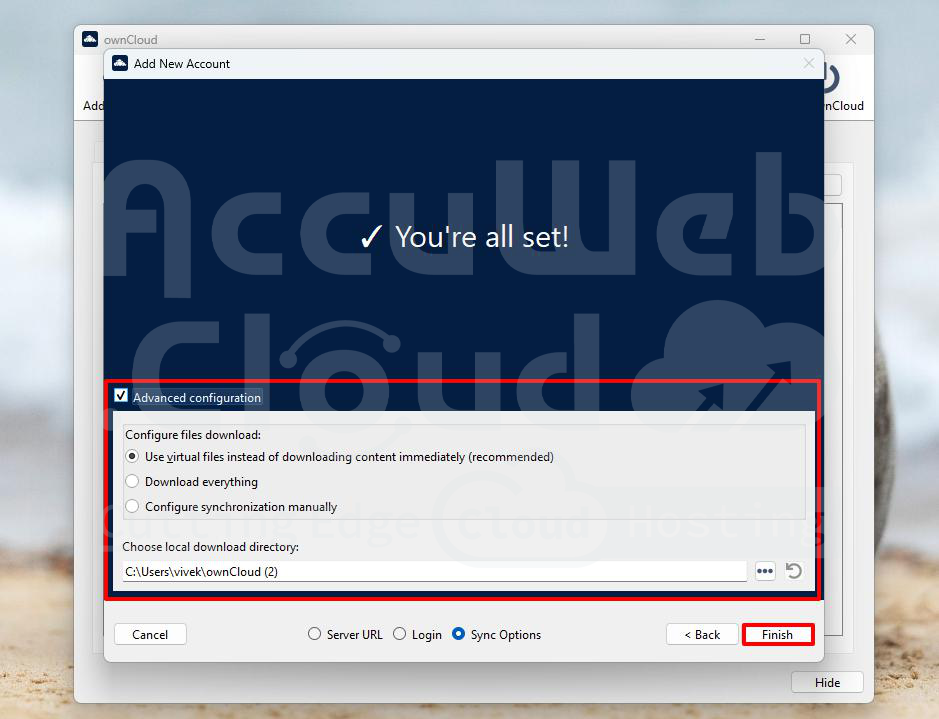
Step 4: On the next screen, check the box for Advanced Configuration to choose how files are stored on your computer:
- Use Virtual Files (Recommended):
You can see the file names and folders on your computer, but the files won’t download until you open them.. - Download Everything:
All files are downloaded right away. - Set Sync Options Manually:
You choose which folders to download and which to keep in the cloud.
Step 5: Click ‘Finish’ to complete the setup and close the window.
Add a new folder from your computer to sync with OwnCloud
If you want to sync a single folder without syncing your whole drive or local system, you can add a specific folder in the OwnCloud Desktop App. You can control what gets uploaded and downloaded based on your needs.
Below are steps on how to add a new folder from the local system to sync with the OwnCloud Server
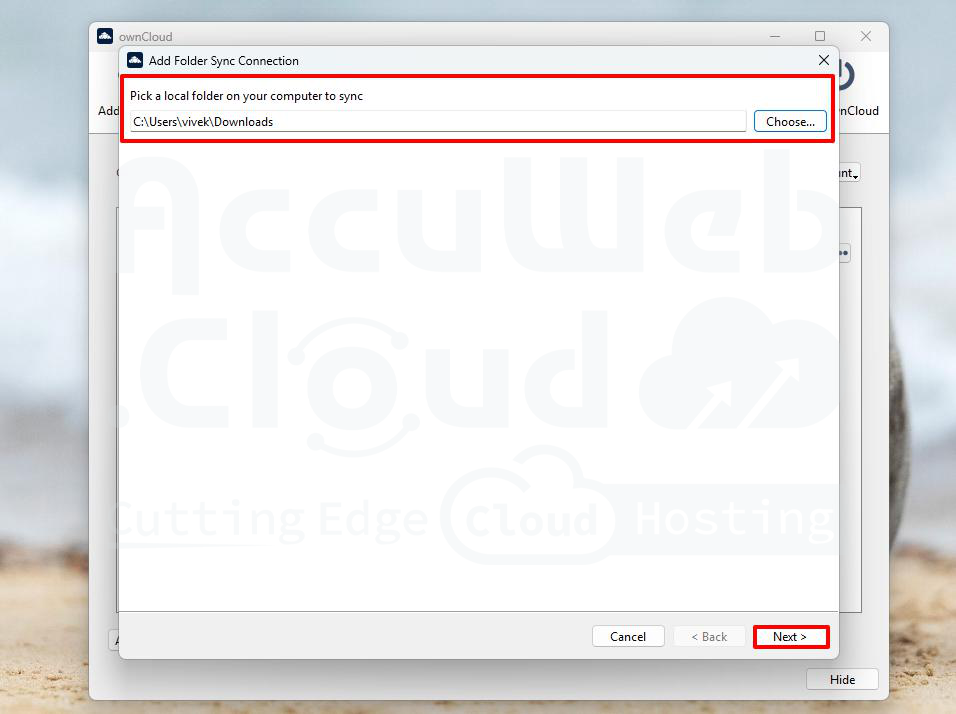
Step 1: Click on the “Add Folder” button in the OwnCloud app.
Step 2: Select a folder you want to sync on your computer. Here, we have selected the Download folder as an example.
Step 3: Choose where in your OwnCloud account you want to sync that folder. Here, we have selected the Photos folder as an example.
Step 4: Click the Add Sync Connection button, and OwnCloud will update both folders automatically.
Step 5: After you click the Add Sync Connection button, the app will begin syncing. This may take a few minutes, depending on how many files you have and how big they are.
That’s all.
Conclusion:
Integrating an OwnCloud server with your local system allows real-time file storage and synchronization. By installing the OwnCloud desktop app, adding sync folders, and choosing the proper sync method (like virtual files or full downloads), you can ensure your files are always up-to-date across devices securely and efficiently.


