
How to Use Load Balancers for High Availability?
Introduction
Modern applications are expected to remain available regardless of traffic spikes, hardware failures, or maintenance activities. Even a brief service interruption can impact user experience, disrupt business operations, and reduce customer trust. Achieving high availability requires eliminating single points of failure and ensuring that workloads continue running even when individual infrastructure components become unavailable.
Load balancing is one of the most effective strategies for building highly available cloud environments. Instead of directing all incoming traffic to a single server, a load balancer intelligently distributes requests across multiple healthy backend instances. This approach not only improves application uptime but also enhances scalability, fault tolerance, and overall system performance.
Within the AccuWeb Cloud Dashboard, load balancers can be incorporated into cloud deployments to create resilient architectures capable of handling varying workloads while maintaining consistent service availability.
Understanding High Availability
High availability (HA) refers to the ability of an application or service to remain operational with minimal downtime, even when failures occur within the infrastructure. Rather than relying on a single server, high availability is achieved by deploying redundant resources that can seamlessly continue serving traffic if one component becomes unavailable.
A highly available environment is designed to withstand events such as:
- Hardware failures
- Virtual machine outages
- Network interruptions
- Planned maintenance
- Unexpected application crashes
The objective is to ensure continuous service delivery without requiring users to manually reconnect or experience noticeable disruptions.
What Is a Load Balancer?
A load balancer acts as an intelligent traffic distribution layer positioned between clients and backend application servers. Instead of allowing every request to reach a single instance, it evaluates the available backend resources and forwards incoming requests according to predefined balancing policies.
From the client’s perspective, the application appears as a single service endpoint. Behind the scenes, however, requests are distributed across multiple servers operating together as a unified application environment.
This architecture improves both availability and performance by preventing individual servers from becoming overloaded while ensuring traffic is automatically redirected when failures occur.
How Load Balancing Supports High Availability
Without load balancing, every client request is processed by a single server. If that server experiences an outage, the application becomes inaccessible until the issue is resolved.
A load balancer removes this dependency by continuously distributing requests among multiple backend instances. If one instance becomes unavailable, traffic is automatically redirected to the remaining healthy servers without requiring manual intervention.
This automated failover mechanism significantly reduces downtime and allows applications to continue operating during infrastructure failures or maintenance windows.
In addition to improving availability, distributing workloads across multiple servers reduces resource contention, resulting in more consistent response times and improved application stability.
Key Components of a Highly Available Load-Balanced Environment
A resilient infrastructure typically consists of several core components working together.
Load Balancer
The load balancer receives incoming client requests and determines which backend instance should process each request based on the configured traffic distribution strategy.
Backend Server Pool
A backend pool contains multiple application servers that collectively handle incoming workloads. Since every server performs the same function, requests can be processed by any healthy instance.
Adding additional servers increases redundancy while also providing greater capacity to accommodate growing application demand.
Health Checks
Health checks continuously monitor backend servers to verify their operational status.
Depending on the configured health monitoring method, the load balancer may perform:
- TCP connectivity checks
- HTTP or HTTPS response validation
- Port availability verification
- Custom application endpoint monitoring
When a server fails a health check, it is temporarily removed from the active pool until it recovers. This prevents client requests from being routed to unhealthy instances.
Network Layer
Reliable communication between the load balancer and backend servers is essential for maintaining uninterrupted service. Proper network configuration ensures efficient traffic flow while minimizing latency between components.
Traffic Distribution Methods
Load balancers support multiple algorithms for distributing client requests. The appropriate method depends on application behavior and workload characteristics.
Round Robin
Round Robin distributes incoming requests sequentially across all available backend servers.
This method provides simple and effective load distribution when application instances have similar hardware resources and process requests at comparable speeds.
Least Connections
The Least Connections algorithm directs new requests to the server currently handling the fewest active connections.
This approach is particularly beneficial for applications where user sessions vary significantly in duration.
Weighted Distribution
Weighted balancing assigns different capacities to backend servers by allocating higher traffic volumes to systems with greater processing power.
This method is useful when backend infrastructure consists of servers with varying CPU, memory, or storage resources.
Source Affinity
Some applications require clients to continue communicating with the same backend server throughout an active session.
Source affinity, often referred to as session persistence, ensures requests from the same client are consistently directed to the same backend instance while maintaining overall load distribution.
Health Monitoring and Automatic Failover
Health monitoring is one of the most critical capabilities of any load-balanced architecture.
The load balancer continuously evaluates the availability of each backend instance. If an application stops responding or exceeds defined health thresholds, that instance is removed from the active rotation.
Once the server successfully passes subsequent health checks, it is automatically restored to the backend pool.
This automated recovery process minimizes service interruptions without requiring administrator intervention.
Scaling Applications with Load Balancers
Load balancing not only improves availability but also enables applications to scale efficiently.
As user demand increases, additional application instances can be introduced into the backend pool to share the workload. Incoming requests are automatically distributed across the expanded infrastructure, preventing resource bottlenecks and maintaining consistent application performance.
Similarly, when demand decreases, excess resources can be removed while preserving application availability.
This flexibility allows infrastructure to adapt to changing workloads without affecting end-user experience.
Load Balancer
A Load Balancer helps distribute incoming traffic across multiple servers to ensure high availability, reliability, and improved performance. In Stack Console, you can set up a Load Balancer to handle web applications, databases, and other services efficiently. This guide will walk you through the steps to configure a Load Balancer in Stack Console.
Creating a Load Balancer
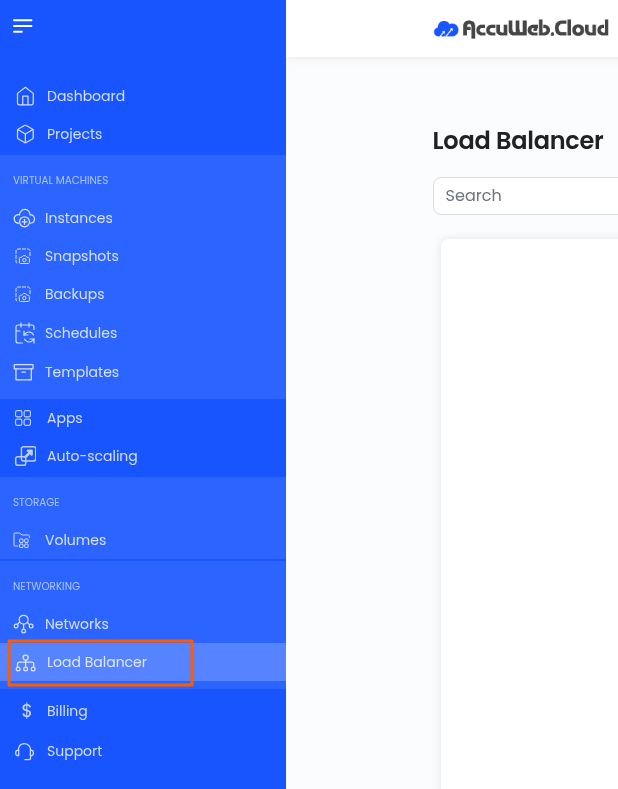
- From the left-hand side menu, click on the Load Balancer tab.
- To create a load balancer, click the Load Balancer or plus (+) icon located on the right side of the page. This will open the load balancer creation menu.
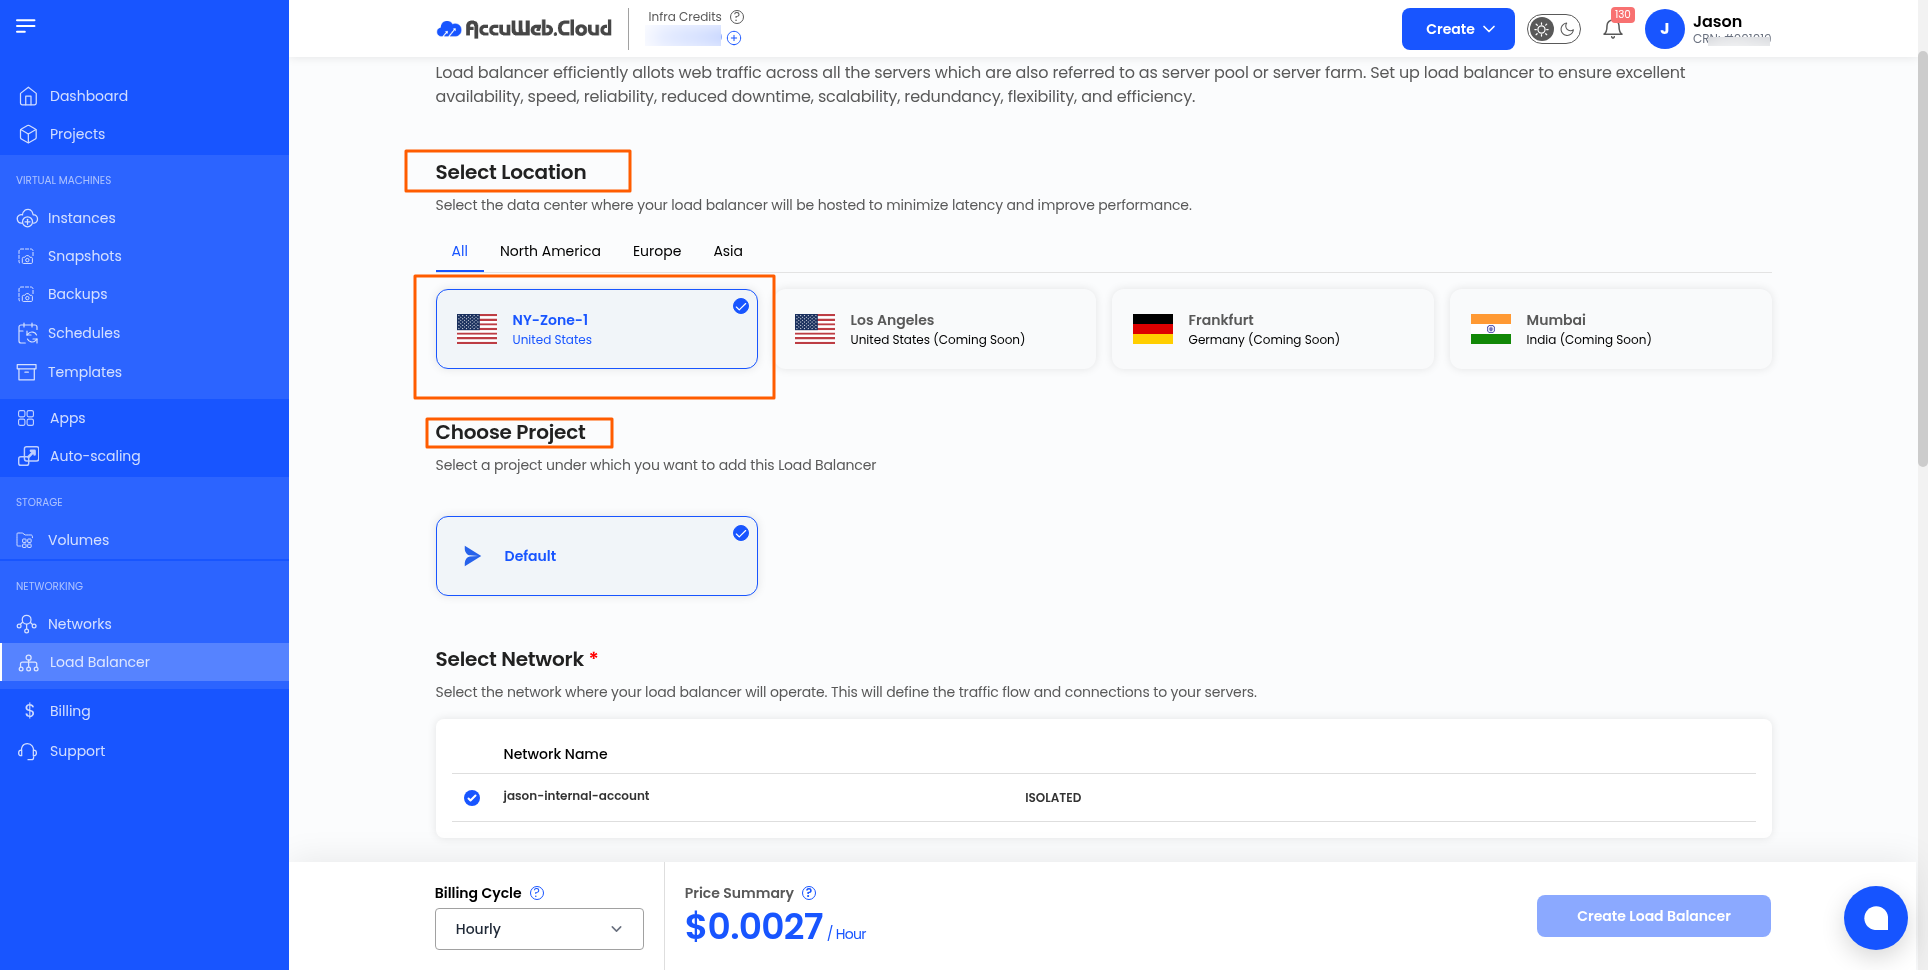
Choose a Location
- Select the data center location where your server will be physically hosted.
- Choose from the available locations listed.
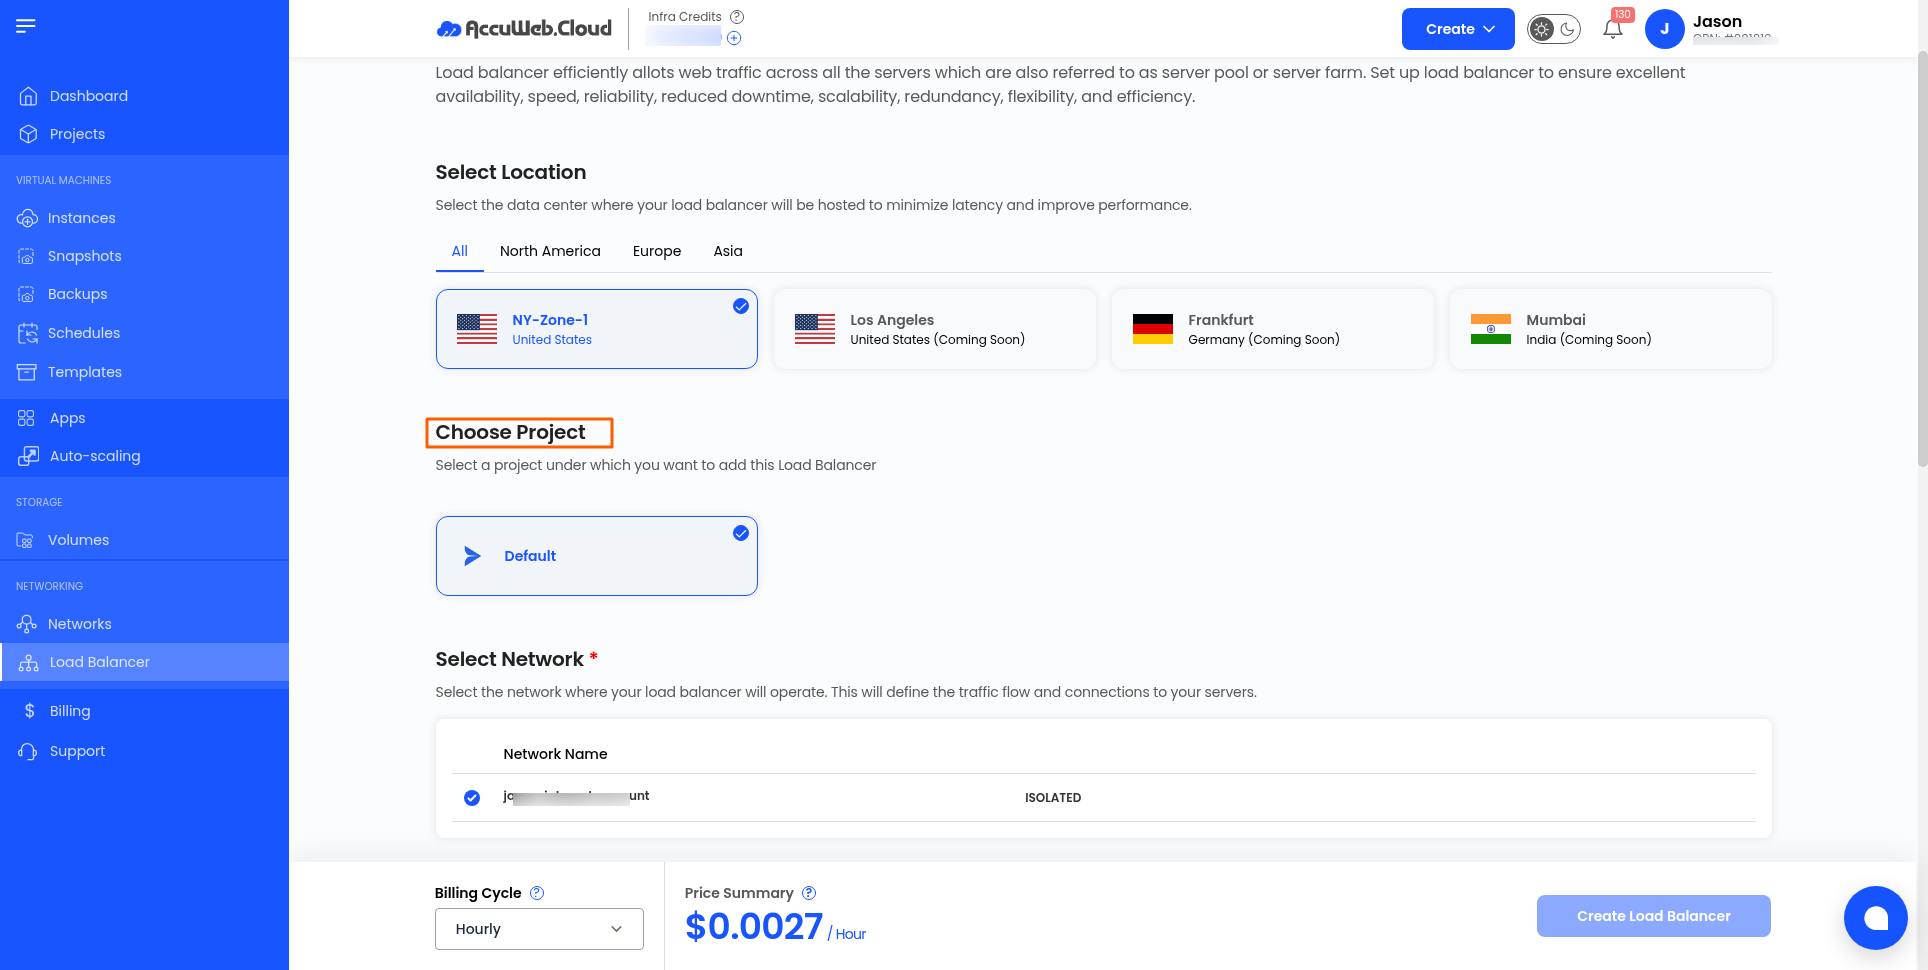
Assign to a Project
- Assign the load balancer to one of your projects to organize and manage resources effectively.
Choose Network
- Select the network where your load balancer will operate. This will define the traffic flow and connections to your servers.

Choose IP
- Choose the network IP for your load balancer by selecting from Existing IP Address or Acquire New IP Address.
- Note: By choosing Acquire New IP, it will create a default isolated IP under the selected zone.

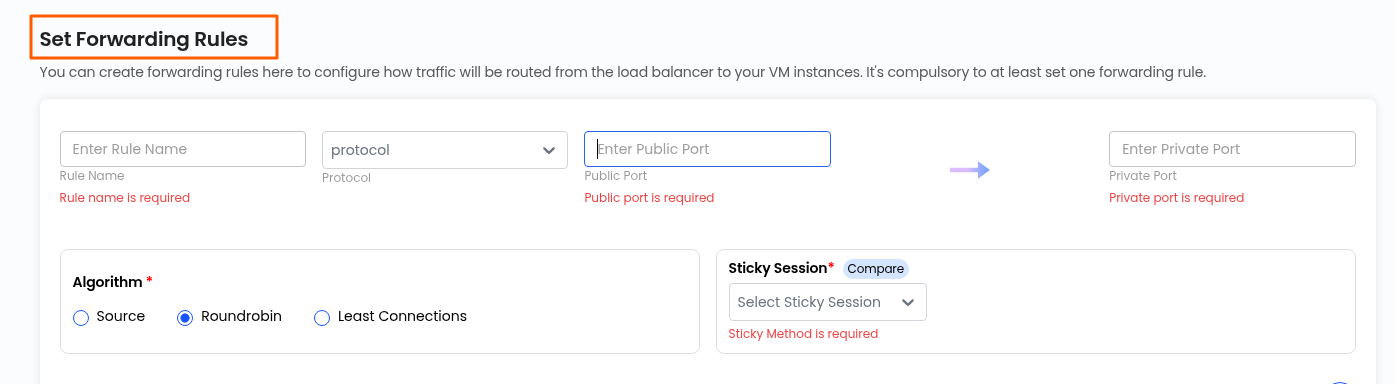
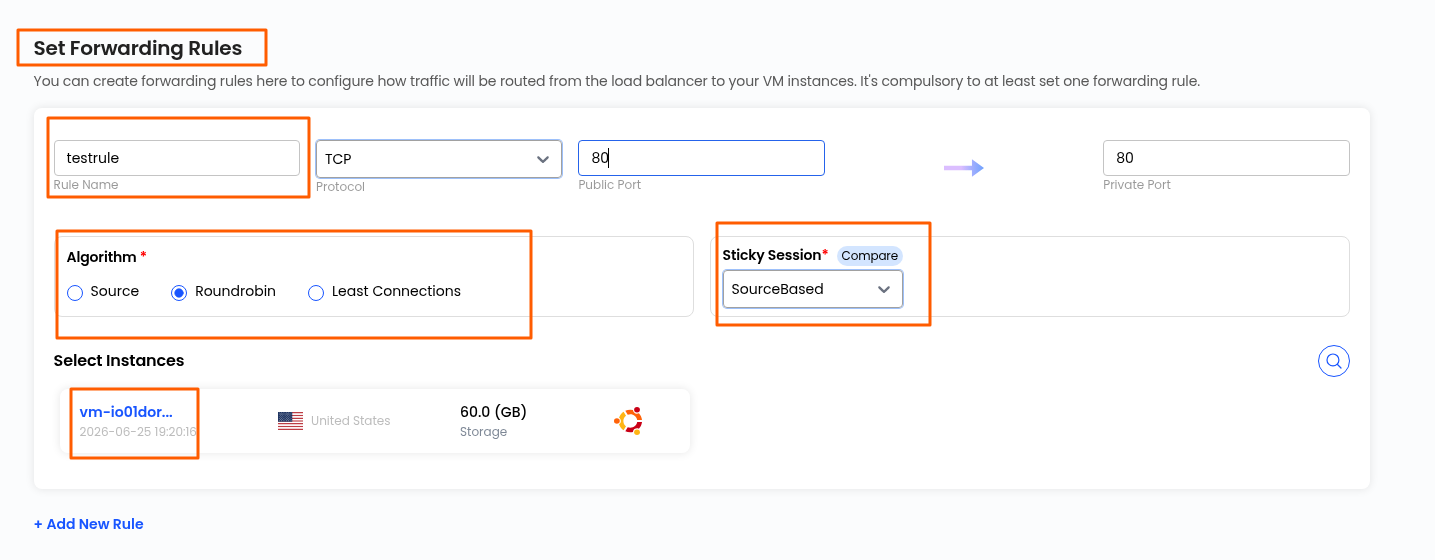
Set Forwarding Rules
- Configure forwarding rules to define how traffic should be distributed across your servers.
- Provide a unique Rule Name for the forwarding rule. Choose the appropriate Protocol (e.g., TCP, UDP, HTTP, HTTPS). Specify the port range for incoming traffic.
- Select an algorithm to distribute incoming requests among instances:
- Source – Directs traffic to the same instance based on the client’s source IP.
- Round Robin – Distributes traffic evenly across all available instances.
- Least Connections – Sends traffic to the instance with the fewest active connections.
- You can enable Sticky sessions ensure that a user’s requests are consistently routed to the same backend instance.
- LB Cookie – Uses a load balancer-generated cookie to maintain session persistence.
- App Cookie – Uses application-defined cookies for session persistence.
- Source-Based – Binds sessions to a backend instance based on the client’s source IP.
- None – No session persistence; requests are distributed normally.
- Choose the VM instances that will handle incoming traffic.
Name Load Balancer
- Provide a unique name for your load balancer to easily identify it. The name can only include alphanumeric characters, dashes, and periods.+
Create Load Balancer
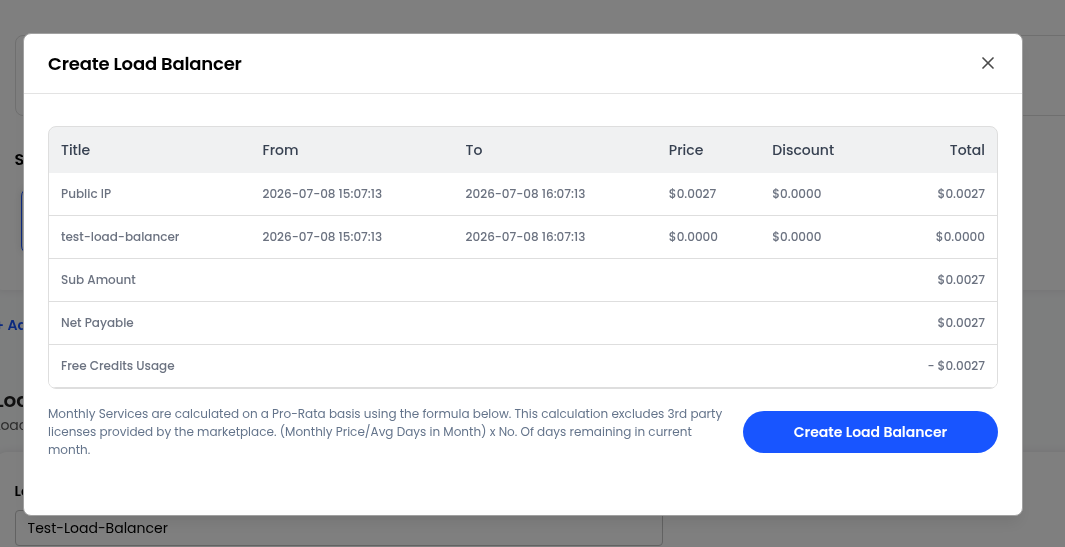
- Choose the desired Billing Cycle for your load balancer. Load Balancer supports Hourly, Monthly, Quarterly, Semiannually, Yearly, Bi-annually, and Tri-annually billing cycles.
- The billing rules it supports include Date to Date, Fixed Calendar Month, Unfixed Calendar Month, Fixed Prorata, and Unfixed Prorata.
- Only one load balancer package is available per zone. This simplifies configuration and ensures consistent behavior within each deployment zone.
- Verify all the configuration details and review the price summary. Click on Create Load Balancer to create the load balancer for your network.

View Load Balancer
- To view more about the load balancer in detail, click on the Load Balancer.
- You can view the policies associated with this load balancer.
- If you want to attach a VM instance to your load balancer, you can go to Add VM and select the VM instance to attach.
Conclusion
By following this guide, you can easily configure and manage a Load Balancer on Stack Console. Load Balancers ensure high availability, reliability, and improved performance by distributing incoming traffic across multiple servers. For further assistance, refer to the Stack Console documentation or reach out to support.