Learn how to install LAMP on Ubuntu 22.04
The LAMP stack – short for Linux, Apache, MariaDB, and PHP – is one of the most popular open-source web hosting environments. On Ubuntu 22.04, it provides a reliable foundation for running everything from personal blogs to enterprise web applications. In this stack:
- Linux (Ubuntu 22.04) serves as the operating system,
- Apache handles web server functionality,
- MariaDB (a MySQL-compatible database) manages data, and
- PHP processes dynamic content.
Together, these components power millions of websites worldwide. In this guide, you’ll learn step-by-step how to install LAMP on Ubuntu 22.04 in under 15 minutes, with clear commands and explanations designed for beginners and system administrators alike.
Prerequisites
Before you begin:
- Create an Ubuntu 22.04 server on AccuWeb.Cloud.
- You must log in to your server with the root user through SSH.
- Add a new A record for your domain that points to your server’s IP address.
- Add the port 80, 443, 3306 on your AccuWeb.Cloud environment firewall.
Update the System
Before installing the LAMP stack, let’s update the system packages to the latest versions. Run this command:
# apt update && apt upgradeIf asked to confirm during the server update and upgrade process, press Y to continue.
Install Apache Web Server
Apache is a popular, open-source web server that can run on different operating systems like Windows, Linux, and more. It’s currently the most widely used web server, even more popular than Nginx and Cloudflare.
To install Apache, run this command:
# apt install apache2 -yAfter installation, start and enable Apache so it runs automatically:
# systemctl start apache2# systemctl enable apache2To check if Apache is running, use this command:
# systemctl status apache2If everything is set up correctly, you should see an output indicating the service is active and running.
You can enable the ufw firewall on the Accuweb Cloud Ubuntu server, as it is not enabled by default. If you allow the ufw firewall rule without installing it on the AccuWeb.Cloud Elastic VPS then you will receive the following error.
To install ufw firewall on your https://accuweb.cloud/compute/cloud-vps Elastic Ubuntu VPS, run the following command in the terminal.
# apt install ufwOnce it is installed, you can enable it by running the following command in the terminal.
# ufw enableAfter that, you can allow the HTTP connection on your server through ufw firewall.
# ufw allow 80/tcp# ufw allow 443/tcpOnce you allow the HTTP connection on your server through ufw firewall, you can check its status by running the following command.
# ufw statusNow, open a web browser like Chrome and go to your domain or server IP to check if the default Apache web page appears.
Install MariaDB Database Server
MariaDB is a free, open-source database system similar to MySQL, with improvements in reliability, speed, and flexibility. It uses the same SQL language as MySQL to help create and manage databases.
MariaDB is often used in the LAMP stack for database-driven applications like WordPress, Drupal, and Joomla. To install it, run this command:
# apt install MariaDB-serverThis will download and install MariaDB and its required components. During installation, if asked to confirm, press Y to continue.
After installation, you need to start the Mariadb service. By default, it is in the inactive status. To start the MariaDB service, run the following command.
# systemctl start MariaDBOnce you start the MariaDB service, it’s good to check if the MariaDB service is running. Use this command:
# systemctl status MariaDBIf everything is working, you’ll see that the service is active. To make sure MariaDB starts automatically when the system boots, run:
# systemctl enable MariaDB
Secure MariaDB
To secure your MariaDB installation, run the following command:
# mysql_secure_installationThis script will guide you through some basic security settings. It will prompt you to:
- Set a root password.
- Choose whether to remove anonymous users and disable remote root login (recommended for security).

- Remove the test database, which is accessible by default, and may pose a security risk.
- Finally, be sure to reload the privilege tables after making these changes to apply them right away.
- Disabling remote root login helps prevent brute-force attacks, so do this unless you need remote access.
- Removing the test database is also advised to keep your system secure.
These steps will strengthen your MariaDB setup and help protect it from common security threats.
Setup MariaDB
Log in to MySQL
First, log in to your MySQL server as the root user:
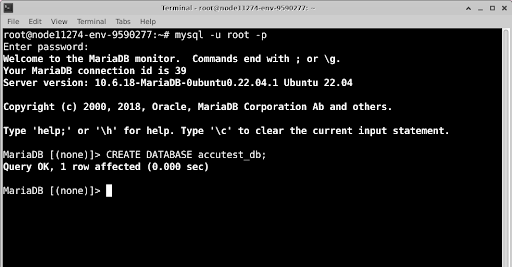
# mysql -u root -p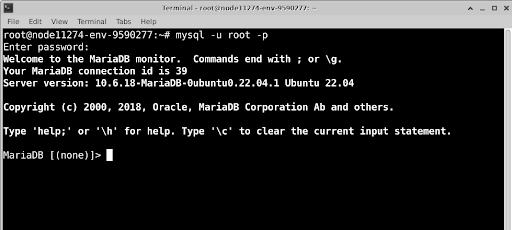
Create a New Database
Create a sample database called accutest_db:
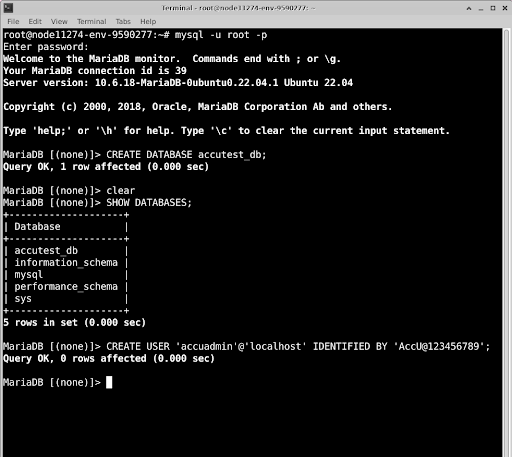
CREATE DATABASE accutest_db;To make sure the database was created, list all databases:
SHOW DATABASES;
Create a New User and Grant Permissions
Create a new user, such as accuadmin, with a secure password. Replace AccU@123456789 with your desired password:
CREATE USER 'accuadmin'@'localhost' IDENTIFIED BY 'AccU@123456789';Then, grant full access to accuadmin on the new accutest_db database:
GRANT ALL PRIVILEGES ON accutest_db.* TO 'accuadmin'@'localhost';Apply the changes by flushing privileges:
FLUSH PRIVILEGES;
Finally, exit MySQL:
EXITInstall PHP and Configure PHP-FPM
Install PHP
PHP (Hypertext Preprocessor) is a server-side language used to make dynamic web pages. It’s popular with developers worldwide. In the LAMP stack for Ubuntu 22.04, PHP 8.3 is included by default.
Some projects may need different PHP versions, which can be installed and managed through PHP-FPM. However, Ubuntu 22.04’s default repositories offer only limited PHP versions.
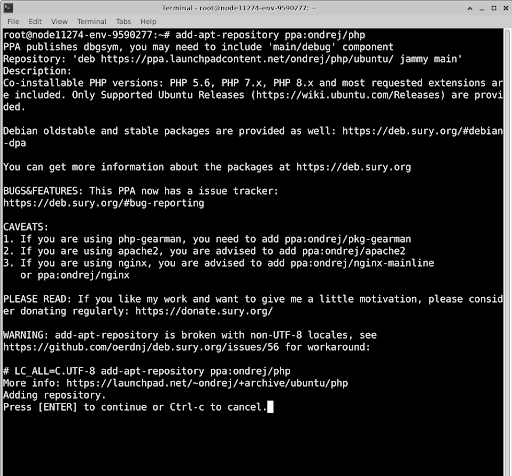
To install other PHP versions, such as PHP 7.4, you can add a trusted repository like ppa:ondrej/php. Follow these steps to add this repository and install multiple PHP versions:
Add the ppa:ondrej/php repository:
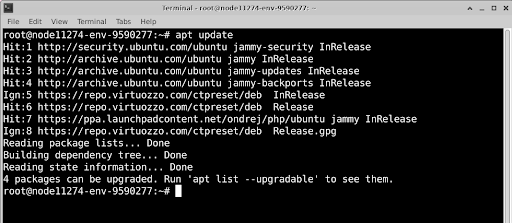
# add-apt-repository ppa:ondrej/phpUpdate the package index to include this repository:
# apt updateInstall PHP and PHP-FPM
PHP-FPM (FastCGI Process Manager) helps manage PHP processes efficiently.
# apt install -y php php-fpmInstall Common PHP Extensions
You can install frequently used PHP extensions with the following command:
# apt install -y php-cli libapache2-mod-php php-mysql php-mbstring php-bcmath php-zip php-gd php-curl php-xmlHere’s what each extension does:
php-mysql: Allows PHP to interact with MySQL databases.
libapache2-mod-php: Let Apache run PHP scripts.
php-mbstring: Adds support for UTF-8 text formats.
php-bcmath: Provides support for precise math calculations.
php-zip: Adds ZIP file support for PHP.
php-gd: Enables image processing in PHP.
php-curl: Allows URL transfers in PHP applications.
php-xml: Adds XML support in PHP.
Install Optional PHP Packages
Here are some optional PHP packages you can install if needed for your setup.
PHP-CLI
To run PHP scripts from the command line, install the php-cli package:
# apt install php-cliPHP-CGI
To run PHP scripts without the Apache PHP module, install php-cgi:
# apt install php-cgiPHP-MySQL
To connect PHP with MySQL, install php-mysql:
# apt install php-MySQLPHP-PgSQL
To connect PHP with PostgreSQL, install php-pgsql:
# apt install php-pgsqlCheck the PHP Version
To see which version of PHP is installed, run:
# php -vStart and Enable PHP-FPM
For example, if you installed PHP 8.3, start PHP-FPM with:
# systemctl start php8.3-fpmTo make PHP-FPM start automatically on boot:
# systemctl enable php8.3-fpmTo check if PHP-FPM is running:
# systemctl status php8.3-fpmConfigure PHP-FPM
PHP-FPM helps PHP applications run faster by using memory-based pools. Follow these steps to set up PHP-FPM with Apache and adjust the pool settings to manage resources efficiently.
Enable the required Apache modules.
You need to run the following command to enable the Apache modules.
# a2enmod proxy_fcgi setenvifThe command above activates these modules on your web server:
proxy_fcgi: Allows Apache to connect with PHP-FPM as a proxy.
setenvif: Sets environment variables to allow connections between Apache and PHP-FPM.
If you have added or modified the configuration file, then you need to activate it by running the following command.
# systemctl restart apache2Enable the default PHP-FPM configuration.
You need to run the following command to enable the default PHP-FPM configuration.
# a2enconf php8.3-fpmYou need to restart the Apache service to apply the changes that you have made.
# systemctl restart apache2Switch to the PHP-FPM pool configurations directory.
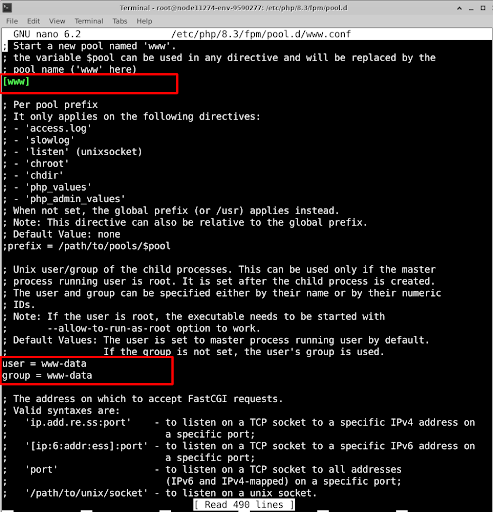
# cd /etc/php/8.3/fpm/pool.d/Open the default www.conf PHP-FPM pool configuration.
# nano /etc/php/8.3/fpm/pool.d/www.confVerify that the default PHP-FPM pool name www.
[www]
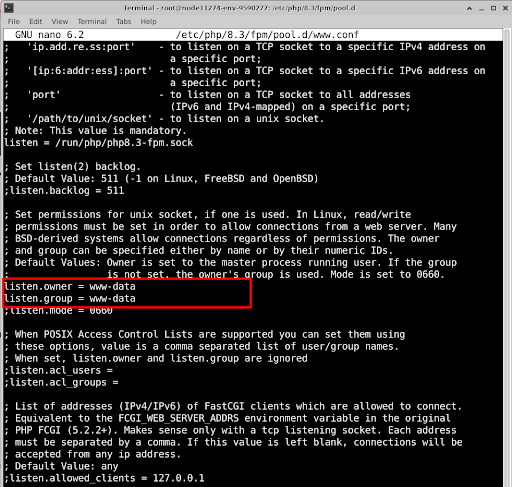
Search and verify the following variables are set to www-data to enable PHP-FPM to use the default web server user profile.
user = www-data
group = www-data
listen.owner = www-data
listen.group = www-data
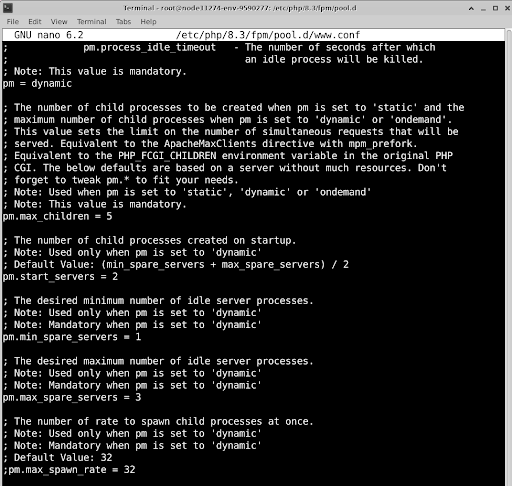
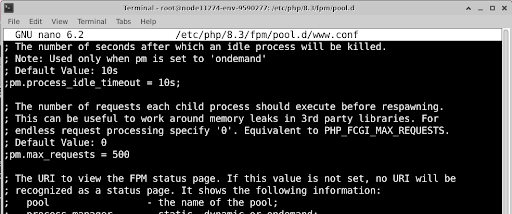
Locate these pool settings and adjust them based on your server needs:
pm: Defines the process manager. Setting it to “dynamic” lets PHP adjust the number of processes as needed.
pm.start_servers: Sets the number of PHP child processes that start with the server. The default is 2.
pm.max_children: Limits the total number of PHP child processes that can run at once. The default is 5.
pm.min_spare_servers: Sets the minimum number of idle PHP processes. The default is 1.
pm.max_spare_servers: Sets the maximum number of idle PHP processes. The default is 3.
pm.max_requests: Caps the number of requests a PHP process can handle before it resets.
Save and close the file.
Restart the PHP-FPM service to make your changes take effect.
# systemctl restart php8.3-fpmConfigure Apache with PHP-FPM
Apache can connect to PHP-FPM using the mod_proxy_fcgi module, which communicates through a UNIX socket or the default TCP port 9000. Here’s how to set up an Apache virtual host to work with PHP-FPM.
Remove Default Apache Configuration Files
Delete the default Apache virtual host configuration files:
# rm -rf /etc/apache2/sites-enabled/000-default.conf && rm -rf /etc/apache2/sites-available/000-default.confCreate a New Apache Virtual Host File
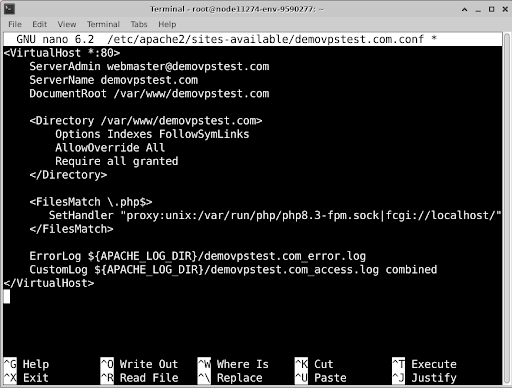
Create a new configuration file for your domain in /etc/apache2/site-available/, e.g., demovpstest.com.conf:
# nano /etc/apache2/sites-available/demovpstest.com.confStep 3: Add Virtual Host Configurations
Replace demovpstest.com with your domain and add these configurations:
<VirtualHost *:80>
ServerAdmin [email protected]
ServerName demovpstest.com
DocumentRoot /var/www/demovpstest.com
<Directory /var/www/demovpstest.com>
Options Indexes FollowSymLinks
AllowOverride All
Require all granted
</Directory>
<FilesMatch \.php$>
SetHandler "proxy:unix:/var/run/php/php8.3-fpm.sock|fcgi://localhost/"
</FilesMatch>
ErrorLog ${APACHE_LOG_DIR}/demovpstest.com_error.log
CustomLog ${APACHE_LOG_DIR}/demovpstest.com_access.log combined
</VirtualHost>
Explanation:
This setup creates a new Apache virtual host that listens on HTTP port 80 and serves web content for your domain, demovpstest.com. All PHP file requests are handled by PHP-FPM through the /var/run/php/php8.3-fpm.sock UNIX socket.
VirtualHost *:80: Listens on HTTP port 80.
DocumentRoot: You can set the root folder for your site’s files.
<FilesMatch \.php$>: Forwards PHP requests to PHP-FPM using the /var/run/php/php8.3-fpm.sock socket.
ErrorLog and CustomLog: You can add custom paths for logs.
Save and close the file.
Enable the New Virtual Host Configuration
Enable your new site configuration:
# a2ensite demovpstest.com.confThen, we need to reload the Apache service. Run the following command to reload the Apache service.
# systemctl reload apache2Test Apache Configuration
Check for syntax errors:
# apache2ctl configtestYou are getting a warning message because DocumentRoot has not been created yet. Rest the Syntex is good. To fix it, we need to create it. Let’s do that.
Create the Web Root Directory
Create the directory for your site:
# mkdir -p /var/www/demovpstest.comCreate a PHP Test File
Make a test file called phpinfo.php to check the PHP setup:
# nano /var/www/demovpstest.com/phpinfo.phpAdd the following content:
<?php
phpinfo();
?>
Save and close the file.
Restart Apache
Restart Apache to apply changes:
# systemctl restart apache2Verify in the Browser
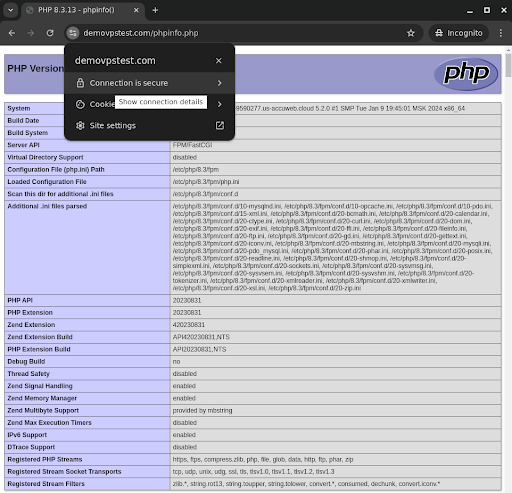
Open a web browser and visit http://domainname.com/phpinfo.php or http://server-ip-address/phpinfo.php to confirm your PHP setup.
Here, we have used http://demovpstest.com/phpinfo.php to confirm the PHP setup. This should display PHP version information and installed modules.
Secure the Server
Ubuntu 22.04 servers on AccuWeb.Cloud comes with Uncomplicated Firewall (UFW) enabled by default. Apache uses HTTP port 80 to deliver web content, while other LAMP stack services use internal ports like MySQL (3306) and PHP-FPM (9000).
Follow these steps to configure the firewall to allow connections on port 80 (HTTP) and set up HTTPS connections on port 443.
Configure the Firewall
Check the Firewall Status
Check if UFW is active:
# ufw statusList Available UFW Application Profiles
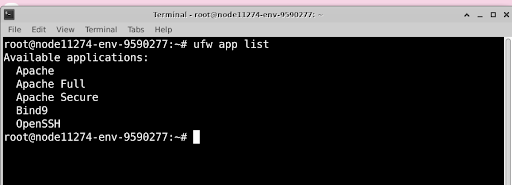
View available profiles to confirm that the Apache profile is present:
# ufw app listAllow Apache Connections
Allow both HTTP and HTTPS connections for Apache:
# ufw allow "Apache Full"Now, you need to reload the firewall to apply the new rules that you have added:
# ufw reloadVerify UFW Rules
Check that the Apache rules are applied:
# ufw statusThis ensures your server can securely handle HTTP and HTTPS connections.
Generate Trusted Let’s Encrypt SSL Certificates
Install Certbot
Install the Certbot tool for Let’s Encrypt using Snap:
# snap install certbot - classicRequest an SSL Certificate
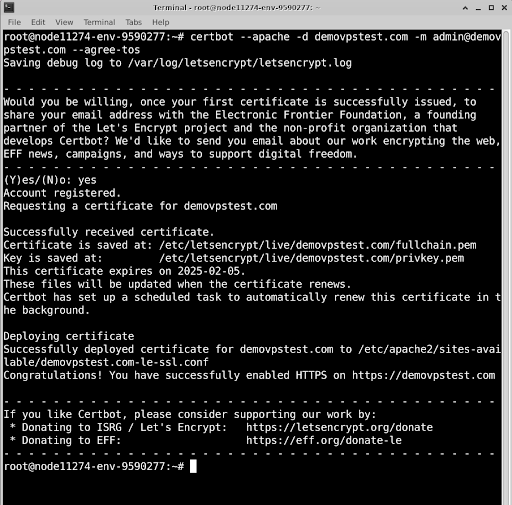
Get a new SSL certificate for your domain. Replace demovpstest.com with your domain and [email protected] with your email:
# certbot --apache -d demovpstest.com -m [email protected] --agree-tosTest Automatic Renewal
Check if the automatic renewal process for the SSL certificate works:
# certbot renew --dry-runRestart Apache
Restart the Apache web server to apply your SSL settings:
# systemctl restart apache2Once you install the Let’s Encrypt SSL Certificate on your domain and it points to your Accuweb.Cloud Elastic VPS, the SSL certificate warning message will be removed from your website, and it will show that your website is secure.
Test the LAMP Stack Installation
Follow these steps to create a new table in your content_database MySQL database so your PHP application can show the message “Hello World! Greetings from AccuWeb.Cloud” when accessed in a web browser.
Log in to MySQL
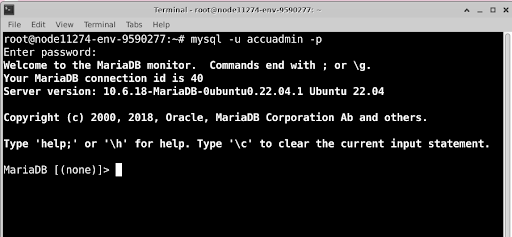
Access the MySQL console using the dbadmin user you created earlier:
# mysql -u accuadmin -pEnter the password for the dbadmin user when prompted.
Select the Sample Database
Switch to the accutest_db database:
USE accutest_db;Create a New Table
Create a table named messages with two columns, content_id and content, to store your data:
CREATE TABLE IF NOT EXISTS messages (
content_id INT AUTO_INCREMENT PRIMARY KEY,
content VARCHAR(255) NOT NULL
);
This creates a new table with:
content_id: A unique number that increases automatically for each new entry.
content: A text field that can hold up to 255 characters.
Insert Data
Add a message to the messages table that you want to display on the web page:
INSERT INTO messages (content) VALUES ('Hello World! Greetings from Accuweb.Cloud');Check Table Data
View all the data in the table to make sure your message was added:
SELECT * FROM messages;Exit MySQL
Exit the MySQL console:
EXIT;Create a PHP File
Create a new PHP file named accuweb-setup.php in your web root directory /var/www/demovpstest.com:
# nano /var/www/demovpstest.com/accuweb-setup.phpAdd the following code to the file:
<?php
$hostname = "localhost";
$username = "accuadmin";
$password = "Strong##Password123";
$dbname = "accutest_db";
// Establish Connection
$conn = new mysqli($hostname, $username, $password, $dbname);
// Check connection
if ($conn->connect_error) {
die("Connection Failed: " . $conn->connect_error);
}
$sql = "SELECT content FROM messages";
$result = $conn->query($sql);
if ($result->num_rows > 0) {
$row = $result->fetch_assoc();
echo "<h2 style='color: blue; text-align: center; margin-bottom: 15px;'>"
. htmlspecialchars($row["content"]) . "</h2>";
} else {
echo "<h1>No records found.</h1>";
}
$conn->close();
?>
Save and Close the File.
This PHP code connects to the MySQL database and displays the message table’s content. If there are no records, it will show “No records found,” or if the connection fails, it will show “Connection Failed.”
Set Permissions
Give the Apache user www-data full access to your web root directory:
# chown -R www-data:www-data /var/www/demovpstest.com/Test Your Application
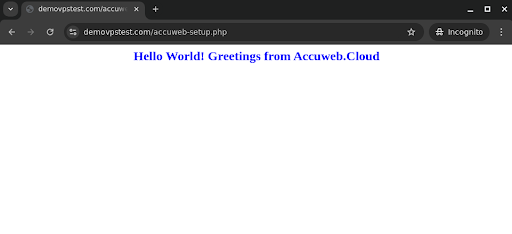
Open your web browser and go to https://domainname.com/phpinfo.php or https://server-ip-address/phpinfo.php to check if your PHP application displays the message “Hello World! Greetings from AccuWeb.Cloud” from your MySQL database.
Here, we have used https://demovpstest.com/accuweb-setup.php to check if the PHP application displays the same message.
Conclusion:
We set up Apache, MariaDB, and PHP (a LAMP stack) on an Ubuntu 22.04 server. We also created example applications to test how all parts of the LAMP stack work together and to run the apps securely on the server. With the LAMP setup, you’re ready to start building web applications.
People Also Ask(And You Should Too!)
1. What is the difference between LAMP and LEMP stack on Ubuntu 22.04?
The LAMP stack uses Apache as the web server, while the LEMP stack replaces Apache with Nginx (“Engine-X”). Both can run on Ubuntu 22.04, but Apache is known for wide compatibility and ease of setup, whereas Nginx offers better performance under high traffic.
2. Is MariaDB better than MySQL for LAMP on Ubuntu 22.04?
Yes, in most cases. MariaDB is a drop-in replacement for MySQL, offering faster performance, improved features, and open-source community-driven development. Since Ubuntu 22.04 prioritizes MariaDB in its repositories, it’s often the recommended choice.
3. Can I install LAMP on Ubuntu 22.04 without root access?
You’ll need sudo privileges to install and configure LAMP, since package installation and service management require administrative access. Without it, you can only run a limited version inside containers or user-space environments.
4. How do I test if my LAMP installation is working on Ubuntu 22.04?
Create a simple PHP info file inside /var/www/html/ with:
<?php phpinfo(); ?>
Then, open http://your-server-ip/info.php in a browser. If you see PHP configuration details, your LAMP setup is working correctly.
5. Can I secure my LAMP stack on Ubuntu 22.04?
Yes. Use UFW firewall, enable SSL/TLS with Let’s Encrypt, and configure MariaDB with a root password. Regular updates (sudo apt update && sudo apt upgrade) also help secure your stack.
6. Can I replace Apache with Nginx after installing LAMP?
Yes, but then it becomes a LEMP stack. You’ll need to remove Apache and configure Nginx as the web server. This is common if you want higher performance under heavy traffic.
7. Is LAMP still relevant in 2025 with modern stacks like MEAN or MERN?
Absolutely. LAMP remains one of the most reliable, secure, and widely supported stacks, especially for PHP-based applications like WordPress, Drupal, and Joomla. Modern stacks are popular, but LAMP is still the backbone of millions of websites.
8. What is the minimum server requirement to install LAMP on Ubuntu 22.04?
At least 1 GB RAM, 1 vCPU, and 10 GB disk space is recommended for a basic setup. For production websites, 2 GB RAM or more ensures smoother performance.

Jilesh Patadiya, the visionary Founder and Chief Technology Officer (CTO) behind AccuWeb.Cloud. Founder & CTO at AccuWebHosting.com. He shares his web hosting insights on the AccuWeb.Cloud blog. He mostly writes on the latest web hosting trends, WordPress, storage technologies, and Windows and Linux hosting platforms.


