Hosting Spring Boot Standalone and Clustered Java Applications with AccuWeb.Cloud
TL;DR
- Spring Boot Java apps can be deployed on cloud platforms using containerization (Docker), PaaS offerings, or VM-based hosting.
- Packaging your app as a JAR or WAR ensures portable deployment across environments.
- Use build tools like Maven or Gradle to compile and package your Spring Boot application reliably.
- Containerize with Docker to create consistent, reproducible deployment images that run anywhere.
- On cloud providers, deploy containers via orchestration tools like Kubernetes or serverless platforms for autoscaling.
- Integrate CI/CD to automate builds, tests, and deployment for faster delivery and fewer errors.
- Configure environment variables and secure credentials to protect sensitive data in production environments.
AccuWeb.Cloud PaaS has advocated for streamlining and standardizing the application deployment process ever since it was founded. In keeping with this goal, we are thrilled to present the Spring Boot server for standalone and clustered applications, or microservices, as a new member of our array of certified Java platforms.
You can quickly execute different Java-based apps in the cloud with AccuWeb.Cloud’s Spring Boot stack template by using an intuitive graphical user interface or automation scripts. This server is capable of hosting the subsequent categories of Java projects:
WAR – for web applications with an embedded servlet container; JAR – for standalone Java applications or stateless microservice instances made with frameworks like Spring Boot, Dropwizard, or Spark
With this configuration, AccuWeb.Cloud enables quick application deployment to production and offers all-inclusive management via a GUI, API, or Cloud Scripting, while Spring Boot can retain universality.
Creation of Spring Boot Environment
Step 1. Start by logging into your AccuWeb.Cloud dashboard and selecting the “New Environment” button to start a new environment. Choose the Spring Boot template from the application server layer on the left panel of the topology wizard by selecting the Java tab.
To continue, modify the resources allotted, type in the name of your environment, and click “Create“.
Step 2. Once your new environment appears in the dashboard, click “Open in Browser” to launch the pre-installed Hello World application sample.
This way, you can confirm that your Spring Boot instance is up and running.
Now, let’s see how to integrate your custom Java application into the newly created Spring Boot environment.
Deploying Java Applications to Spring Boot
You must first package your Spring Boot project into an executable archive including all of the compiled classes and resources (as well as an embedded servlet container for standalone apps) to run it on AccuWeb.Cloud. The types of archives that are supported are:
- **JAR**: The most common Java archive type. It should either contain a manifest with the declared entry point class or be built as an all-in-one “fat” JAR or nested JAR file.
- **WAR**: Used for deploying applications with an embedded servlet container. This is particularly suitable for JSP-based projects to address known support issues within Spring Boot.
ZIP Bundle
Any executable JAR file produced by Spring Boot by default comes with extra settings and property files. Nonetheless, it’s frequently more sensible to send these data outside of the bundled archive for production deployment. This method is effective for logging configurations (`log4j2.properties`, `logback.xml`) and externalized configuration files (`application.properties` or `application.yml`).
In these situations, AccuWeb.Cloud facilitates the deployment of a ZIP bundle that may contain an executable JAR file in addition to any other files or folders, hence simplifying the deployment process.
AccuWeb.Cloud searches every folder in a ZIP package upon unpacking to locate the executable JAR. A JAR file’s `META-INF/MANIFEST.MF} manifest file must include the {Main-Class} declaration to identify it as an execution point. When AccuWeb.Cloud finds such a JAR file, it will launch the JVM from the deployed archive’s root directory with the parameters “java –jar /path/to/jar.”
Example
Here is an example of a ZIP bundle directory structure suitable for deployment in AccuWeb.Cloud PaaS.
application.zip
|
+-config
| +-application.properties
| +-log4j.properties
+-lib
| +-my-springboot-app.jar
+-some_directory
| +-additional_file1
| +-additional_file2
+-additional_configuration.yml
When deploying this kind of archive, AccuWeb.Cloud will execute the JVM with the “java -jar lib/my-springboot-app.jar” arguments from the directory that matches the root folder of the extracted application.zip archive.
Application Deployment
AccuWeb.Cloud offers various options for deploying your application in the cloud, giving you the flexibility to select the method that suits you best.
Manual Deployment
Using the easy-to-use AccuWeb.Cloud interface to accomplish it manually is the most straightforward and user-friendly approach. Simply use the Deployment Manager to upload your application archive, then click the “Deploy to” button to begin the deployment process.
Select the “spring-boot-app” environment as the destination environment from the window that pops up, then click the “Deploy” button. Hold off until the assignment is finished.
Remote Deploy via CLI
You also have the option to use AccuWeb.Cloud CLI to remotely deploy your application to the desired Spring Boot environment using the following command:
~/AccuWeb.Cloud /environment/control/deployapp --envName spring-boot-app --fileUrl
http://link/to/archive --fileName my_springboot.jar --context ROOT
Checking Logs
Once the deployment is complete, allow the system some extra time to initialize the necessary services, with the duration depending on your project’s complexity. You can monitor the real-time progress of this operation through the run.log server log.
Once it’s done, you can access your application’s web interface, assuming it runs on the default 8080 port, just like you did for the preinstalled Hello World app—by clicking “Open in Browser” for your environment.
Ways to Build a Spring Boot Application
To make an archive file suitable for hosting your application in AccuWeb.Cloud PaaS, you can utilize Gradle or Maven build tools. Below is the basic structure for a Gradle build script (build.gradle), where parameters in curly braces need to be replaced with your specific values:
buildscript {
ext {
springBootVersion = '{X.X.X.RELEASE}'
}
repositories {
mavenLocal()
mavenCentral()
}
dependencies {
classpath("org.springframework.boot:spring-boot-gradle-plugin:${springBootVersion}")
}
}
apply plugin: 'java'
apply plugin: 'eclipse'
apply plugin: 'org.springframework.boot'
sourceCompatibility = 1.8
targetCompatibility = 1.8
jar {
baseName = '{your_app_name}'
version = '{your_app_version}'
}
repositories {
mavenLocal()
mavenCentral()
}
dependencies {
compile("org.springframework.boot:spring-boot-starter")
}
task wrapper(type: Wrapper) {
gradleVersion = '{used_gradle_version}'
}To generate an executable JAR file using this script, execute the following command:
./gradlew clean assembleThe generated archive will be stored at the `build/libs/{app_name}-{app-version}.jar` path.
The minimal base for `pom.xml` Maven project description includes the following parameters (where parameters in curly braces should be substituted with your custom values):
<?xml version="1.0" encoding="UTF-8"?>
<project xmlns="http://maven.apache.org/POM/4.0.0" xmlns:xsi="http://www.w3.org/2001/XMLSchema-instance"
xsi:schemaLocation="http://maven.apache.org/POM/4.0.0 http://maven.apache.org/xsd/maven-4.0.0.xsd">
<modelVersion>4.0.0</modelVersion>
<parent>
<groupId>org.springframework.boot</groupId>
<artifactId>spring-boot-starter-parent</artifactId>
<version>{Х.Х.Х.RELEASE}</version>
</parent>
<groupId>org.springframework</groupId>
<artifactId>{your_app_name}</artifactId>
<version>{your_app_version}</version>
<properties>
<java.version>1.8</java.version>
</properties>
<dependencies>
<!-- Compile -->
<dependency>
<groupId>org.springframework.boot</groupId>
<artifactId>spring-boot-starter-web</artifactId>
</dependency>
</dependencies>
<build>
<plugins>
<plugin>
<groupId>org.springframework.boot</groupId>
<artifactId>spring-boot-maven-plugin</artifactId>
</plugin>
</plugins>
</build>
</project>
To create an executable JAR with Maven, run the following command:
mvn clean packageYour application archive will be located at the …target/{app_name}-{app-version}.jar path.
AccuWeb.Cloud Maven Plugin
You may want to utilize the AccuWeb.Cloud Maven plugin for a more convenient build and deployment procedure. Its purpose is to make deploying your application to the cloud easier. It may be integrated into the pom.xml configuration file of your Maven project, allowing you to build an application bundle and deploy it to a target environment with a single command.
CI/CD Tools for Java Applications in the Cloud
Dedicated Maven Build Node in the Cloud
If you would rather work with a graphical user interface, you can use the built-in Maven build node that the AccuWeb.Cloud PaaS offers. It can be used to retrieve, compile, and launch programs from the sources contained in a designated remote GIT/SVN repository. It is integrated into the environment in addition to the Java application server.
CI/CD Automation Add-On
In addition to the previously listed solutions, AccuWeb.Cloud offers continuous deployment from GitHub and GitLab repositories using the Git-Push-Deploy add-on. It’s a CI/CD pipeline integrated with ease. This is a really useful feature when development is ongoing and commits happen often. Every time there is a code change, your application is automatically rebuilt and deployed. Consequently, the most recent version is made available through the linked URL in a matter of minutes.
Maintaining Your Spring Boot Server
Most basic server management tasks can be carried out directly through the AccuWeb.Cloud UI uses its built-in tools, such as:
Use the built-in Configuration Manager to create, upload, edit, or delete files, set up mount points, and manage data exported from other servers.
Configure custom Java options and arguments for your server by modifying the JAVA_OPTS and JAVA_ARGS environment variables.
- Review server logs to get details on runtime operations for efficient administration and troubleshooting.
- Monitor resource consumption statistics to determine your server’s needs and optimize resource allocation.
For more complex maintenance tasks, connect to your Spring Boot container via SSH (using either a web or local SSH client). Here are some tips for managing your Spring Boot server:
- Your application files are in the /home/AccuWeb.Cloud /APP directory, which is the “current” or “working” directory for the Java process.
- JVM configuration parameters can be customized in the /home/AccuWeb.Cloud /conf/variables.conf file (e.g., to enable remote debugging or pass additional arguments to the JVM).
- Log files are located in the /var/log directory.
- The /home/AccuWeb.Cloud directory is considered the home directory.
- The JDK is located in the /usr/java/latest directory.
- To restart your application, use the jem service restart command.
Operating servers via the console is particularly useful for handling non-web Spring Boot applications.
Automatic Scaling for Spring Boot Server
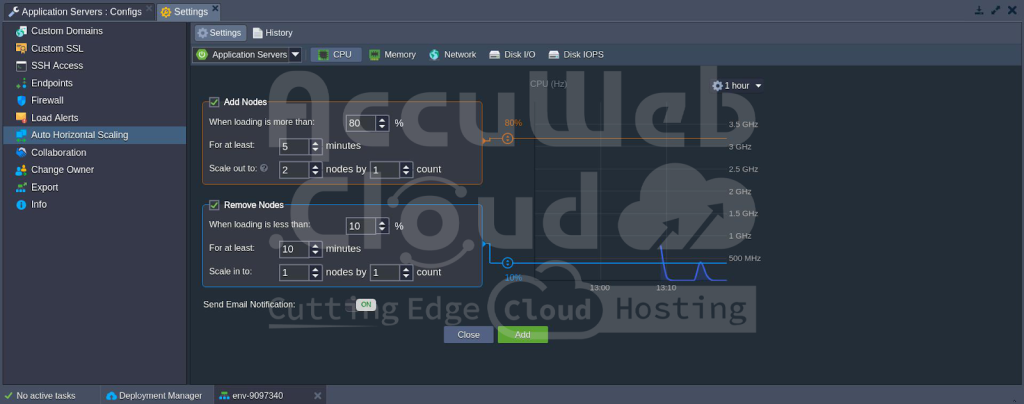
The AccuWeb.Cloud Platform offers real-time elastic scalability for any server right out of the box. With both automatic vertical and horizontal scaling, your Spring Boot application can easily adapt to varying workloads.
Automatic Vertical Scaling
Automatic vertical scaling is enabled by default, ensuring your service remains available during load spikes while eliminating the cost of unused resources. Set the maximum resource limit for your application (using cloudlets), and AccuWeb.Cloud will automatically adjust the maximum memory size (-Xmx) for your application based on these limits. For example:
- 8 cloudlets (1GiB RAM) set the maximum heap size to 819 MB
- 16 cloudlets (2GiB RAM) set the maximum heap size to 1638 MB
To customize -Xmx or other JVM options, edit the /home/AccuWeb.Cloud /conf/variables.conf file via Configuration Manager or AccuWeb.Cloud SSH Gate.
Automatic Horizontal Scaling
Automatic horizontal scaling adjusts the number of web and application servers based on your application’s resource consumption. This is managed through configurable monitoring triggers based on the usage of specific resource types:
-
- CPU
- Memory (RAM)
- Network
- Disk I/O
- Disk IOPS
Additionally, all newly added nodes are created on different hardware servers to ensure high availability for your application.
Traffic Encryption with SSL
If your project needs complex configurations for handling requests, such as HTTPS and load balancing, you can use the following security options:
The built-in SSL functionality lets you quickly enable traffic encryption for your application’s internal domain (i.e., https://{envName}{platformDomain}) using AccuWeb.Cloud’s wildcard SSL certificate.
You can add a certified load balancer to your Spring Boot environment to configure bespoke SSL. Moreover, you can use the free Let’s Encrypt add-on for internal and custom domains (Keep in mind that this option requires a certified load balancer). With one of these methods, your application won’t need to be configured because traffic will be encrypted at the environment level. After being decrypted at the load balancing layer, encrypted communication is subsequently sent to the application server.
Custom Ports & HTTP/HTTPS Usage Considerations
By default, most Java applications use port 8080 for HTTP traffic, making it the standard endpoint for Spring Boot applications. When your environment’s link is accessed over the Internet, the ports are automatically mapped as follows:
- The internal HTTP port 8080 corresponds to port 80.
- The secure HTTPS port 8743 corresponds to ports 443 and 80.
So, if your application uses these standard HTTP/HTTPS ports, it can be accessed directly via the environment URL with the appropriate protocol specified, without needing to enter the port number.
If your application requires processing requests on a custom interface, AccuWeb.Cloud allows you to expose private container TCP and UDP ports via Endpoints. Once added, the corresponding port will be automatically enabled in the server’s firewall settings, making it accessible to the outside world.
Conclusion
Play with the Spring Boot server on AccuWeb.Cloud to learn more about it. Create an account, then launch a Java application that is scalable to run in the cloud with ease.

Jilesh Patadiya, the visionary Founder and Chief Technology Officer (CTO) behind AccuWeb.Cloud. Founder & CTO at AccuWebHosting.com. He shares his web hosting insights on the AccuWeb.Cloud blog. He mostly writes on the latest web hosting trends, WordPress, storage technologies, and Windows and Linux hosting platforms.


