Deploy Docker in 60 Seconds with AccuWeb.Cloud
Today, many developers are abandoning heavy and clumsy VMs in exchange for lightweight, portable containers. They are inclined towards creating modern cloud-native applications structured as a set of microservices.
Modes for Docker Engine Auto-Installation
AccuWeb.Cloud offers the Docker Engine CE through three distinct deployment modes, which you can select from during the pre-configuration phase of package installation.
In the following sections, we will examine each of these options extensively. This analysis aims to assist you in identifying the optimal solution for deploying your instance according to your unique requirements. Additionally, we will delve into the typical post-creation steps frequently carried out.
Clean Docker Engine Server
Choosing the clean installation option creates an Engine instance solely containing a running Docker daemon (i.e., void of deployed applications or additional customizations). In this context, adhering to the UI-centric application deployment approach, the Platform offers the choice to include this node with an integrated Portainer. Portainer is a dedicated graphical user interface (GUI) panel that empowers users to manage their Docker-based environments and specific instances through a user-friendly web interface.
For advanced configurations, a dedicated set of docker CLI commands is available. These commands are designed to be executed within a terminal window after establishing a connection to the necessary Engine node through the SSH Gate. The methods for establishing the connection are explained later in the article. For the moment, let’s direct our attention to the primary and frequently employed CLI operations:
docker run – used to start a container with customized instructions (such as adding or overriding image defaults).
docker exec – used to perform a command within a currently running container.
docker-compose up – used to establish (or re-establish, if already present) and commence service(s) within containers, following the instructions outlined in the designated compose file.
Comprehensive details about the relevant commands, detailed descriptions, and available options are accessible within the official Docker documentation.
Docker Engine Inclusion into Swarm Cluster
If you have a Docker Swarm cluster operating anywhere online, you can effortlessly expand its membership using the Docker Engine.
This package enables the smooth integration of the newly created instance into the existing clustering solution, either as a Worker or Manager node role.
In addition to the apparent management convenience, this method of extending the cluster offers a valuable chance to enhance your cluster’s high availability and failover protection by locating new instances across various hardware sets.
It’s essential to locate the Join Token of the target Docker Swarm and its Manager node’s Host IP (external address) to establish a connection to a swarm. These values should be provided within the Engine installation framework. In this context, the initial one can be obtained by running the relevant command on your Swarm Manager node:
docker swarm join-token {node_type}
In this string, the {node_type} placeholder should be replaced with either “worker” or “manager” based on the desired role for the added instance.
To verify the cluster’s status after its creation, run the following command within any of its Manager containerDockerker node ls
Our illustrative Swarm cluster currently comprises 3 Manager nodes(indicated by the relevant statuses in the final column) and 6 Worker containers. One of these containers operates in an environment with a distinct domain name, as it was externally added through our Docker Engine CE solution.
Docker Engine with Pre-Installed Services
When selecting this choice, the installation interface will be expanded to include a dedicated input field. This field indicates a link to the Git repository, which will be automatically deployed to the recently established Engine instance.
After executing all the necessary operations, you can verify the outcome through any of the following methods:
- If your application includes a web interface, you can validate its successful installation by clicking the “Open in browser” button. (This assumes the relevant graphical user interface (GUI) operates on the default container port 80. However, if a different port is utilized, you must add the port number to the end of the opened URL. For instance: http://{env_host}:{exposed_port}).
Regarding our provided default example application, you should be presented with the following page:

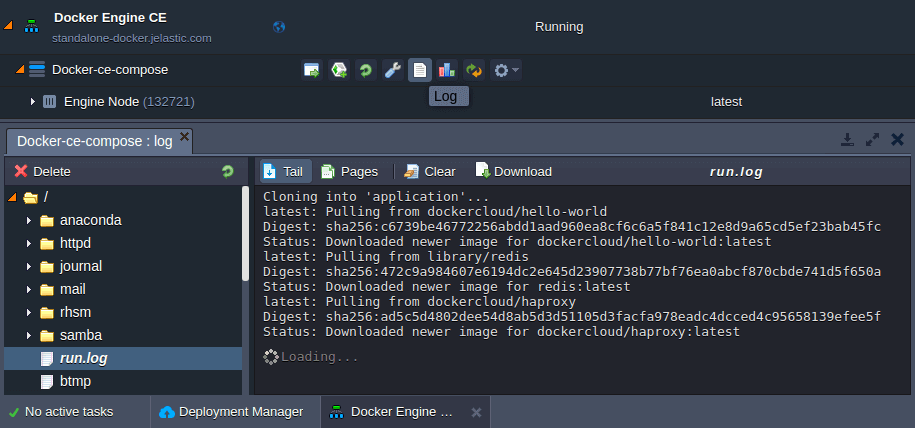
If the deployed project doesn’t incorporate a built-in graphical user interface, you can access deployment details directly from the dashboard to confirm the successful installation. To do so, review the logs, particularly the “run.log” file:
Pro Tip: To inspect the Docker daemon logs, access your container through the terminal and run the command journalctl -u docker.service.
To continue utilizing and customizing the Engine, refer to the following section of the article. Here, you’ll discover various methods for managing the instances you’ve created.
Connecting to a Docker Engine Container
You can access the relevant container via SSH for more advanced Docker Engine management. Or use specialized third-party tools designed for Docker. Here, we’ll explore a few fundamental approaches to achieve this:
Portainer UI
Suppose you’ve installed the Portainer UI while configuring a primary Engine instance. In that case, you can access the relevant management panel by directly opening your environment’s URL in a web browser using HTTPS.
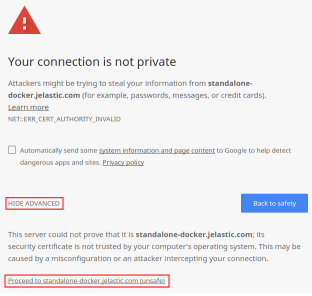
Note: Your site connection is initially secured with a self-signed SSL certificate. It may trigger your browser to display a warning that the certificate isn’t recognized as trusted. It’s important to understand that the sign doesn’t impact Portainer. You only need to confirm your intent to access the requested page.
The steps required for these actions can vary depending on your browser. For instance, in Google Chrome, you must expand the Advanced section and click the Proceed to {env_URL} link.
The authentication credentials to access Portainer can be found in your email notification when the Engine server is created.
SSH Gate
Use the SSH Gate: Connect to your account, Select your environment & input the necessary server/container details to start your work.
Wrapping up for today, we hope that the outlined functionalities of the Docker Engine package have provided ample evidence of its user-friendly attributes (owing to its entirely automated installation and simple configuration/connection processes) and versatility (offering numerous deployment options to fulfil individual requirements). To ensure its capacity to meet your expectations, take the opportunity to test it out by deploying your very own Docker Engine instance on the AccuWeb.Cloud.


